18
AprComponents in Angular
Understanding Components in Angular
Angular components are the core components of Angular applications, containing templates, data, and behavior in reusable and modular parts. They consist of a TypeScript class and an HTML template that provide an organized approach to UI development within the Angular framework. Understanding Angular components is necessary for understanding Angular using resources such as Angular Certification Training and Angular Tutorials.
The Angular tutorial will provide you with complete guidance on the components in Angular?,Angular Components Page View,Angular Components Advantages,the Difference between Angular Components and Angular Directives,how you create components in Angular, and many more.
What are the Components in Angular?
Angular components are the core building blocks of an application. Imagine our ecosystem as an application. Factors like water, temperature, oxygen, and carbon dioxide work together to make it function. Similarly, an Angular application consists of multiple components, such as a header, footer, and sidebar, which collectively form a complete app.

A component is essentially a type of Angular directive with templates, styles, and logic for user interaction. You can think of it as a reusable part of your application. These components are exported as custom HTML tags, such as: <my-component></my-component>.
Angular components are initialized using the powerful Angular Dependency Injection engine. This ensures seamless integration of your components within the application.

Angular Components Page View
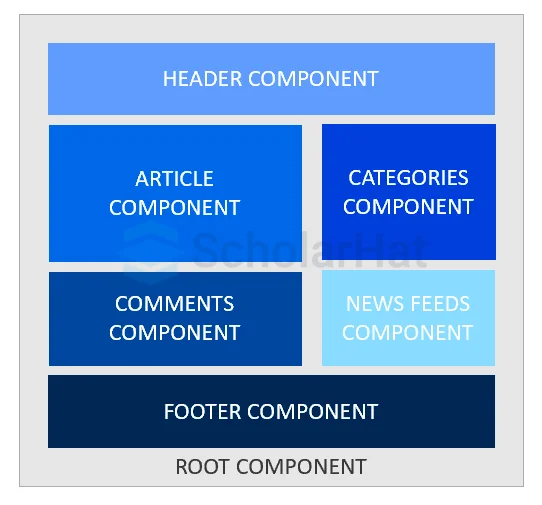
A webpage containing an article with comments, categories, a news feed, and a header, the footer can be managed using the components in angular as given below:
Angular Component Advantages
Are you wondering why you should use components in Angular? Components bring numerous advantages to Angular, making it a powerful framework for building applications. Let’s explore the key benefits:
1. Reusability
- Angular components can be reused in multiple places, reducing duplication of effort.
- Example: If you have a header and a footer that appear on both the About Page and Contact Page, you only need to include their respective tags once in each template. This eliminates the need to copy the code for the header and footer across multiple files.
- For single-page applications, reusing Angular components, utility functions, templates, and business logic files saves development time and results in cleaner, more manageable code.
2. Testability
- Angular components are self-contained, making it easy to test them individually.
- Dependency Injection allows you to mock services during testing, simplifying the process.
- Angular’s TestBed provides powerful tools for thorough and isolated component testing.
3. Consistency
- Angular enforces a consistent structure across the application, promoting best practices.
- Uniformity in code style makes it easier for teams to collaborate and maintain projects.
- Consistent patterns reduce errors and streamline the development process.
4. High Cohesion
- Each Angular component encapsulates specific functionality, keeping concerns separated.
- This high cohesion enhances maintainability and makes debugging more straightforward.
- Well-structured components lead to scalable and reliable applications.
Difference between Angular Components and Angular Directives
Now, the folks familiar with Angular 1. x might be in a dilemma. What is the actual difference between Angular Components andAngularDirectives? Right!
The significant difference between both of them is Angular Directives add behavior to existing DOM elements while Angular Components create their view with attached behavior.
| Aspects | Angular Components | Angular Directives |
| Definition | An Angular component is a directive with a template (view) that defines a portion of the UI. | An Angular Directive is an instruction that can modify the behavior or appearance of DOM elements. |
| Purpose | To create and manage views (UI) and associated behaviors. | To add behavior to elements or manipulate the DOM. |
| View | Yes, components have an HTML template or template URL. | No, directives do not have templates. |
| Types | There is only one type of component in Angular. | There are three types: attribute, structural, and custom. |
| Use Cases | Used to build reusable UI elements, such as forms, navigation bars, buttons, etc. | Used to modify the behavior or appearance of an existing DOM element (e.g., applying styles, showing/hiding elements). |
| Lifecycle Hooks | Components have lifecycle hooks like ngOnInit(), ngOnDestroy(), etc. | Directives can also have lifecycle hooks like ngOnInit(), but not all hooks apply. |
| Read More: DOM and BOM in JavaScript |
How do you create components in Angular?
There are two ways to create the Angular Components that are discussed below:
- Creating The Angular Component by Angular CLI
- Creating Angular Components Manually
1. Creating The Angular Component by Angular CLI
We are using Angular CLI to create the Angular Components. Here, we will discuss this in steps that will explained below:
- Step-1. Open a terminal window and go to the directory where your program is located.
- Step-2. Now, you should run the ng generate component <component-name> command, where <component-name> is the name of your new component.
After running this command, this will create some elements that are:
- A directory named after the component
- A component file, <component-name>.component.ts
- A template file, <component-name>.component.html
- A CSS file, <component-name>.component.css
- A testing specification file, <component-name>.component.spec.ts. Where <component-name> is the name of your component.
2. Creating Angular Components Manually
Next, the question that arises in our mind is how Angular identifies the Angular components among many other files. The answer is that if you open any ts file of the component, you will see @component metadata, and below it, there will be one class. The @component decorator is responsible for identifying the class as a component and for specifying its metadata.
- Now, let us move towards creating our first component. Initially, your app structure will look something like this:
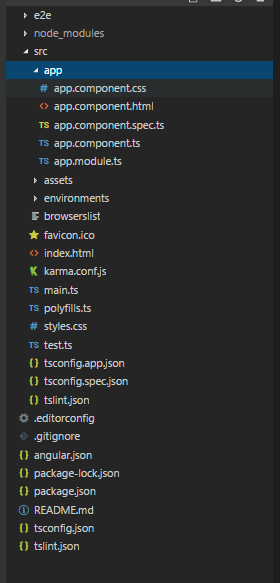
Now, here is the first built-in component that you can see in the app. Now, looking at this, you can assume the basic structure of a component. It consists of 4 files: HTML, CSS, and TypeScript and spec.ts.
Our APP.COMPONENT.HTMLThe file looks like this:
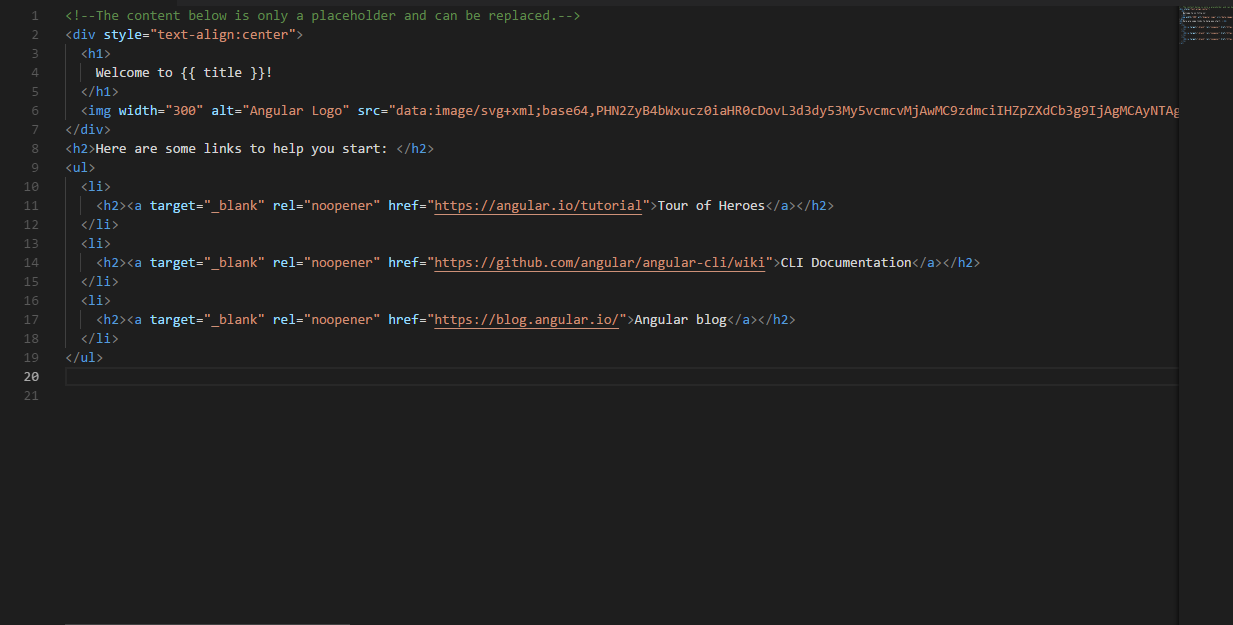
Angular has created this file. It is the basic HTML file. If you run this app, the first page you’ll see as an output will have this HTML written there.
Next file is APP.COMPONENTS.TS:
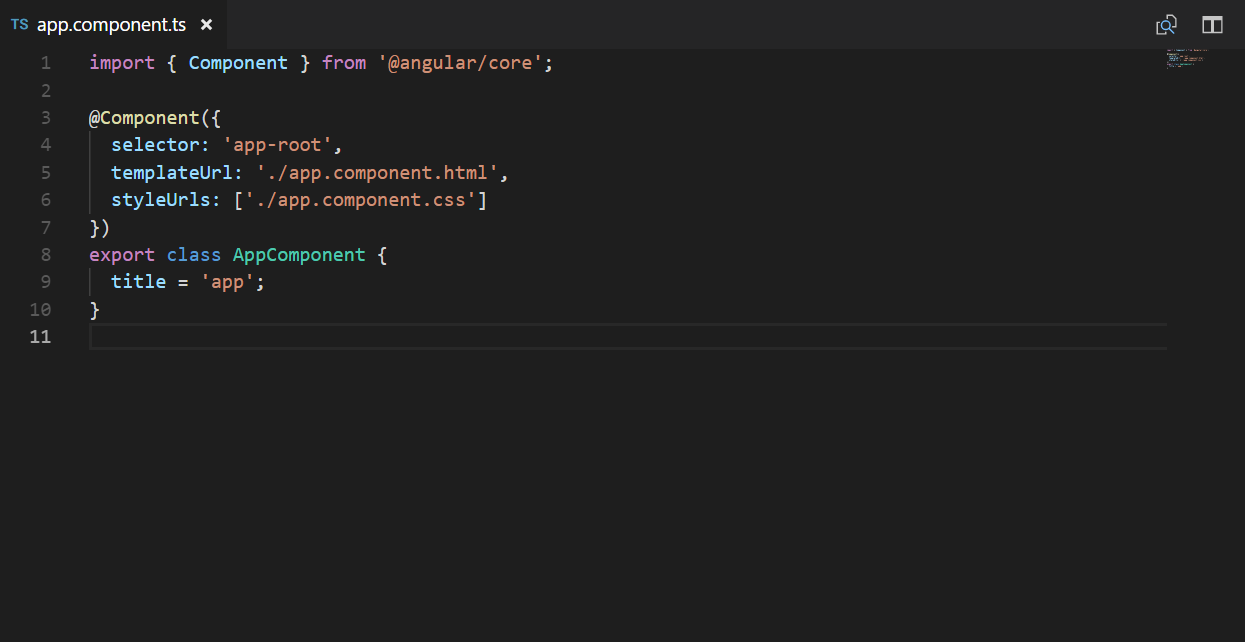
As I have mentioned earlier, you can call component this at any other component by the selector.
TemplateURL depicts the corresponding HTML file for this TS file, and the last is styleUrls, which represents the styles used by this TS file. Note that this is an array. You can always mention more than one CSS file for one TS file.
- Let me just highlight one phenomenon: if you want to use any component, call it by its selector name.
- Let's, for example, I want to use the demo component at the demo1 component; then I simply need to call the demo’s selector <app-demo></app-demo> (say, for example).
- This will render the demo's HTML at demo1's HTML.
Now, let us create our first component by firing the given below command:
ng g c component_name)
(g stands for generating, and c stands for Component)
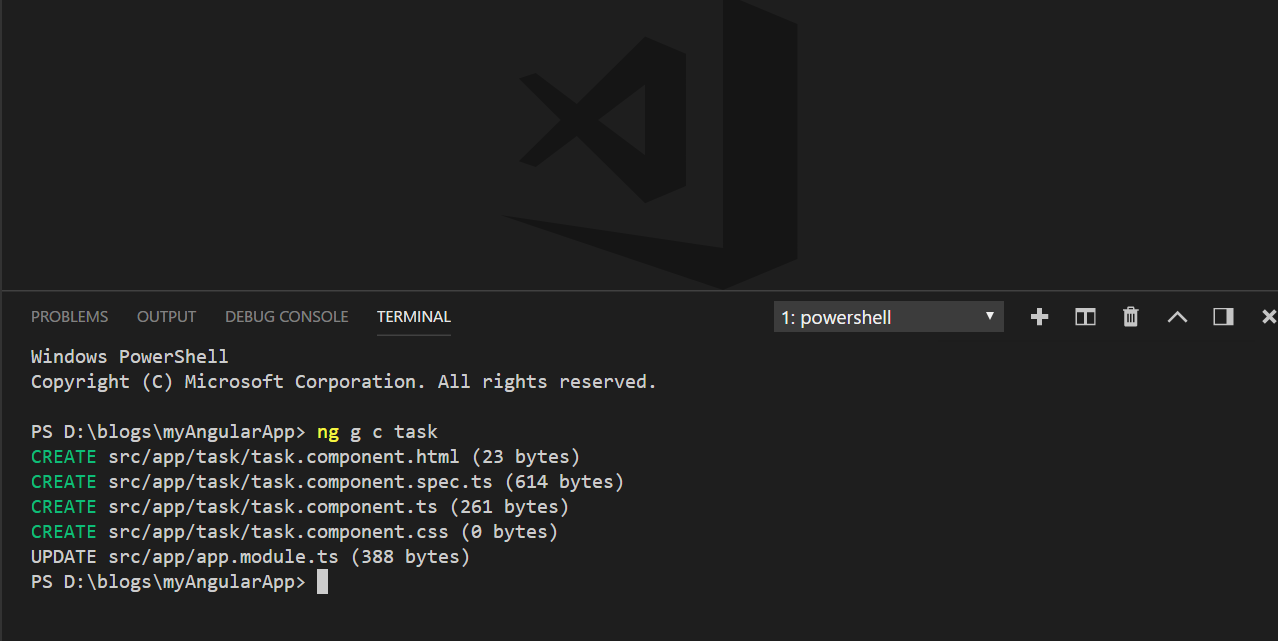
You can open this terminal using VS Code from (view -> Integrated terminal). As we have previously discussed, a component has 4 files inside it.
- One new message you'll see is regarding app.module.ts. It is the heart of our app.
- It contains the global declaration for all our Angular components.
- After creating a component, our app.module.ts will look like this:
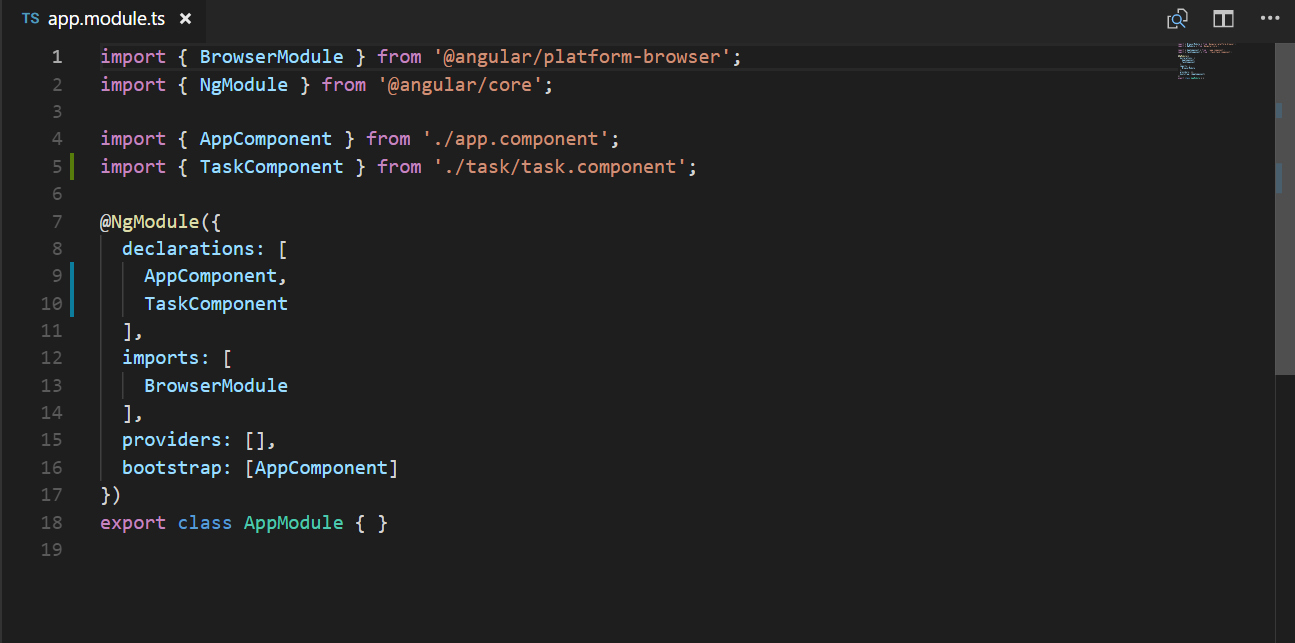
Our component should be imported and added to the declaration array.
Specifying a Component's CSS Selector
Every component in Angular needs a CSS selector. The selector lets Angular know when to create a component by matching the selector with the tag in the HTML template.
- For instance, if the selector is app-hello-world, Angular will render the component wherever it finds the
<app-hello-world>tag in the template.
- To define a selector, use the selector property in the
@Componentdecorator:
@Component({
  selector: 'app-component-overview',
})
Defining a Component's Template
The template determines how Angular renders your component. You can define it in two ways:
- External File: Use the templateUrl property to reference an external HTML file.
- Inline Template: Use the template property to embed the HTML directly within the component.
Using an External File
Here’s how to use the templateUrl property:
@Component({
  selector: 'app-component-overview',
  templateUrl: './component-overview.component.html',
})
Using an Inline Template
Use the template property to define HTML directly:
@Component({
  selector: 'app-component-overview',
  template: 'Hello World!',
})
Using Multi-line Templates
If the template spans multiple lines, use backticks (`):
@Component({
  selector: 'app-component-overview',
  template: `
    Hello World!
    This template spans multiple lines.
  `,
})
Note: You can only use either template or templateUrl, not both.
Declaring a Component's Styles
Styles define how your component looks. You can declare styles in two ways:
- External File: Use the styleUrls property to reference a CSS file.
- Inline Styles: Use the styles property to define styles directly in the component.
Using an External File
Add the CSS file reference in the styleUrls property:
@Component({
  selector: 'app-component-overview',
  templateUrl: './component-overview.component.html',
  styleUrls: ['./component-overview.component.css'],
})
Using Inline Styles
Define CSS rules directly using the styles property:
@Component({
  selector: 'app-component-overview',
  template: 'Hello World!',
  styles: ['h1 { font-weight: normal; }'],
})
The styles property takes an array of strings containing CSS rules.
Creating a Component Manually
You can make a standalone component by using the standalone: true flag:
@Component({
  selector: 'app-component-overview',
  template: 'Hello World!',
  styles: ['h1 { font-weight: normal; }'],
  standalone: true,
})
If your application is module-based, you need to declare the component in the @NgModule decorator:
import { NgModule } from '@angular/core';
import { ComponentOverviewComponent } from './component-overview.component';

@NgModule({
  declarations: [ComponentOverviewComponent],
})
export class AppModule {}
Once done, your Angular component is ready for integration!
Nested Component
Now, if you want to see the task component’s HTML as your output. What would you do!? Remember that Selector concept? Yes, you have to add the task’s selector at APP.COMPONENT.HTML. (Because it is the first component that is being loaded by angular, if you want to check how? Check your index.html, there you will find <app-root></app-root> which is a selector for the app component).
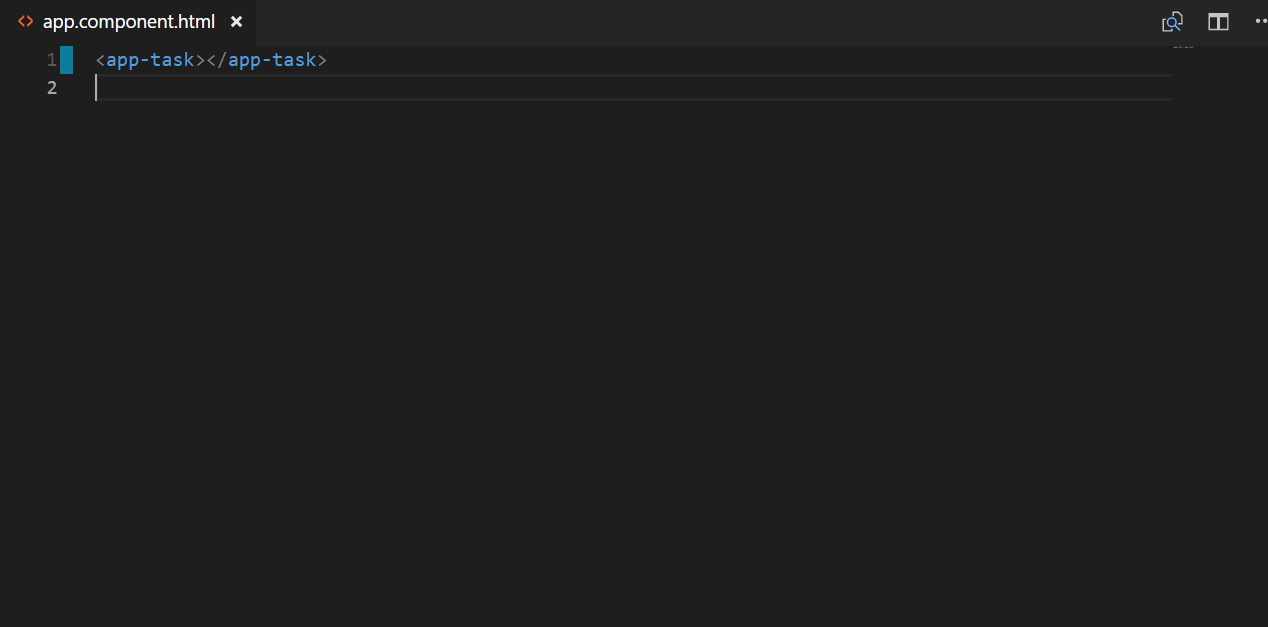
And here is your output in the browser, which shows the content written into the child component but nested from the parent component

With this, we learned a new concept called Nested Component. In the Nested component, we call one component inside another component. The component in which we have called another component is known as the Parent component, and the called component is known as Child or Nested component.
| Read More: |
| Top 35 Angular 4 Interview Questions and Answers |
| Top 50+ Angular Interview Question & Answers |
| Anatomy of components |
| Composing with Components |
Summary
Angular components are the building blocks of any Angular application. They make your app modular, reusable, and easier to manage. By focusing on benefits like reusability, testability, high cohesion, and consistency, these components help you create scalable web solutions. Are you ready to take your web development skills to the next level? Check out the Scholarhat Angular Certification Online Training. This course offers hands-on practice, real-world projects, and interactive lessons on Angular components, directives, services, and more.
Additionally, explore the React JS Certification Training to master front-end development and build dynamic, interactive web applications with ease.
Exclusive Free Courses
Scholarhat offers amazing free courses to help you build job-ready skills and boost your career. Check them out below:
- Free Angular Course – Learn JavaScript basics and start creating dynamic web applications.
- Free Node.js Course – Master TypeScript to elevate your coding skills for Angular and beyond.
Enhance your skills today and become an expert in Angular development!
Test Your Knowledge of Angular Components!
Q 1: What is the correct way to define a component in Angular?
- (a) @Component() decorator with selector, template, and style properties
- (b) @Component() decorator with HTML, CSS, and JS files
- (c) @NgModule() decorator with selector, template, and style properties
- (d) @Directive() decorator with template and style properties
Q 2: What does the selector in the @Component() decorator define?
- (a) The name of the class in which the component is defined
- (b) The HTML tag that will be used to represent the component
- (c) The URL to fetch the component's template
- (d) The module where the component is declared
Q 3: What is the purpose of the templateUrl property in a component?
- (a) It defines the style rules for the component
- (b) It links to an external JavaScript file
- (c) It defines the HTML template to be used for the component
- (d) It provides the routing configuration for the component
Q 4: Which Angular directive is used to bind a class to an element dynamically?
- (a) ngModel
- (b) ngClass
- (c) ngFor
- (d) ngIf
Q 5: What is the life cycle hook in Angular that is called after a component is fully initialized?
- (a) ngOnInit
- (b) ngAfterViewInit
- (c) ngOnChanges
- (d) ngAfterContentInit
FAQs
Take our Angular skill challenge to evaluate yourself!

In less than 5 minutes, with our skill challenge, you can identify your knowledge gaps and strengths in a given skill.


