


18
AprUse of FluentValidation in ASP.NET Core
03 Apr 2025
Beginner
3.4K Views
17 min read

Learn with an interactive course and practical hands-on labs
Free ASP.NET Core Online Course with Certificate - Start Now
FluentValidation in ASP.NET Core
FluentValidation is a library. By using it you can create strongly-typed validation rules for your models with this.NET package. To keep your code clean and manageable, you can utilize FluentValidation in place of writing validation logic directly in your controllers or models.
In this Asp.Net Core Tutorial, we will explore more about FluentValidation which will include What is FluentValidation .NET Core, and Fluent validation .net core examples. So let's explore it.
What is FluentValidation .NET Core?
- FluentValidation is a .NET library.
- It is designed to provide a fluent interface for defining validation rules for models in a maintainable way.
- ASP.NET Core web applications can validate incoming models by using FluentValidation.
- There are various methods for achieving FluentValidation such as manual validation and automatic validation.
- In manual validation, the validator is injected into your controller (or API endpoint), it is called, and the outcome is handled. This is the simplest method to understand.
- In automatic validation, Models can be validated before a controller action.
Features of FluentValidation
- Fluid Interface: This enables you to write readable and fluid validation rules.
- firmly-Typed Validation: This technique lowers the possibility of mistakes that can arise from string-based validation by ensuring that validation rules are firmly typed.
- Separation of Concerns: Makes your code clearer and easier to maintain by keeping your validation logic apart from your models and controllers.
- Connectivity to ASP.NET Core: Simple to set up and use, it works with the ASP.NET Core dependency injection mechanism and model binding with ease.
- Extensive Rule Set: Offers a large selection of pre-built validation rules and facilitates the creation of custom validation logic.
The Ways To Implement FluentValidation in ASP.NET Core
As seen above, There are different ways to implement FluentValidation in ASP.NET Core,
- Manual validation
- Automatic validation (using the ASP.NET validation pipeline)
- Clientside Validation
- Minimal APIs
| Top 50 ASP.NET Core Interview Questions and Answers for 2025 |
Let's see one by one
1. Manual Validation
- When using the manual validation method, you will call the validator against the model by inserting it into your controller (or Razor page).
Example
Controller Code
public class EmployeeController : Controller
{
  private IValidator _validator;
  private IPersonRepository _repository;

  public PeopleController(IValidator validator, IPersonRepository repository)
  {
    // Inject our validator and also a DB context for storing our employee object.
    _validator = validator;
    _repository = repository;
  }

  public ActionResult Create()
  {
    return View();
  }

  [HttpPost]
  public async Task Create(Person person)
  {
    ValidationResult result = await _validator.ValidateAsync(person);

    if (!result.IsValid)
    {
      // Copy the validation results into ModelState.
      // ASP.NET uses the ModelState collection to populate
      // error messages in the View.
      result.AddToModelState(this.ModelState);

      // re-render the view when validation failed.
      return View("Create", person);
    }

    _repository.Save(person); //Save the employee to the database, or some other logic

    TempData["notice"] = "Person successfully created";
    return RedirectToAction("Index");
  }
}
- Our validator will be injected into our controller via the constructor as it is registered with the service provider.
- The validator can then be used by using ValidateAsync to invoke it inside the Create action.
- In order for the error messages to be shown to the user, we must transmit them back down to the view in the event that validation is unsuccessful.
- To do this, we can define an extension method that inserts the error messages into the ModelState dictionary of ASP.NET and applies it to the ValidationResult type of FluentValidation:
public static class Extensions
{
  public static void AddToModelState(this ValidationResult result, ModelStateDictionary modelState)
  {
    foreach (var error in result.Errors)
    {
      modelState.AddModelError(error.PropertyName, error.ErrorMessage);
    }
  }
} - In the previous instance, this method is called inside the controller action.
- Below here is the related view for your reference.
- The error messages from ModelState will be picked up by this view and shown next to the appropriate attribute.
@model Employee

<div asp-validation-summary="ModelOnly"></div>

<form asp-action="Create">
  Id: <input asp-for="Id" /> <span asp-validation-for="Id"></span>
  <br />
  Name: <input asp-for="Name" /> <span asp-validation-for="Name"></span>
  <br />
  Email: <input asp-for="Email" /> <span asp-validation-for="Email"></span>
  <br />
  Age: <input asp-for="Age" /> <span asp-validation-for="Age"></span>
  <br /><br />
 <input type="submit" value="submit" />
</form>
2. Automatic Validation
A. Using the ASP.NET Validation Pipeline(No longer recommended)
By connecting to ASP.NET's validation pipeline, the AspNetCore package facilitates validation for ASP.NET Core MVC projects.
FluentValidation integrates into ASP.NET's built-in validation process, which is a part of ASP.NET Core MVC, and enables models to be validated automatically utilizing the validation pipeline (during model-binding). Although more smooth, this validation method has a few drawbacks:
- The ASP.NET validation pipeline is not asynchronous, so your validator won't be able to run if it contains asynchronous rules.
- If you try to utilize an asynchronous validator with auto-validation, you will get an exception during runtime.
- It is exclusive to MVC: This auto-validation method is limited to Razor Pages and MVC Controllers. It is incompatible with Blazor and other more recent ASP.NET components, including Minimal APIs.
- More difficult to debug: Because so much work is done in the background, the "magic" of auto-validation makes it difficult to debug or troubleshoot if something goes wrong.
B. Using a Filter
- Using an Action Filter is an alternate method for performing automatic validation.
- This method reduces the synchronous constraint of the Validation Pipeline method (above) by operating asynchronously.
- Although there isn't built-in support for this method, you can utilize the third-party SharpGrip.FluentValidation.AutoValidation package for this purpose.
3. Clientside Validation
- Since it is a server-side library, FluentValidation cannot directly perform client-side validation.
- But, in the same way that ASP.NET's default validation attributes function, it can supply metadata that can be applied to the resulting HTML elements for usage with a client-side framework like jQuery Validate.
- You must install the standalone FluentValidation.AspNetCore package in order to use this metadata.
- This package has installation and usage instructions on its project page.
- Although it is no longer supported, you can still use this package.
4. Minimal APIs
- You can still register the validators with the service provider (or instantiate them directly if they don't have dependencies).
- And invoke them inside your API endpoint while using FluentValidation with basic APIs.
Example
var builder = WebApplication.CreateBuilder(args);
var app = builder.Build();

// Register validator with service provider (or use one of the automatic registration methods)
builder.Services.AddScoped, PersonValidator>();

// Also registering a DB access repository for demo purposes
// replace this with whatever you're using in your application.
builder.Services.AddScoped();

app.MapPost("/person", async (IValidator validator, IPersonRepository repository, Person person) =>
{
  ValidationResult validationResult = await validator.ValidateAsync(person);

  if (!validationResult.IsValid)
  {
    return Results.ValidationProblem(validationResult.ToDictionary());
  }

  repository.Save(person);
  return Results.Created($"/{person.Id}", person);
}); - Take note that FluentValidation 11.1 and later are the only versions that support the ToDictionary function on the ValidationResult.
- You will have to use this as an extension method in earlier versions.
public static class FluentValidationExtensions
{
  public static IDictionary ToDictionary(this ValidationResult validationResult)
    {
      return validationResult.Errors
        .GroupBy(x => x.PropertyName)
        .ToDictionary(
          g => g.Key,
          g => g.Select(x => x.ErrorMessage).ToArray()
        );
    }
} - Alternatively, you may apply validation to an endpoint (or set of endpoints) using a filter rather than explicitly calling the validator.
- Although there isn't built-in support for this, you can use one of the following third-party packages to get around this:
ForEvolve.FluentValidation.AspNetCore.Http
SharpGrip.FluentValidation.AutoValidation
Building a Simple ASP.NET Core API Application
- Let's go ahead and accept all of the settings when we create a File -> New -> ASP.NET Core 3.1 API in Visual Studio.
- We will be left with the well-known "Weather Forecast" API structure at the wizard's pattern:
- After pressing CTRL-F5 to launch our API, the following weather values for the next few days should appear:
[
  {
    "date": "2020-07-01T14:34:13.7180989+10:00",
    "temperatureC": 82,
    "temperatureF": 104,
    "summary": "Bracing"
  },
  {
    "date": "2020-07-02T14:34:13.7181617+10:00",
    "temperatureC": 33,
    "temperatureF": 87,
    "summary": "Freezing"
  },
  {
    "date": "2020-07-03T14:34:13.7181627+10:00",
    "temperatureC": 24,
    "temperatureF": 35,
    "summary": "Scorching"
  },
  {
    "date": "2020-07-04T14:34:13.7181632+10:00",
    "temperatureC": -17,
    "temperatureF": 2,
    "summary": "Hot"
  },
  {
    "date": "2020-07-05T14:34:13.7181636+10:00",
    "temperatureC": 52,
    "temperatureF": 124,
    "summary": "Bracing"
  }
] [HttpGet]
public IEnumerable Get()
{
var rng = new Random();
return Enumerable.Range(1, 5).Select(index => new WeatherForecast
{
Date = DateTime.Now.AddDays(index),
TemperatureC = rng.Next(-20, 55),
Summary = Summaries[rng.Next(Summaries.Length)]
}).ToArray();
}
[HttpPost]
public ActionResult Post([FromBody] WeatherForecast forecast)
{
    return Ok("Success!");
}
Use of Postman for API Testing
- Now let's launch Postman and verify that our API functions as intended.
- First, we'll use Postman's "New" button to add a new request:

We'll include the following values in the request:
- Use the HTTP verb "POST" and the URL http://localhost:61997/weatherforecast.
- A "Content-Type" header with the value "application/json"
- A body of type "JSON" that sets the value 6000 in the "TemperatureC" field of our WeatherForecast model
- Let's press the "Send" button after that. If everything went as planned, the answer should display our "Success!" text:
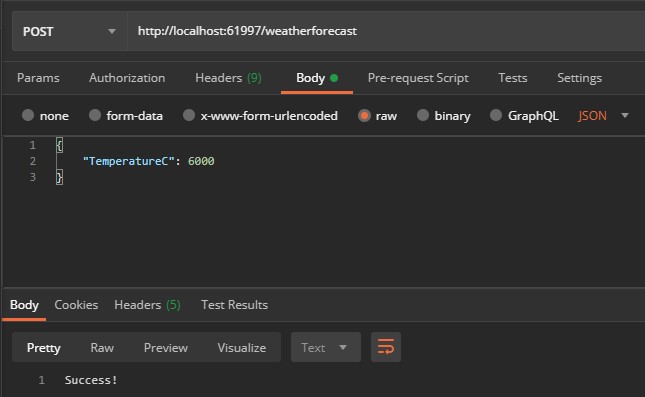
Fantastic!
- Consequently, we can now upload new weather forecasts.
- But take note that the TemperatureC value has passed with a value of 6000.
- We probably shouldn't let this into our system for a weather forecast because it's hotter than the Sun!
- In order to establish some guidelines, let's include a basic validator in the following section to make sure that the TemperatureC value is limited to 100.
Including a Basic Validator for FluentValidation
We must first install FluentValidation in the package manager console before we can add our basic validator:
PM>> install-package FluentValidation.AspNetCore public class WeatherForecastValidator : AbstractValidator
{
public WeatherForecastValidator()
{
RuleFor(model => model.TemperatureC).LessThanOrEqualTo(100);
}
} Explanation
Now let's discuss our code:
- We define the type WeatherForecast and build a class named WeatherForecastValidator, which inherits from the AbstractValidator
class. This indicates to FluentValidation that the WeatherForecast class is the subject of this validation. A constructor describing our rules is visible. Here, we establish a single rule stating that the TemperatureC value must be less than or equal to 100. The validation class can be placed anywhere, but let's keep it in the same file for simplicity's sake. Although we can employ custom validators, chain validators, and add as many rules as we like, for the time being, we'll concentrate on a single, basic rule.
Conclusion:
FAQs
FluentValidation is a free. NET library that helps you quickly and easily implement validation rules.
FluentValidation is a powerful open-source . NET validation library that helps you make your validations clean, easy to create, and maintain.
There are many places where fluent APIs can simplify how software is written and help create an API language.
Take our Aspnet skill challenge to evaluate yourself!

In less than 5 minutes, with our skill challenge, you can identify your knowledge gaps and strengths in a given skill.