08
JanDifference between disabled and read only attributes
Difference between Disabled and Read-only attributes: An Overview
Read More: Top 50 ASP.NET Core Interview Questions and Answers for 2025
Difference between disabled and read only attributes
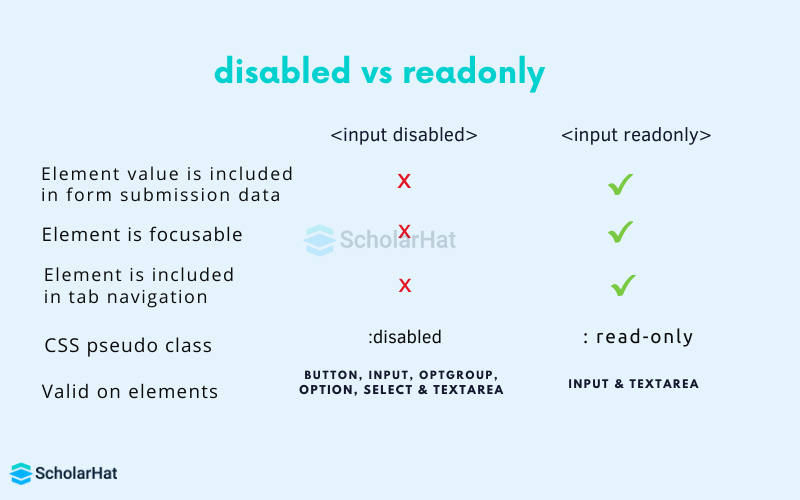
In ASP.NET, "disabled" refers to a control that is inactive or greyed out, prohibiting user interaction. In contrast, "read-only" permits viewing but not editing. Disabled is like locking a door, whereas read-only is similar to a window—you can see inside but can't do anything.
| Attribute | Disabled | Read-only |
| Purpose | It specifies that an input element is prevented from user interaction. | It specifies that an input element is allowed only to be viewed and cannot be modified. |
| Styling | The element will be inactive or greyed out. | The element will have no change in appearance. |
| Applicability | It is used with form elements like inputs and buttons. | It is applied to text-based input fields and textarea elements. |
| Accessibility | The element clearly appears to be unavailable to the users. | The element can be accessed by the users as in read-only state. |
Read More: How can you become an ASP.NET developer
Disabled Attribute
- When disabled is applied to an element, it becomes unusable and graphically communicates its unavailability.
- Users are unable to interact with the element, which means they are unable to update its content, choose options, or submit the form.
- Disabled items do not appear in the form data sent to the server.
- Disabled elements are generally greyed out and have a distinct cursor style, indicating their inactive condition.
Example of Disabled Attribute
<asp:TextBox ID="TextBox1" runat="server" Text="Mohan Kumar" disabled="disabled" />Read Only Attribute
- When an element is set to readonly, users are unable to edit its content, but it can still be accessed and seen.
- Users may still view the value of the element, zoom in on it, and interact with other form elements.
- Readonly elements, unlike disabled elements, are included in form data transmitted to the server.
- Readonly elements appear normal, with no visual signals suggesting their non-editable nature.
Example
<asp:TextBox ID="TextBox2" runat="server" Text="Mohan Kumar" readonly="true" />TextBox2 is read-only in this case. The text "Mohan Kumar" can be read but not edited by users. The form, on the other hand, will submit the value "Mohan Kumar" together with other form input.

Note
We can’t set readonly attributes to all the form fields or elements. The <SELECT>, <OPTION>, and<BUTTON> elements do not have readonly attributes while they can have disabled attributes.
In asp.net, when you change the value of ReadOnly Textbox with the help of javascript or jQuery then on the server side you will get the oldest value, not the changed value. To get the changed value from ReadOnly TextBox, make the TextBox Read-Only from code-behind by adding a readonly attribute to TextBox like as txtReadonly.Attributes.Add("readonly", "readonly");
Set Disabled Attribute
ASP.NET TextBox<asp:TextBox ID="txtDisabled" Enabled="false" runat="server"></asp:TextBox>HTML Input
<input name="txtDisabled" type="text" id="txtDisabled" disabled="disabled"/>
With the disabled attribute, both ASP.NET TextBox and HTML Input components generate a text input field that users cannot modify. They have the same functionality and ID, but the ASP.NET TextBox runs on the server, while the HTML Input runs on the client.
Set Read Only Attribute
ASP.NET TextBox<asp:TextBox ID="txtReadonly" ReadOnly="true" runat="server"></asp:TextBox>HTML Input
<input name="txtReadonly" type="text" id="txtReadonly" readonly="readonly"/>
This code sample represents an ASP.NET TextBox control and its HTML input element equivalent. Both components perform the same function: they generate a text box into which users cannot enter text due to the "readonly" property.
CSS For read-only and disabled attribute input element
Since some browsers don’t provide a default style for disabled elements. Hence to display disabled elements on all browsers with the same look and feel, we can use the below CSS.
input[disabled]{background-color:#F0F0F0; color:#303030;} Similarly, we can change the look and feel of the readonly element by using the below CSS.
input[readonly]{background-color:#F0F0F0 ;color:#303030 } Summary
"Disabled" controls in ASP.NET are inactive and non-interactive, whereas "read-only" controls are visible but not editable. Use "disabled" to hide functionality and "read-only" to display information but prevent editing. Choose the appropriate property based on your requirements. To delve more into the concepts of ASP.NET, consider enrolling in our step by step guide ASP.NET Certification Course.
FAQs
- Navigate to the read-only folder.
- Right-click it and choose Properties.
- Uncheck the Read-only checkbox on the General tab.
- Click Apply, then OK.


