18
AprWhat is Azure Web App? Create an Azure Web App
Azure Web App: An Overview
Web Apps are one of the most widely used Azure services that enable us to host our web applications in Azure. It can host a user-interactive application or even a backend service like a WCF Service or Web APIs. With Web Apps, we can leverage the power of Microsoft Azure and build multi-functional, immensely scalable, highly secured, and seamlessly accessible internet or intranet-based applications. Check out our free courses by getting Azure Certification to get an edge over the competition.
What we need to do is to push our application package into the web app and Azure App Service will take care of anything and everything required to keep it running. The most important advantage of using a web application is that we need not worry about the infrastructure plumbing that may be required to host the application. In traditional web hosting, we need to make sure that the Server is up, the OS is updated and the IIS is running. But in the case of web apps, Azure Service Fabric makes sure that the web app is allocated with all required computing power and resources.
Azure Web Apps provides an extensive platform to build an app in Azure without having to deploy, configure, and maintain your own Azure virtual machines. We can build any web app using different languages such as ASP.NET, PHP, Node.js, and Python.
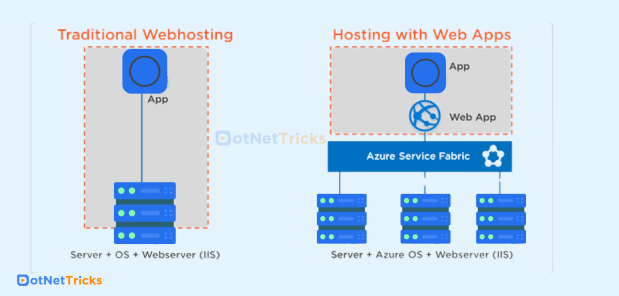
We can also build our applications on-premise and migrate them to Azure Web Apps.
Features of Web Apps
Auto Scale
Azure promises 99.95% availability in its SLA for web apps. In order to have a seamless experience for the users even in high demand, we can scale out or scale up the web apps instances to support the load. We can also configure auto-scale to web apps based on some metrics like CPU percentage, RAM Utilization, etc.
Easy Deployments
With Web apps, we can make use of the DevOps feature and we can deploy our applications directly from source code repositories like Visual Studio Team Services, Git Hub Bitbucket, etc.
Language Choice
Web apps support applications built on many languages and frameworks like ASP.Net, .Net Core, Java, PHP, Python, and Node.js.
The Azure web apps support multiple programming languages and frameworks, and some of the widely used languages are ASP.NET, Java, ASP.NET Core, Ruby on Rails, Nodejs, PHP, and Python. The PowerShell and other certain scripts or executables can also be used as background services.
Security
We can integrate user identity provider services and enhance the capability of web applications. For example, we can use Azure AD to maintain a user database, authenticated login, and authorization.
The Azure app service complies with the security standards such as ISO, SOC, and PCI thus the level of security is extremely high. Apart from that the end-user or customer can log in to their account by using Azure Active Directory, Facebook, Google, Twitter, or the Microsoft accounts.
Diagnostics
Azure App Services provides diagnostics logs for both application level and server level. It supports
Application logging - This is basically the logs written using the code or even uncaught exceptions.
Web server logging -It contains the logs of HTTP requests which hit the web app.
Detailed error messages - Detailed error messages contain detailed information about each failed request with an HTTP status code.
Failed request tracing - This keeps track of IIS steps and modules the request goes and captures generally the requests that respond with HTTP Status code 500 or above.
Web App Deployment Slots
We can deploy the web apps in separate deployments slots to ensure that the application runs as expected before it goes live in production. Deployment slots can be created in standard or premium app service plans. Deployment slots are containers to host the apps with their own IP address and content and configuration.
Benefits of Deployment Slots
Minimum downtime for the production website: With the Staging slot in place we can push our changes to the staging slot and test if everything works as expected and then easily swap the staging slot with production. Since Azure does this activity by changing the virtual IP of slots, it completes in seconds and the latest code changes reflect in the live website with minimum impact on the business.
Managing the minimum downtimes comes with an advantage where we have a huge scope for better service catering capabilities to the customer all the time without any downtime of the other server-related issues.
Rollback Deployment: Now that we deployed a new version of the app by swapping the staging slot to production, we can easily revert by again swapping the production slot with the staging slot.
Rollback allows us to quickly swap the previous working version of the web in a live environment hence the way of managing infrastructure is capable of all the rollback deployment capabilities.
Effective Testing: Deployment slots provide a real-time environmental setup like that of a production website in Azure so, we can do effective testing on the staging environment and there will be fewer chances of issues where anything breaks in production.
The number of deployments slots is different for each app service plan. We do not have a deployment slots option with Free, basic, and Shared App Service plans. The standard App Service plan supports maximum deployment slots up to 5 whereas this can go as high as 20 in the Premium app service plan.
Step by Step: Creating a Web App
Log in to the Azure portal.
Click on Create a resource and select web from the marketplace.
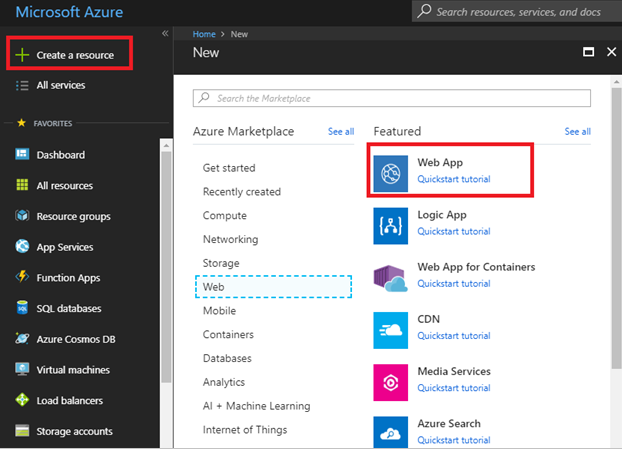
Click on Web App.
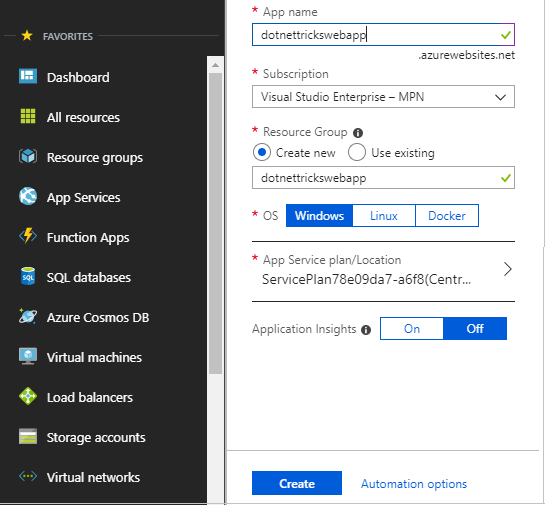
Fill in the name, resource group, and app service plan.
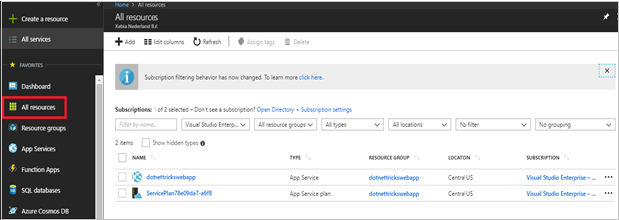
Go to All resources in the left panel to see the list of created resources.
Click on the Web app name.
Then click on the Browse button to open the web app in the browser.
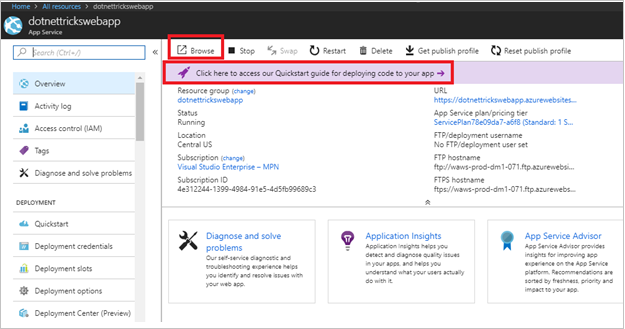
Click on the purple ribbon as highlighted above to deploy a source code into the web app.
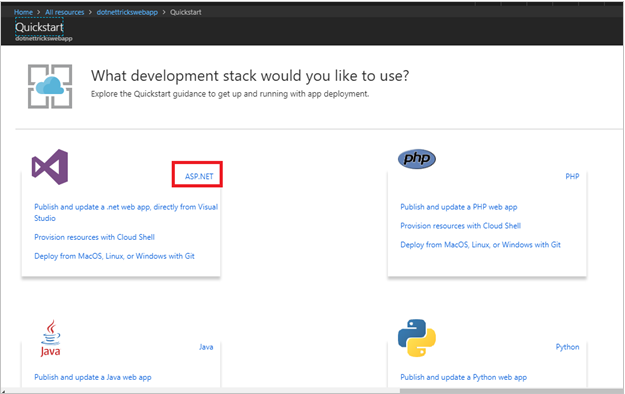
Click on your desired development stack and follow the guide.
Deploying Asp.Net Core App to WebApp
We can deploy an Asp.Net Core app in multiple ways
Publishing to Azure through Visual Studio
We can directly deploy an application without going to the Azure portal.
Create a new Asp.Net Core application in Visual Studio.
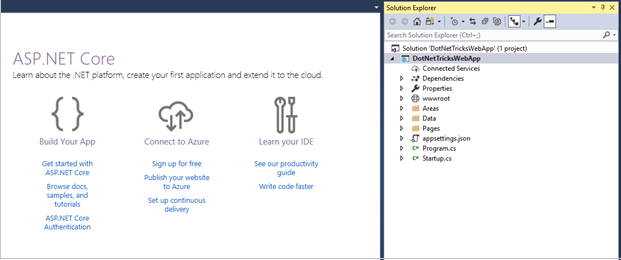
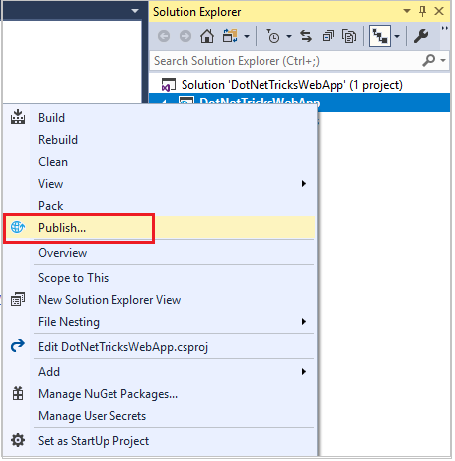
Right-click on the project file and select publish.
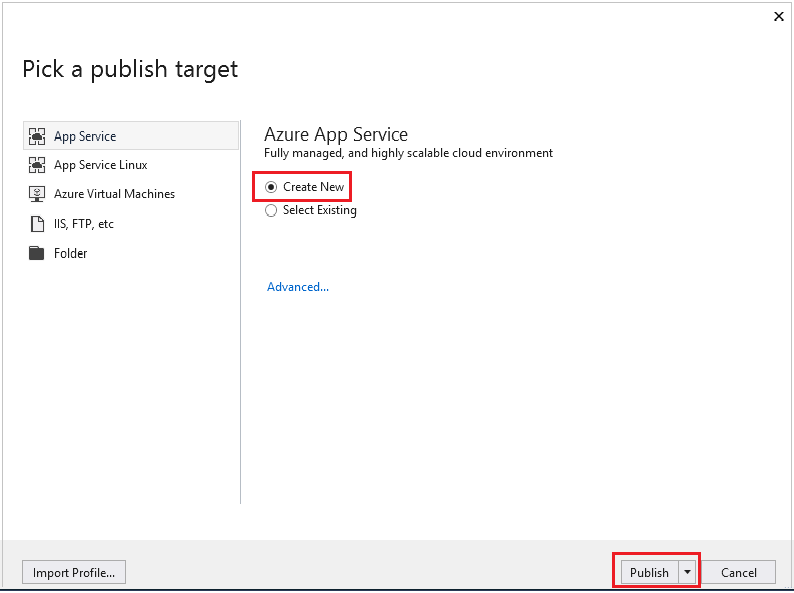
In Publish target window Select the ‘Create New’ option and click on Publish button.
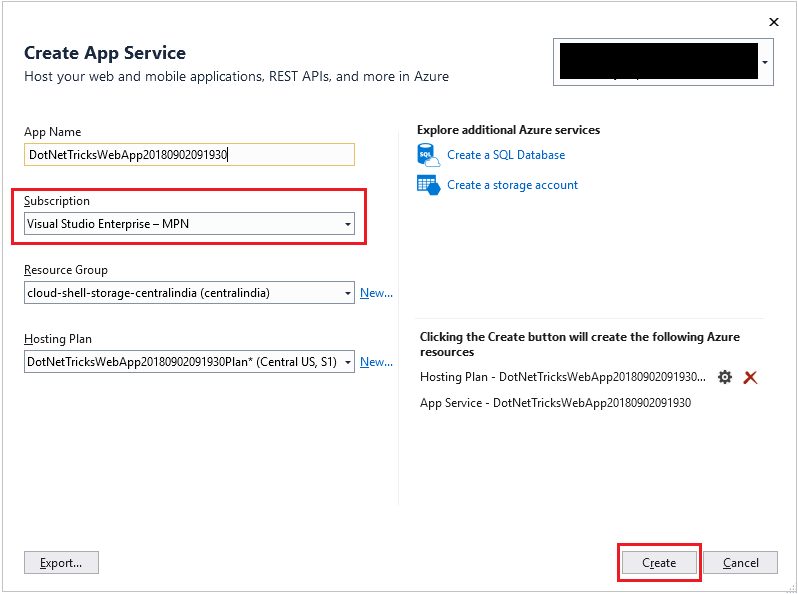
In Create App Service dialogue box, fill in the Azure Subscription.
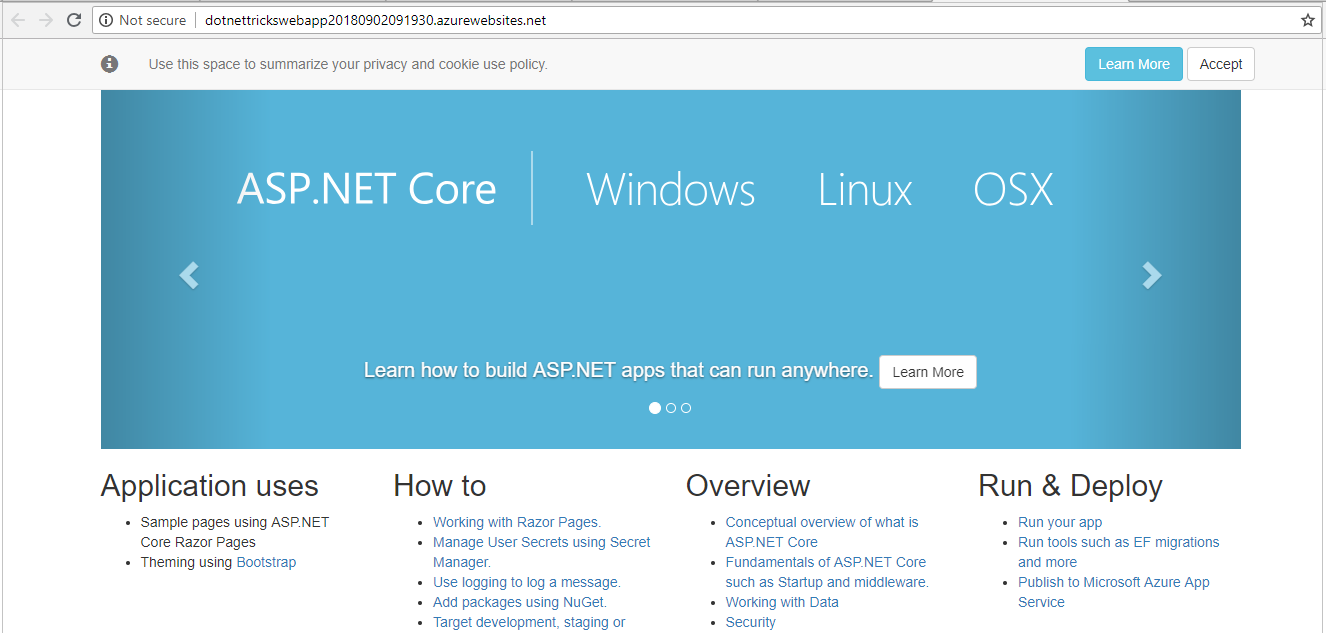
The Visual studio starts creating the web app in Azure and deploys the application.
Continuous Deployment with Visual Studio
Create a web app in the Azure portal as described in step by step section above.
Create an Asp.Net Core application in Visual Studio.
Login to Azure Portal and select the web app created in the previous section.
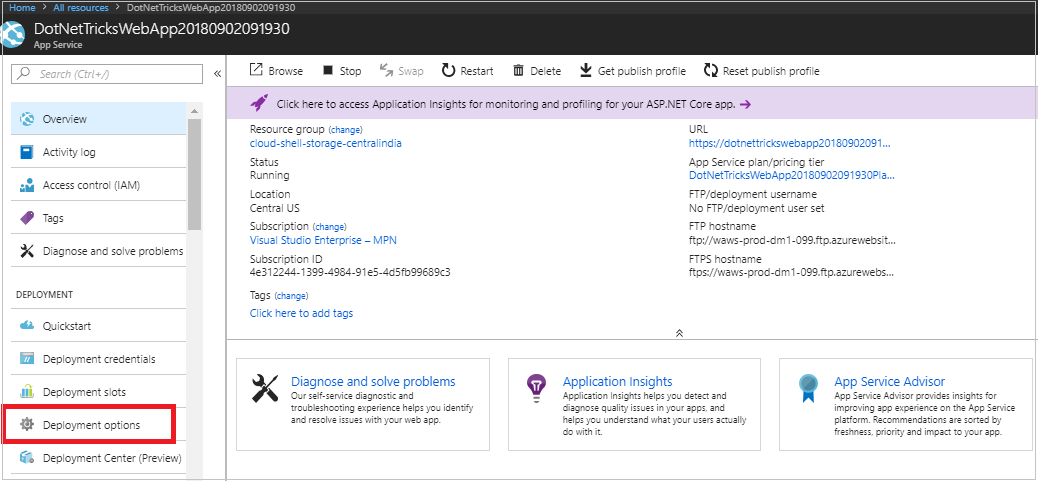
In the deployment, blade Select the Deployment option.
c
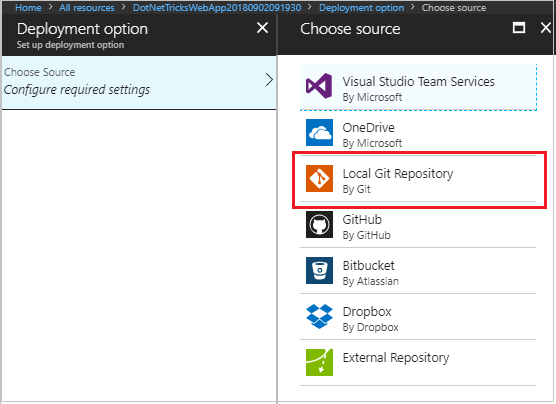
Set up deployment credentials and click ok.
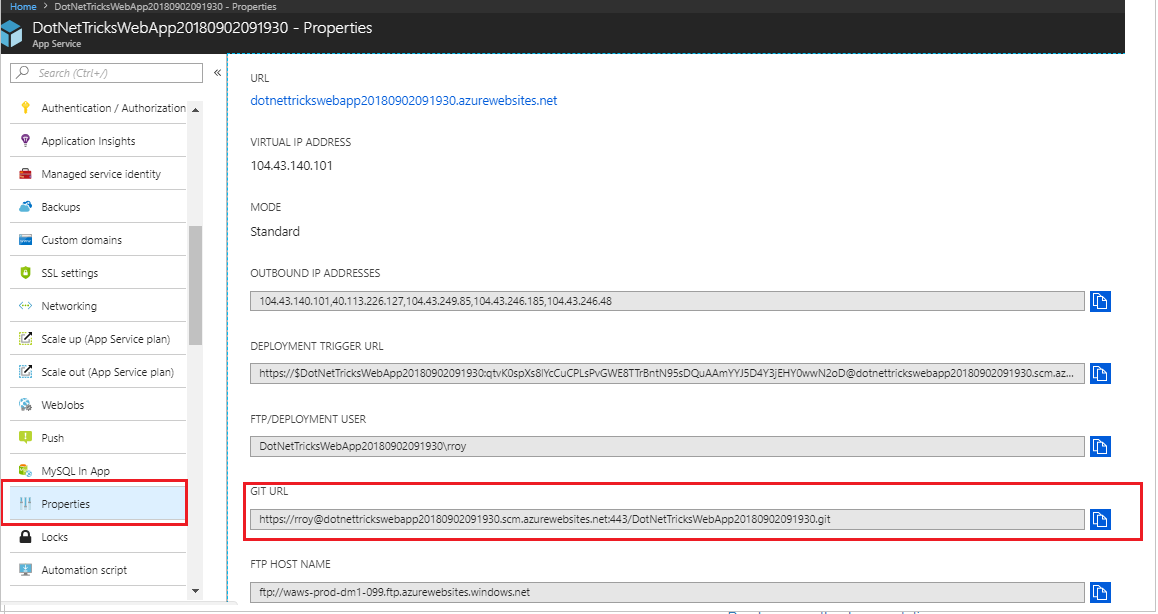
In the web app blade, go to the Settings section and click on properties.
Copy the Git URL.
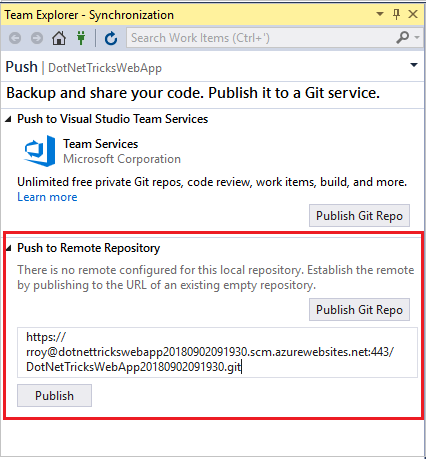
Configure the git repository for the local source code in Visual Studio by adding a remote repository Git URL.
Verify that the web app is configured with a local git repository.
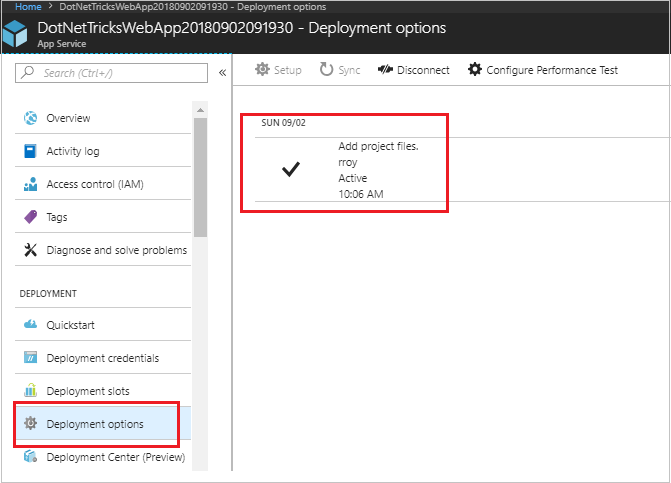
Now we can make changes in our source code and push the changes to the Git repository. As soon as we push changes, the web app will reflect the updated version.
Continuous Deployments to Azure with VSTS
Visual Studio Team Services is Microsoft’s DevOps Solution to configure continuous integration (CI) and continuous delivery (CD) pipeline for an application. With a DevOps Project in Azure, we can easily configure the CI and CD of an application and deploy an application into the web app with every check into the VSTS repository. This will be discussed in detail in a separate article.
Setting Custom Domains
By default, Azure web apps have an URL in the format <web app name>. azurewebsite.net. We can add custom domain names to the web apps. For this, we should buy a domain from one of the domain name service providers like Godadday.com.
Steps to Add Custom domain to web app
Go to the Web App in the Azure portal.
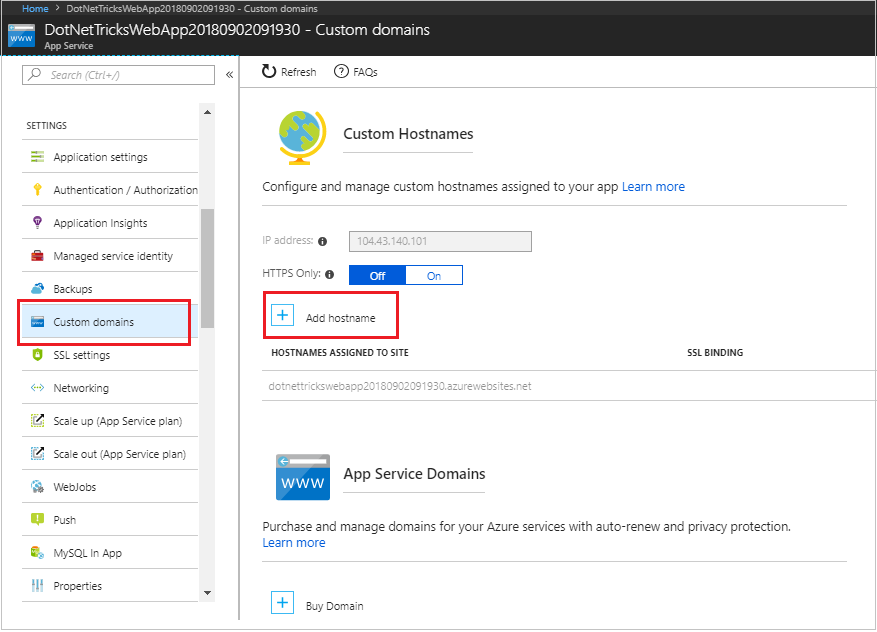
In Settings Section on the left-hand blade, Select Custom Domains and click on Add hostname.
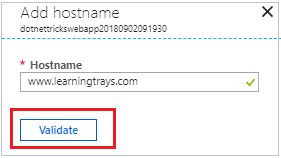
In the Add hostname panel, provide the domain name and click on validate.
If the domain name is available to be mapped to the default domain, the host name record type will be automatically selected as the CNAME type.
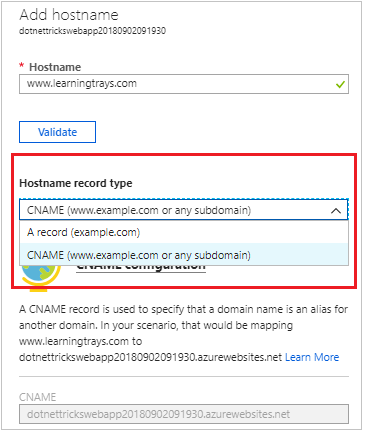
In case, we want to map a reserved IP address of an application to map with a custom domain, we would go for the ‘A record’ type.
In the below section, we get a warning to add a CNAME record to the DNS provider site.
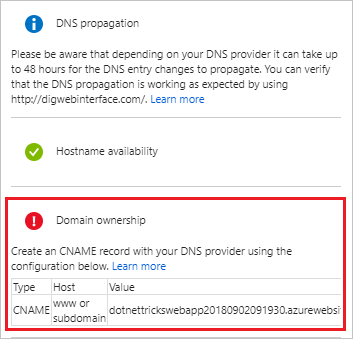
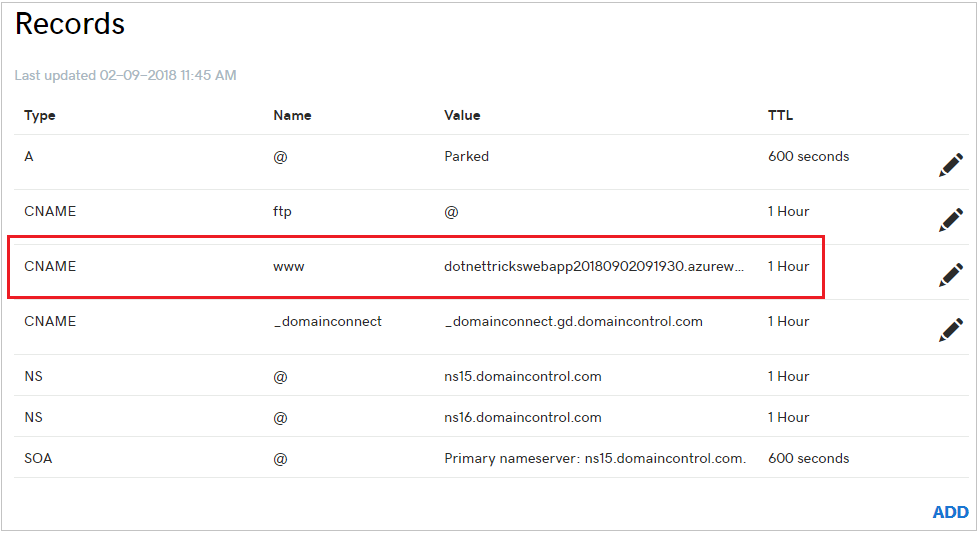
Add a record to DNS Settings in the DNS provider site as depicted below.
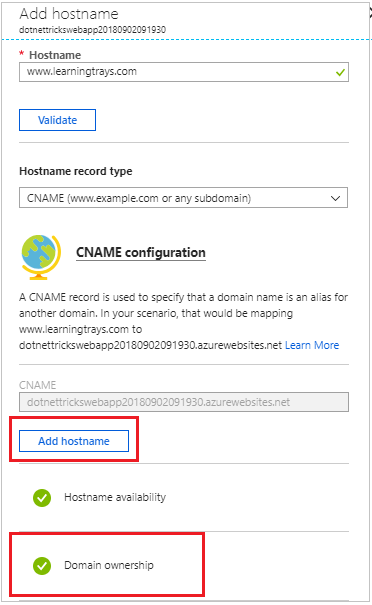
It may take a couple of minutes to propagate the change. Go back to the Azure portal and click on Validate button again.
Once the Domain ownership is validated a green tick mark will appear. Click on Add hostname button.
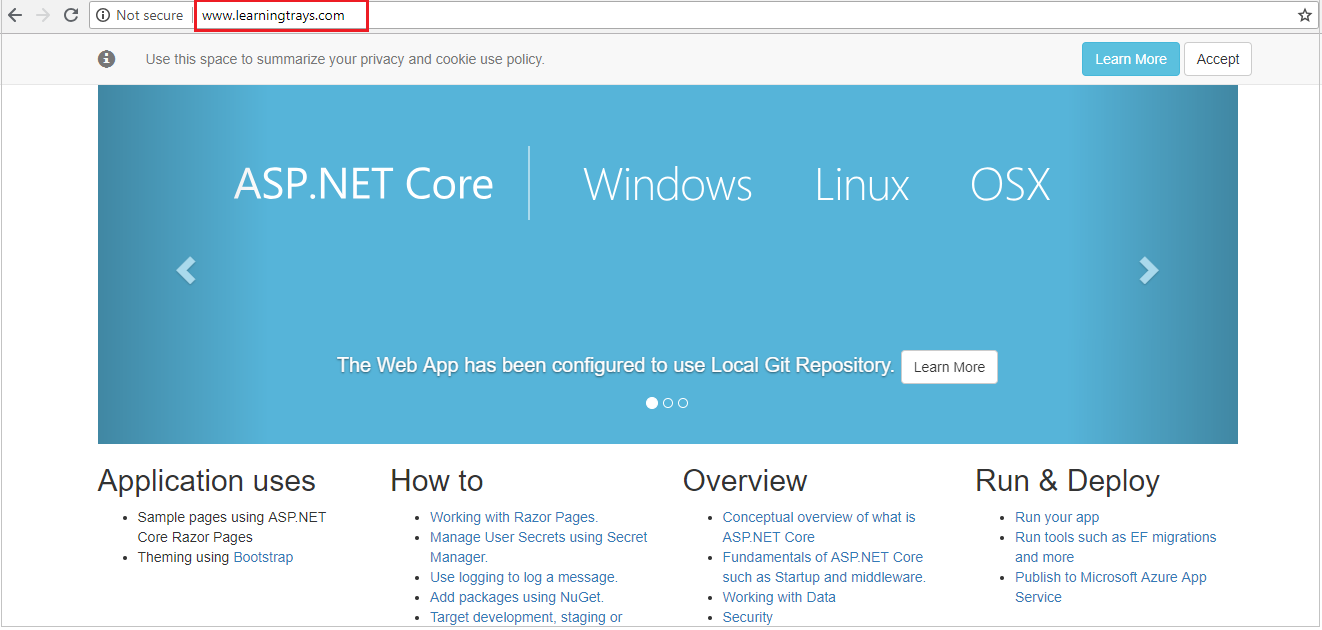
Go to the browser and navigate to the custom URL mapped.
Summary
With Azure features of Auto Scaling, multiple deployment slots, many ways to deploy web applications, detailed diagnostics, and enhanced security along with load balancing with traffic manager, Web Apps have become the obvious choice for many enterprise applications. Azure's online training program helps you gain proficiency in Microsoft's various Azure services to earn Azure certification.
FAQs
Take our Azure skill challenge to evaluate yourself!

In less than 5 minutes, with our skill challenge, you can identify your knowledge gaps and strengths in a given skill.


