26
DecIntroduction to Bridge Design Pattern
Bridge Design Patterns
Bridge Design Patterns is an important concept in software design. It enables you to separate an abstraction from its implementation, allowing it to evolve independently. This results in flexible, scalable systems that are simple to manage and expand over time.
In this design patterns tutorial, we will discuss the bridge design pattern, including "What is the bridge design pattern?" and "When should we use the bridge design pattern?" We'll also explore examples of the Bridge Design Pattern in action. Skilled .NET developers with design pattern expertise earn up to $12,000 more annually. Join our Free .NET Design Patterns Course with Certification now!
What is the Bridge Design Pattern?
- The Bridge Design Pattern is a structural design pattern that separates an idea and its implementation, allowing it to change independently.
- Rather than being tightly tied, the concept and its implementation are linked by a bridge, allowing for flexibility and scalability.
- This encourages loose coupling, making the system easier to extend and maintain.
The bridge design pattern helps you separate abstraction and implementation.
There are two parts to the Bridge design pattern:
- Abstraction
- Implementation
This is a design feature that encapsulates an implementation class within an interface class.
- The bridge pattern allows the Abstraction and Implementation to be built independently, and the client code can only access the Abstraction component without regard for the Implementation part.
- The abstraction is an interface or abstract class, and so is the implementer.
- The abstraction includes a reference to the implementer.
- The children of the abstraction are referred to as refined abstractions, while the children of the implementer are concrete implementers.
- Because we may alter the reference to the implementer in the abstraction, we can change the implementation at runtime.
- Client code is unaffected by changes to the implementer.
- It increases the loose connectivity between class abstraction and implementation.
Real-world Illustration of Bridge Design Pattern
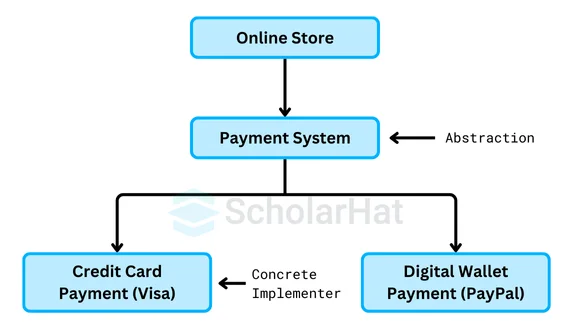
- Imagine an online store that allows customers to pay with different methods, like credit cards or digital wallets.
- It doesn’t handle the payment directly.
- Instead, it uses a payment system (Bridge) to connect to various payment services like Visa, PayPal, or Stripe.
- This makes it easy for the store to add new payment methods without changing its own system.
- The store focuses on selling products, while the payment system handles the details of transactions.
UML Diagram of Bridge Design Pattern
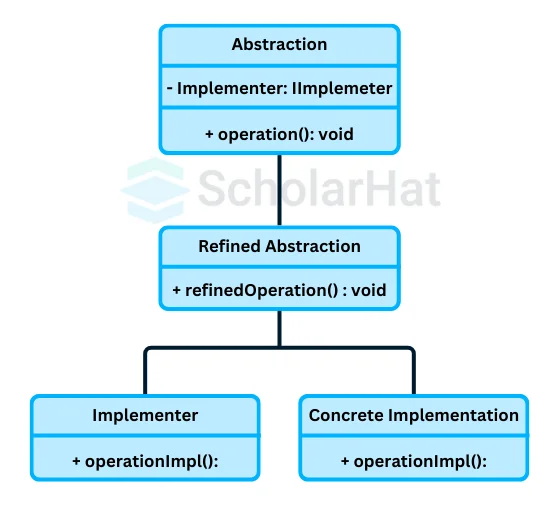
Elements of Bridge Design Pattern:
- Abstraction -The core of the bridge design pattern and defines the crux. Contains a reference to the implementer
- Refined Abstraction - Extends the abstraction by moving the finer detail one step down. Hides the finer details from implementers.
- Implementer - It specifies the interface for implementation classes. This interface does not need to be identical to the abstraction interface and can be significantly distinct. Abstraction imp implements the operations offered by the Implementer interface.
- Concrete Implementation - Provides the above implementer with a concrete implementation.
Real Life Example
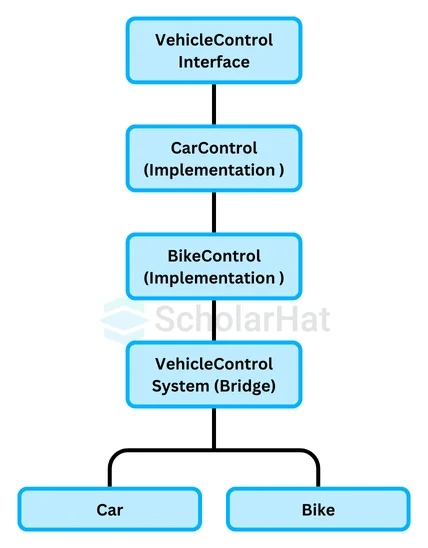
1. Subsystems (Various Types of Vehicles)
- In a transportation system, you have different types of vehicles like cars, bikes, and trucks.
- Each vehicle has its own way of operating and specific features.
2. Abstraction (Vehicle Control Interface)
- It is the Vehicle Control Interface that defines the operations for various vehicles.
- This interface provides a unified way to control different vehicles, such as starting or stopping the engine, without needing to know the specific details of each vehicle type.
3. Implementation (Vehicle-Specific Controls)
- Vehicle-specific controls handle the details of operating each vehicle type.
- These implementations include how to start the engine of a car or a bike, and they are accessed through the Vehicle Control Interface.
4. Bridge (Vehicle Control System)
- It is the Vehicle Control System that acts as a bridge.
- Instead of managing each vehicle's specific controls individually, you use the unified Vehicle Control System.
5. Operation Flow
- Simplified Interaction: When you want to operate a vehicle, such as starting the engine or adjusting the settings, you do it through the Vehicle Control System.
- Command Handling: The control system (bridge) sends commands to the specific vehicle type. For example, if you start the engine, the control system manages the operations for both cars and bikes.
- Subsystem Response: Each vehicle (car, bike, truck) then performs the requested actions based on the commands from the control system.
6. How the Bridge Helps
- Unified Interface: It is the Vehicle Control System that provides a single point of control. This means you don’t need to handle each vehicle’s unique control system separately.
- Reduced Complexity: By using the bridge, it is not necessary to manage each vehicle’s controls individually. It simplifies your experience by interacting with all vehicles through one system.
- Improved Usability: The bridge makes it easier to operate different vehicles. It is the control system that manages everything, making transportation more convenient and efficient.
using System;

// Abstraction
public interface IVehicleControl {
    void StartEngine();
    void StopEngine();
}

// Implementation for Car
public class CarControl : IVehicleControl {
    public void StartEngine() {
        Console.WriteLine("Starting the car engine...");
    }

    public void StopEngine() {
        Console.WriteLine("Stopping the car engine...");
    }
}

// Implementation for Bike
public class BikeControl : IVehicleControl {
    public void StartEngine() {
        Console.WriteLine("Starting the bike engine...");
    }

    public void StopEngine() {
        Console.WriteLine("Stopping the bike engine...");
    }
}

// Bridge
public class VehicleControlSystem {
    private IVehicleControl _vehicleControl;

    public VehicleControlSystem(IVehicleControl vehicleControl) {
        _vehicleControl = vehicleControl;
    }

    public void StartVehicle() {
        _vehicleControl.StartEngine();
    }

    public void StopVehicle() {
        _vehicleControl.StopEngine();
    }
}

// Main class to test the example
public class Program {
    public static void Main(string[] args) {
        // Using VehicleControlSystem with CarControl
        IVehicleControl carControl = new CarControl();
        VehicleControlSystem carSystem = new VehicleControlSystem(carControl);

        Console.WriteLine("Operating Car:");
        carSystem.StartVehicle();
        carSystem.StopVehicle();

        // Using VehicleControlSystem with BikeControl
        IVehicleControl bikeControl = new BikeControl();
        VehicleControlSystem bikeSystem = new VehicleControlSystem(bikeControl);

        Console.WriteLine("\nOperating Bike:");
        bikeSystem.StartVehicle();
        bikeSystem.StopVehicle();
    }
}
interface VehicleControl {
    void startEngine();
    void stopEngine();
}

class CarControl implements VehicleControl {
    @Override
    public void startEngine() {
        System.out.println("Starting the car engine...");
    }

    @Override
    public void stopEngine() {
        System.out.println("Stopping the car engine...");
    }
}

class BikeControl implements VehicleControl {
    @Override
    public void startEngine() {
        System.out.println("Starting the bike engine...");
    }

    @Override
    public void stopEngine() {
        System.out.println("Stopping the bike engine...");
    }
}

class VehicleControlSystem {
    private VehicleControl vehicleControl;

    public VehicleControlSystem(VehicleControl vehicleControl) {
        this.vehicleControl = vehicleControl;
    }

    public void startVehicle() {
        vehicleControl.startEngine();
    }

    public void stopVehicle() {
        vehicleControl.stopEngine();
    }
}

public class Main {
    public static void main(String[] args) {
        VehicleControl carControl = new CarControl();
        VehicleControlSystem carSystem = new VehicleControlSystem(carControl);

        System.out.println("Operating Car:");
        carSystem.startVehicle();
        carSystem.stopVehicle();

        VehicleControl bikeControl = new BikeControl();
        VehicleControlSystem bikeSystem = new VehicleControlSystem(bikeControl);

        System.out.println("\nOperating Bike:");
        bikeSystem.startVehicle();
        bikeSystem.stopVehicle();
    }
}
from abc import ABC, abstractmethod

# Abstraction
class VehicleControl(ABC):
    @abstractmethod
    def start_engine(self):
        pass

    @abstractmethod
    def stop_engine(self):
        pass

# Implementation for Car
class CarControl(VehicleControl):
    def start_engine(self):
        print("Starting the car engine...")

    def stop_engine(self):
        print("Stopping the car engine...")

# Implementation for Bike
class BikeControl(VehicleControl):
    def start_engine(self):
        print("Starting the bike engine...")

    def stop_engine(self):
        print("Stopping the bike engine...")

# Bridge
class VehicleControlSystem:
    def __init__(self, vehicle_control):
        self.vehicle_control = vehicle_control

    def start_vehicle(self):
        self.vehicle_control.start_engine()

    def stop_vehicle(self):
        self.vehicle_control.stop_engine()

# Main class to test the example
if __name__ == "__main__":
    # Using VehicleControlSystem with CarControl
    car_control = CarControl()
    car_system = VehicleControlSystem(car_control)

    print("Operating Car:")
    car_system.start_vehicle()
    car_system.stop_vehicle()

    # Using VehicleControlSystem with BikeControl
    bike_control = BikeControl()
    bike_system = VehicleControlSystem(bike_control)

    print("\nOperating Bike:")
    bike_system.start_vehicle()
    bike_system.stop_vehicle()
interface VehicleControl {
    startEngine(): void;
    stopEngine(): void;
}

class CarControl implements VehicleControl {
    startEngine(): void {
        console.log("Starting the car engine...");
    }

    stopEngine(): void {
        console.log("Stopping the car engine...");
    }
}

class BikeControl implements VehicleControl {
    startEngine(): void {
        console.log("Starting the bike engine...");
    }

    stopEngine(): void {
        console.log("Stopping the bike engine...");
    }
}

class VehicleControlSystem {
    private vehicleControl: VehicleControl;

    constructor(vehicleControl: VehicleControl) {
        this.vehicleControl = vehicleControl;
    }

    startVehicle(): void {
        this.vehicleControl.startEngine();
    }

    stopVehicle(): void {
        this.vehicleControl.stopEngine();
    }
}

// Main class to test the example
const carControl: VehicleControl = new CarControl();
const carSystem: VehicleControlSystem = new VehicleControlSystem(carControl);

console.log("Operating Car:");
carSystem.startVehicle();
carSystem.stopVehicle();

const bikeControl: VehicleControl = new BikeControl();
const bikeSystem: VehicleControlSystem = new VehicleControlSystem(bikeControl);

console.log("\nOperating Bike:");
bikeSystem.startVehicle();
bikeSystem.stopVehicle();
class CarControl {
    startEngine() {
        console.log("Starting the car engine...");
    }

    stopEngine() {
        console.log("Stopping the car engine...");
    }
}

class BikeControl {
    startEngine() {
        console.log("Starting the bike engine...");
    }

    stopEngine() {
        console.log("Stopping the bike engine...");
    }
}

class VehicleControlSystem {
    constructor(vehicleControl) {
        this.vehicleControl = vehicleControl;
    }

    startVehicle() {
        this.vehicleControl.startEngine();
    }

    stopVehicle() {
        this.vehicleControl.stopEngine();
    }
}

// Main class to test the example
const carControl = new CarControl();
const carSystem = new VehicleControlSystem(carControl);

console.log("Operating Car:");
carSystem.startVehicle();
carSystem.stopVehicle();

const bikeControl = new BikeControl();
const bikeSystem = new VehicleControlSystem(bikeControl);

console.log("\nOperating Bike:");
bikeSystem.startVehicle();
bikeSystem.stopVehicle();
Applications of Bridge Design Pattern
1. The Bridge pattern is useful for dividing and organizing a monolithic class with multiple variants of particular functionality.
- The larger a class, the more difficult it is to understand how it works and the longer it takes to implement changes.
- Changes to one of the variations of functionality may necessitate changes to the entire class, which frequently results in mistakes or failure to handle critical side effects.
- The Bridge design allows you to break a monolithic class into many class hierarchies.
- After that, you can change the classes in each hierarchy without affecting the others.
2. Use this pattern when you need to extend a class in many orthogonal (independent) dimensions.
- The Bridge advises that you create a different class hierarchy for each dimension.
- Instead of handling everything itself, the original class delegated the related work to objects in those hierarchies.
3. Use the Bridge if you need to be able to switch implementations during runtime.
- Although optional, the Bridge pattern allows you to replace the implementation object within the abstraction.
- It's as simple as setting a new value for a field.
- By the way, this last component is the primary reason why so many people misunderstand the Bridge and Strategy patterns.
- Remember that a pattern is more than simply one method to organize your classes.
- It may also convey intent and the problem being addressed.
Benefits of the Bridge Design Pattern
- It separates abstraction and implementation, allowing both to develop independently.
- It provides a common interface for interfacing with different implementations, which simplifies the client code.
- It hides implementation details from the client, allowing modifications to be done without affecting client code.
- The bridge allows you to add new concepts and implementations without altering old code, which promotes flexibility and extensibility.
- It decreases codebase complexity by preventing the multiplication of classes while the bridge handles the separation of concerns.
When we need a bridge design pattern
Without a Bridge Design Pattern
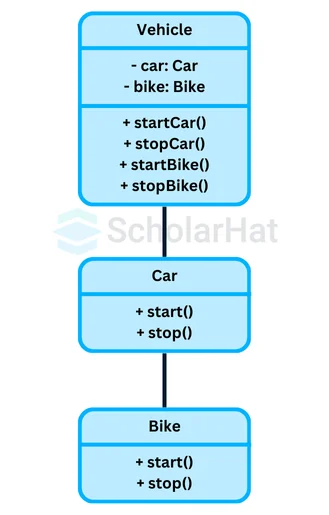
- If you don't use the Bridge Design Pattern, you may be able to obtain the same functionality through inheritance.
- In this method, you would create a hierarchy of classes, with each class combining all of the necessary features and variations.
- This can result in a vast, complex class structure that is challenging to manage and scale.
With Bridge Design Pattern
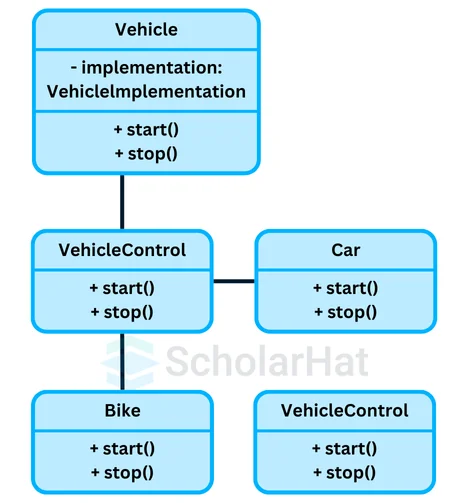
- The Bridge Design Pattern separates the abstraction from the implementation, allowing you to change the implementation without affecting the abstraction.
- This makes your code more versatile and manageable.
Relationship with Other Patterns
1. Mediator Pattern
- It is different from the Bridge Pattern because the Mediator simplifies communication between objects, while the Bridge Pattern separates abstraction from implementation, allowing them to change independently.
2. Adapter Pattern
- It is focused on converting one interface to another to make them compatible.
- In contrast, the Bridge Pattern separates abstraction from implementation, so both can evolve independently.
3. Abstract Factory Pattern
- It works alongside the Bridge Pattern to create families of related objects.
- The Abstract Factory is used for object creation, while the Bridge focuses on separating abstraction from implementation.
4. Decorator Pattern
- It is used to add responsibilities to objects dynamically.
- However, the Bridge Pattern separates abstraction and implementation, allowing them to change independently, unlike the Decorator Pattern's focus on adding extra functionalities.
Summary
The Bridge Design Pattern is a structural pattern that divides a concept and its implementation, allowing both to evolve independently. This technique is useful for lowering complexity and increasing flexibility in systems where abstraction and implementation can vary separately. It simplifies maintenance and scaling by offering a standardized interface while concealing implementation specifics.
Over 10,000 companies seek certified .NET full stack developers in India. Start your journey with our full stack .NET developer course and seize top opportunities!
FAQs
Take our Designpatterns skill challenge to evaluate yourself!

In less than 5 minutes, with our skill challenge, you can identify your knowledge gaps and strengths in a given skill.

