21
DecPrototype Design Pattern: A Quick Guide
Prototype Design Pattern
A prototype Design Pattern is a creational design pattern in the Gang of Four Design Pattern. It allows objects to be cloned rather than created from scratch, improving performance and simplifying object creation. It involves creating new objects by copying an existing prototype, reducing the cost of repeatedly instantiating similar objects.
In the Design Pattern tutorial, we will learn about what is a Prototype design pattern?, the components of a Prototype Design Pattern and many more. Companies using .NET frameworks report 30% faster development with design pattern knowledge. Start our Free .NET Design Patterns Training today!
What is a Prototype Design Pattern?
Prototype Design Pattern is like copying a template. Instead of making a new object from scratch every time, you make a copy of an existing object (the prototype). This saves time and effort, especially when creating similar objects repeatedly. Let's understand some points for the Prototype Design Pattern.
- Copy Types: Depending on whether you wish to replicate everything, including related objects, you may either make a simple copy (shallow copy) or a complete, deep copy of an item.
- Modify Without Impact: After copying, you have the freedom to modify the new item without compromising the old, allowing you to make modifications.
- Constructor Skipping: The Prototype pattern eliminates the need to execute the constructor again by copying and allows you to bypass complicated object configurations.
- Generate Objects Dynamically: This feature lets you quickly generate new objects while the program is running, which is useful if you require objects that can adapt to your changing demands.
| Read More: |
| Different Types of Design Patterns |
| Different Types of Software Design Principles |
Real-world Illustration of Prototype Design Pattern
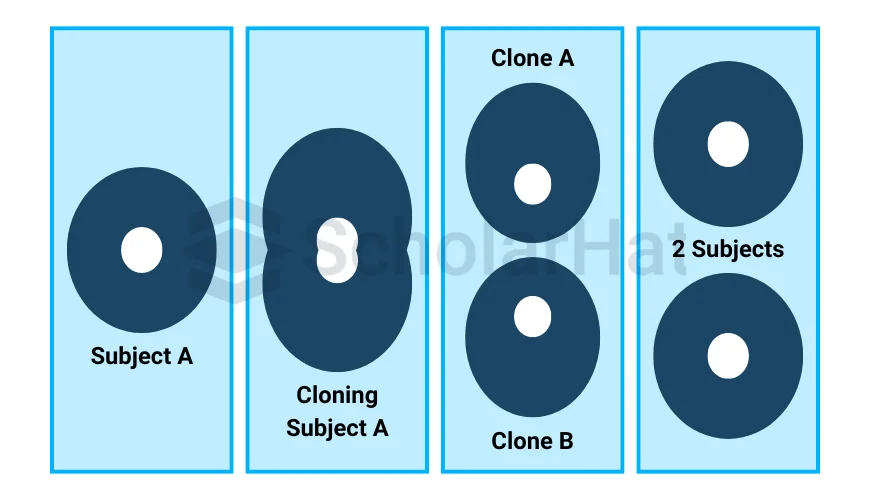
Prototype Design Pattern works like a photocopy machine. You create a copy of an existing object instead of making a new one from scratch, saving time and effort. The copied object can be modified without changing the original.
Components of Prototype Design Pattern
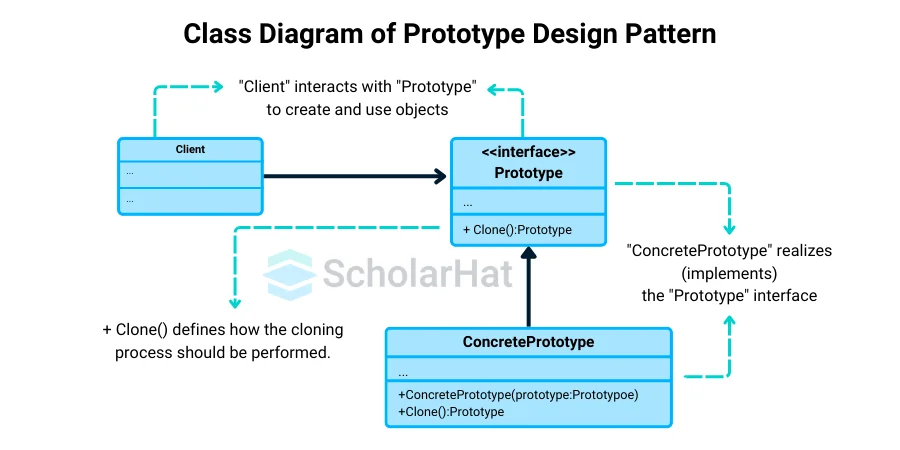
There are four components in the Prototype Design Pattern:
- Prototype Interface or Abstract Class
- Concrete Prototype
- Client
- Clone Method
1. Prototype Interface or Abstract Class
The method(s) for cloning an object is declared in the Prototype Interface or Abstract Class. It establishes the standard interface that concrete prototypes have to have in order to guarantee uniform cloning of all prototypes.
- Its primary function is to define the cloning contract and act as a blueprint for the creation of new objects.
- It announces the clone technique that replicates themselves from actual prototypes.
2. Concrete Prototype
The Concrete Prototype is a class that extends the abstract class or implements the prototype interface. It's the class that stands for the particular kind of item you wish to duplicate.
- It specifies how exactly the cloning procedure for certain class instances should be executed.
- Provides the class-specific cloning logic by implementing the clone method specified in the prototype interface.
3. Client
By interacting with the prototype, the code or module known as the Client requests the production of additional objects. It doesn't know the specific classes involved when it starts the cloning operation.
4. Clone Method
In the abstract class or prototype interface, the Clone Method is specified. It describes the proper way to copy or clone an item. This approach is used by concrete prototypes to specify their distinct cloning behavior. It specifies how to replicate the internal state of the object in order to produce a fresh, independent instance.
| Read More: |
| Flyweight Design Pattern |
| Strategy Design Pattern |
| Chain of Responsibility Design Pattern |
Structure of Prototype Design Pattern
Basic Implementation
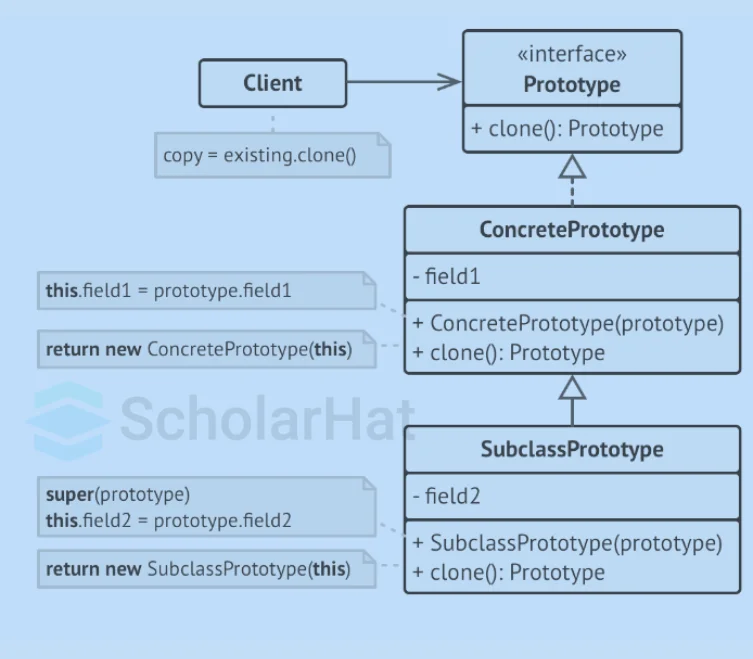
- The cloning techniques are declared in the Prototype interface. It's a single-clone procedure in most circumstances.
- The Concrete Prototype class implements the cloning technique. This method may additionally handle various edge situations of the cloning process, such as cloning linked objects, untangling recursive dependencies, etc., in addition to transferring the original object's contents to the clone.
- The client is permitted to copy any object that matches the prototype interface.
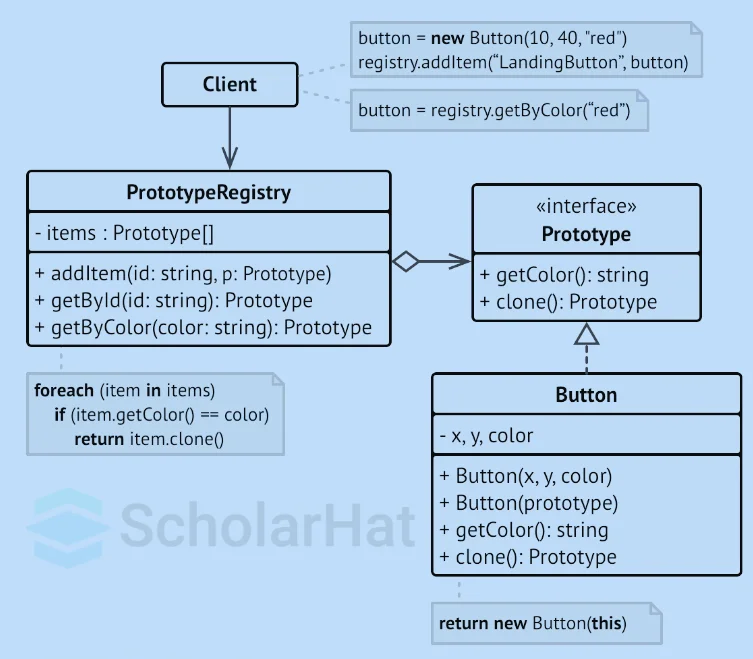
Prototype Registry Implementation
Prototypes that are used regularly can be easily accessed through the Prototype Registry. It keeps a collection of ready-to-copy pre-built items. A name → prototype hash map is the most basic prototype registry. Nonetheless, you may create a far more powerful version of the registry if you want more precise search parameters than just a name.
| Read More: |
| Hashing in Data Structures: Types and Functions [With Examples] |
| Hash Table in Data Structures |
Implementation of Prototype Design Pattern
Here are the following steps for implementing the Prototype Design Pattern:
Step 1. Define the Prototype Interface
Make an interface prototype and include the clone function. Alternatively, if you already have a class hierarchy in place, simply add the function to every class.
Step 2. Implement Concrete Prototypes
Make classes with the Prototype interface implemented. To generate and return a new instance of the class, override the clone function in these classes.
Step 3. Create a Prototype Registry (Optional)
If you need to manage multiple prototypes and create clones based on identifiers, implement a registry that stores and retrieves prototypes.
Step 4. Use the Prototype Pattern
Instantiate concrete prototypes, register them if using a registry, and then clone them as needed.
Example
using System;
using System.Collections.Generic;

// Prototype Interface
interface Shape : ICloneable
{
    void Draw();
}

// Concrete Prototype 1: Circle
class Circle : Shape
{
    private int radius;

    public Circle(int radius)
    {
        this.radius = radius;
    }

    public void Draw()
    {
        Console.WriteLine("Drawing Circle with radius: " + radius);
    }

    public object Clone()
    {
        return new Circle(this.radius); // Shallow copy
    }
}

// Concrete Prototype 2: Rectangle
class Rectangle : Shape
{
    private int width;
    private int height;

    public Rectangle(int width, int height)
    {
        this.width = width;
        this.height = height;
    }

    public void Draw()
    {
        Console.WriteLine("Drawing Rectangle with width: " + width + " and height: " + height);
    }

    public object Clone()
    {
        return new Rectangle(this.width, this.height); // Shallow copy
    }
}

// Client Code
class ShapeCache
{
    private static Dictionary<string, Shape> shapeMap = new Dictionary<string, Shape>();
    // Loading shapes into cache
    public static void LoadCache()
    {
        Circle circle = new Circle(5);
        Rectangle rectangle = new Rectangle(10, 20);

        shapeMap["circle"] = circle;
        shapeMap["rectangle"] = rectangle;
    }

    public static Shape GetShape(string shapeType)
    {
        Shape cachedShape = shapeMap[shapeType];
        return (Shape)cachedShape.Clone(); // Clone instead of creating new object
    }
}

// Demo
class PrototypePatternDemo
{
    static void Main(string[] args)
    {
        ShapeCache.LoadCache();

        Shape clonedCircle = ShapeCache.GetShape("circle");
        clonedCircle.Draw();

        Shape clonedRectangle = ShapeCache.GetShape("rectangle");
        clonedRectangle.Draw();
    }
}# Prototype Interface
class Shape:
def clone(self):
raise NotImplementedError("Subclasses must implement this method")
def draw(self):
raise NotImplementedError("Subclasses must implement this method")
# Concrete Prototype 1: Circle
class Circle(Shape):
def __init__(self, radius):
self.radius = radius
def draw(self):
print(f"Drawing Circle with radius: {self.radius}")
def clone(self):
return Circle(self.radius) # Shallow copy
# Concrete Prototype 2: Rectangle
class Rectangle(Shape):
def __init__(self, width, height):
self.width = width
self.height = height
def draw(self):
print(f"Drawing Rectangle with width: {self.width} and height: {self.height}")
def clone(self):
return Rectangle(self.width, self.height) # Shallow copy
# Client Code
class ShapeCache:
shape_map = {}
@staticmethod
def load_cache():
circle = Circle(5)
rectangle = Rectangle(10, 20)
ShapeCache.shape_map["circle"] = circle
ShapeCache.shape_map["rectangle"] = rectangle
@staticmethod
def get_shape(shape_type):
cached_shape = ShapeCache.shape_map.get(shape_type)
if cached_shape:
return cached_shape.clone() # Clone instead of creating new object
return None
# Demo
if __name__ == "__main__":
ShapeCache.load_cache()
cloned_circle = ShapeCache.get_shape("circle")
if cloned_circle:
cloned_circle.draw()
cloned_rectangle = ShapeCache.get_shape("rectangle")
if cloned_rectangle:
cloned_rectangle.draw()import java.util.HashMap;
import java.util.Map;
// Prototype Interface
interface Shape extends Cloneable {
Shape clone();
void draw();
}
// Concrete Prototype 1: Circle
class Circle implements Shape {
private int radius;
public Circle(int radius) {
this.radius = radius;
}
@Override
public void draw() {
System.out.println("Drawing Circle with radius: " + radius);
}
@Override
public Shape clone() {
return new Circle(this.radius); // Shallow copy
}
}
// Concrete Prototype 2: Rectangle
class Rectangle implements Shape {
private int width;
private int height;
public Rectangle(int width, int height) {
this.width = width;
this.height = height;
}
@Override
public void draw() {
System.out.println("Drawing Rectangle with width: " + width + " and height: " + height);
}
@Override
public Shape clone() {
return new Rectangle(this.width, this.height); // Shallow copy
}
}
// Client Code
class ShapeCache {
private static Map<String, Shape> shapeMap = new HashMap<>();
// Loading shapes into cache
public static void loadCache() {
Circle circle = new Circle(5);
Rectangle rectangle = new Rectangle(10, 20);
shapeMap.put("circle", circle);
shapeMap.put("rectangle", rectangle);
}
public static Shape getShape(String shapeType) {
Shape cachedShape = shapeMap.get(shapeType);
return cachedShape.clone(); // Clone instead of creating new object
}
}
// Demo
public class PrototypePatternDemo {
public static void main(String[] args) {
ShapeCache.loadCache();
Shape clonedCircle = ShapeCache.getShape("circle");
clonedCircle.draw();
Shape clonedRectangle = ShapeCache.getShape("rectangle");
clonedRectangle.draw();
}
}
// Prototype Interface
class Shape {
    clone() {
        throw new Error("Subclasses must implement this method");
    }

    draw() {
        throw new Error("Subclasses must implement this method");
    }
}

// Concrete Prototype 1: Circle
class Circle extends Shape {
    constructor(radius) {
        super();
        this.radius = radius;
    }

    draw() {
        console.log(`Drawing Circle with radius: ${this.radius}`);
    }

    clone() {
        return new Circle(this.radius); // Shallow copy
    }
}

// Concrete Prototype 2: Rectangle
class Rectangle extends Shape {
    constructor(width, height) {
        super();
        this.width = width;
        this.height = height;
    }

    draw() {
        console.log(`Drawing Rectangle with width: ${this.width} and height: ${this.height}`);
    }

    clone() {
        return new Rectangle(this.width, this.height); // Shallow copy
    }
}

// Client Code
class ShapeCache {
    static shapeMap = new Map();

    static loadCache() {
        const circle = new Circle(5);
        const rectangle = new Rectangle(10, 20);

        ShapeCache.shapeMap.set("circle", circle);
        ShapeCache.shapeMap.set("rectangle", rectangle);
    }

    static getShape(shapeType) {
        const cachedShape = ShapeCache.shapeMap.get(shapeType);
        if (cachedShape) {
            return cachedShape.clone(); // Clone instead of creating new object
        }
        return null;
    }
}

// Demo
function prototypePatternDemo() {
    ShapeCache.loadCache();

    const clonedCircle = ShapeCache.getShape("circle");
    if (clonedCircle) {
        clonedCircle.draw();
    }

    const clonedRectangle = ShapeCache.getShape("rectangle");
    if (clonedRectangle) {
        clonedRectangle.draw();
    }
}

prototypePatternDemo(); // Prototype Interface
interface Shape {
clone(): Shape;
draw(): void;
}
// Concrete Prototype 1: Circle
class Circle implements Shape {
private radius: number;
constructor(radius: number) {
this.radius = radius;
}
draw(): void {
console.log(`Drawing Circle with radius: ${this.radius}`);
}
clone(): Shape {
return new Circle(this.radius); // Shallow copy
}
}
// Concrete Prototype 2: Rectangle
class Rectangle implements Shape {
private width: number;
private height: number;
constructor(width: number, height: number) {
this.width = width;
this.height = height;
}
draw(): void {
console.log(`Drawing Rectangle with width: ${this.width} and height: ${this.height}`);
}
clone(): Shape {
return new Rectangle(this.width, this.height); // Shallow copy
}
}
// Client Code
class ShapeCache {
private static shapeMap: Map<string, Shape> = new Map();
// Loading shapes into cache
public static loadCache(): void {
const circle = new Circle(5);
const rectangle = new Rectangle(10, 20);
ShapeCache.shapeMap.set("circle", circle);
ShapeCache.shapeMap.set("rectangle", rectangle);
}
public static getShape(shapeType: string): Shape | undefined {
const cachedShape = ShapeCache.shapeMap.get(shapeType);
if (cachedShape) {
return cachedShape.clone(); // Clone instead of creating new object
}
return undefined;
}
}
// Demo
function prototypePatternDemo(): void {
ShapeCache.loadCache();
const clonedCircle = ShapeCache.getShape("circle");
if (clonedCircle) {
clonedCircle.draw();
}
const clonedRectangle = ShapeCache.getShape("rectangle");
if (clonedRectangle) {
clonedRectangle.draw();
}
}
prototypePatternDemo(); Explanation
- Prototype Interface: Shape defines a clone() method for cloning objects.
- Concrete Prototypes: Circle and Rectangle implement the clone() method to return copies of their objects.
- ShapeCache: Stores a collection of shapes and provides a way to retrieve clones of those shapes.
- Client Code: Demonstrates cloning shapes using the ShapeCache instead of creating new instances manually.
Applications of Prototype Design Pattern
- Game Development: Clone characters, levels, or objects quickly.
- Document Templates: Duplicate documents or tables for easy customization.
- UI Design: Clone common UI elements like buttons or icons.
- Database Records: Create similar records by cloning an existing one.
- Networking: Clone communication packets for different versions.
- Deep Copying: Efficiently clone complex objects with nested structures.
- Software Configurations: Clone templates for different environment setups.
When to use the Prototype Design Pattern?
- Expensive Object Creation: It is more efficient to clone an existing object rather than create new ones, as the former requires a lot of resources (memory or time).
- Several Object Configurations: When numerous objects need to be made, each with a little modification based on a shared prototype.
- Avoiding Complex Constructors: The Prototype pattern makes object creation simpler by cloning when it requires a complex setup or a lot of constructor inputs.
- Modifying an Object Copy Without Changing the Original: When you need to make changes to a duplicated object without affecting the original.
- Dynamic Object Creation at Runtime: This is used when it's necessary to generate new objects on the fly, particularly when the class structure is unknown beforehand.
When not to use the Prototype Design Pattern?
- Simple Object Creation: When object creation is straightforward, and the cost of instantiating new objects is low, the Prototype pattern adds unnecessary complexity.
- Objects with No Need for Copying: If the objects you're working with don’t require frequent copying or cloning, the Prototype pattern may not be helpful.
- Complex Cloning Logic: If the objects involve complex references, deep copying, or circular dependencies, implementing a proper clone method can be tricky and error-prone.
- Immutable Objects: If objects are immutable (cannot be changed after creation), cloning is unnecessary because new objects would have to be created from scratch regardless.
- Readily Available Constructors: If creating objects through constructors is easy and not resource-intensive, there's no need to implement cloning.
Advantages of Prototype Design Pattern
- Reduces object creation time by cloning instead of creating from scratch.
- Simplifies complex object creation by reusing pre-configured objects.
- Avoids complex constructors by cloning existing objects.
- Supports dynamic object creation at runtime.
- Eases object customization without altering the original.
- Decouples object creation from the client, improving maintainability.
Disadvantages of Prototype Design Pattern
- Complex cloning logic for deep or circular references.
- Performance overhead due to cloning large or complex objects.
- Inheritance issues with unintended side effects in prototypes.
- Shallow copy problems where shared references may be affected.
- Increased memory usage from maintaining multiple prototypes and clones.
Prototype Design Patterns Relations with Other Patterns
- Singleton Pattern: Ensures a single instance vs. cloning existing instances.
- Builder Pattern: Constructs complex objects step-by-step vs. cloning pre-configured objects.
- Factory Method Pattern: Creates objects using methods vs. cloning existing ones.
- Abstract Factory Pattern: Creates families of related objects vs. cloning prototypes within a family.
- Prototype Registry: Manages and clones prototypes vs. general Prototype pattern.
- Chain of Responsibility Pattern: Clones request handlers or objects used in the chain.
Conclusion
In conclusion, we have explored the prototype design pattern that allows for efficient object creation by cloning existing objects instead of building new ones from scratch. It simplifies and speeds up object management, particularly when creation is complex or costly. While it offers significant benefits, such as reduced overhead and enhanced flexibility.
By 2026, 75% of enterprise apps will demand .NET architecture mastery. Stay ahead of the curve, join our .NET Architecture Training and dominate the job market!
FAQs
Take our Designpatterns skill challenge to evaluate yourself!

In less than 5 minutes, with our skill challenge, you can identify your knowledge gaps and strengths in a given skill.

