26
DecDevOps Pipeline: A Complete Guide to Streamlined Software Delivery
DevOps Pipeline
DevOps pipelines are a game changer when it comes to automating and streamlining your software development and deployment process. They help teams collaborate efficiently, reduce errors, and speed up the delivery of high-quality software. If you're looking to enhance your workflow and embrace a more automated approach, a DevOps pipeline is the way to go.
In this Azure DevOps tutorial, we'll walk you through the essentials of setting up a DevOps pipeline using Azure DevOps. You'll learn how to automate the build, test, and deployment processes, making it easier to deliver software faster and more reliably. Ready to get started? Let’s explore it!
| Read More: DevOps Interview Questions and Answers |
What is the DevOps Pipeline?
A DevOps pipeline is a set of automated processes that help you build, test, and deploy your software quickly and reliably. It connects development and operations teams so they can collaborate smoothly.
Imagine reducing the time spent on manual tasks and ensuring your software is always ready for release. With a DevOps pipeline, you can focus more on delivering value and less on repetitive tasks. Isn’t that what you’ve been looking for?
| Read More: What is DevOps and DevOps Advantages |
DevOps Methodology
DevOps methodology is all about bringing development and operations together to work as one cohesive unit. It focuses on automating processes, improving collaboration, and delivering software more frequently and reliably. You get to build and deploy faster without sacrificing quality. It’s a shift in mindset – instead of working in silos, teams work together to achieve common goals.
How do you think DevOps could improve your current workflow or project delivery?
Continuous Delivery Pipeline
Continuous Delivery Pipeline is a key part of modern software development. It helps you get new features, bug fixes, and updates into the hands of users faster and more reliably. With CD, you can automate the process of getting your code into production, ensuring a smooth and efficient delivery pipeline.
- Faster Bug Fixes & Feature Delivery: CD allows quick fixes and new features to be pushed into production with minimal delay.
- Smaller Batches: By working in smaller batches, updates are easier to test and deploy, reducing the risk of errors.
- Faster User Feedback: Since updates are delivered quickly, you can gather user feedback much sooner.
- Reduced Time & Cost: Working in smaller increments means less time spent on lengthy development cycles, cutting down overall project costs.
| Read More: Azure Pipelines |
Benefits of Using a DevOps Pipeline
Here’s why using a DevOps pipeline can truly transform your development process:
- Faster Software Delivery: A DevOps pipeline automates the entire process, from building and testing to deployment. This means you can release updates and new features much faster without the long wait times associated with manual processes.
- Improved Collaboration: DevOps encourages better teamwork between development and operations teams. With a shared focus on continuous delivery and automation, everyone is on the same page, leading to smoother workflows and faster problem-solving.
- Higher Quality: Continuous testing is built into the pipeline, ensuring that bugs and issues are detected early in the development process. This leads to higher-quality software since problems are caught and fixed before they reach production.
- Increased Efficiency: Automation reduces the need for manual intervention in tasks like deployment or testing, which means fewer human errors and a faster, more reliable process. This efficiency boosts productivity and ensures that your team spends more time on meaningful work rather than repetitive tasks.
- Faster Feedback: With every change automatically tested and deployed, you get instant feedback on code changes. This allows you to quickly identify issues, improve features, and adapt to user needs without waiting for lengthy review cycles.
Wouldn’t it be great to have more time for innovation and less for fixing errors? A DevOps pipeline lets you do just that!
How to Build a DevOps Pipeline
Building a DevOps pipeline might seem like a big task, but it’s all about setting up the right processes and tools that automate the software delivery lifecycle. Let’s break it down into manageable steps so you can get started with confidence.
The Components of a DevOps Pipeline
- Source Code Management: This is where all your code is stored and version-controlled, typically using platforms like Git. It ensures that your team has access to the most up-to-date codebase.
- Continuous Integration (CI): This part automates the process of merging code changes into a shared repository. It involves running tests automatically whenever new code is added, ensuring any issues are caught early.
- Continuous Delivery (CD): Once the code is tested and validated, CD automates the process of deploying it to production or staging environments, ensuring that updates are delivered quickly and reliably.
- Automated Testing: Automated tests ensure that your code works as expected and doesn’t break existing functionality. This can include unit tests, integration tests, and other forms of automated validation.
- Monitoring & Logging: Monitoring tools track the health and performance of your application in production, while logging helps you troubleshoot issues and improve the system over time.
Steps to Build a DevOps Pipeline
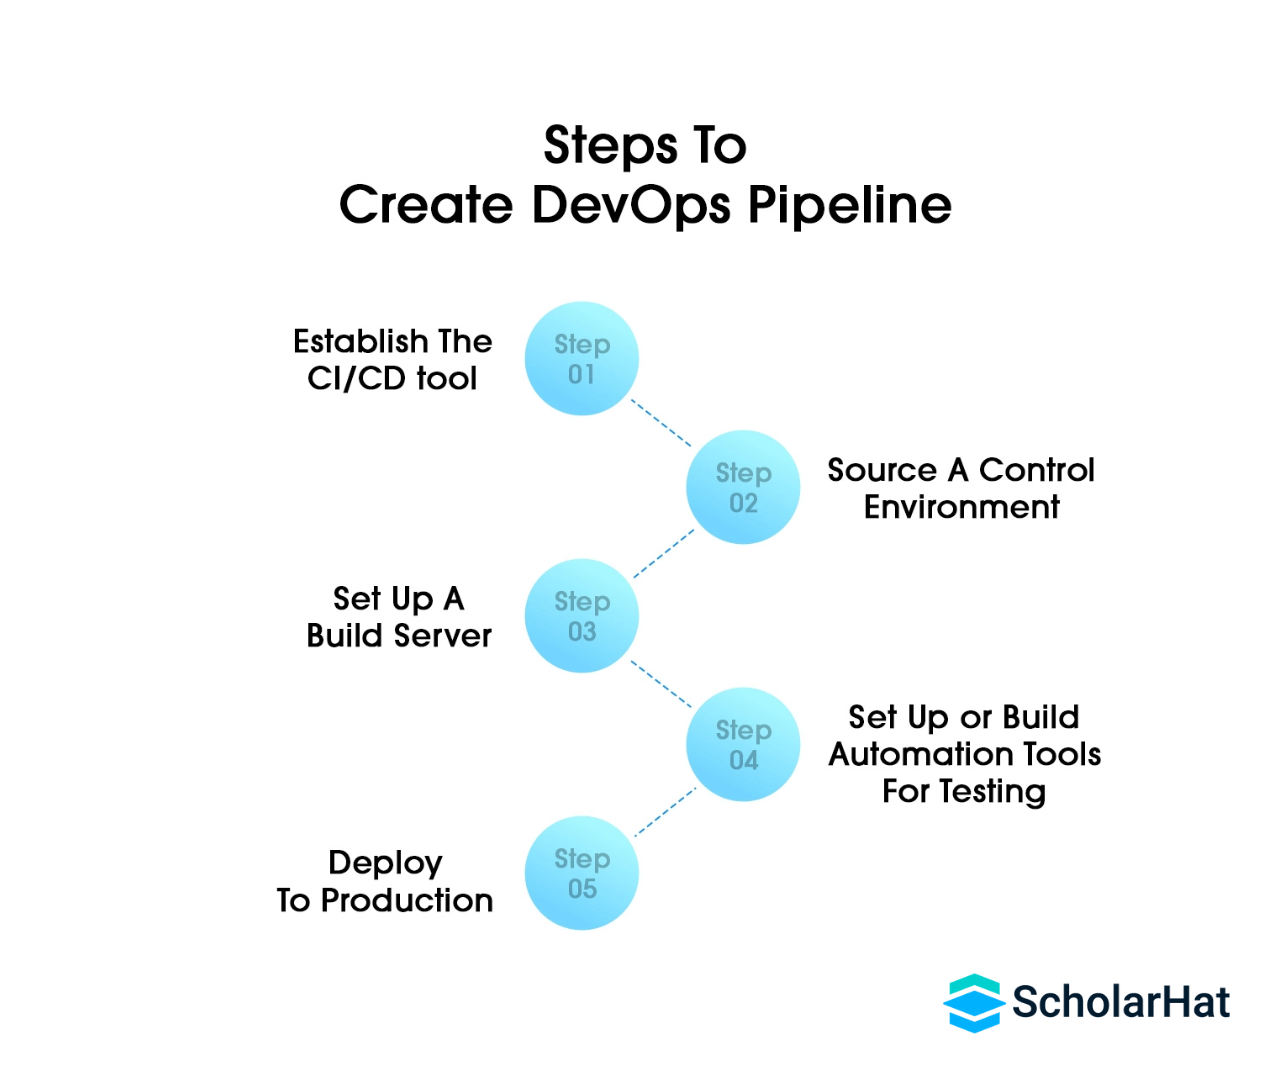
- Set Up Version Control: Start by choosing a version control system like Git to manage your codebase. Create repositories for your projects and organize your code in a way that supports collaboration.
- Automate Build Process: Use tools like Jenkins or Azure DevOps to automate the building process. Whenever a developer commits new code, the pipeline should automatically trigger the build process to ensure there are no errors.
- Integrate Automated Tests: Incorporate automated testing into the pipeline. This step ensures that your code is continuously validated and any bugs are identified before they reach production.
- Deploy to Staging/Production: Set up continuous deployment (CD) to push code automatically to staging or production environments after it has passed all tests. Tools like Kubernetes or Docker can simplify containerized deployments.
- Set Up Monitoring and Feedback Loops: Once your application is deployed, continuously monitor its performance and log important metrics. Use this feedback to make improvements and fix any issues promptly.
Building your own DevOps pipeline is easier than it sounds when you break it down into clear steps. Ready to start automating your software delivery process?
| Read More: Kubernetes vs Docker: Analyzing the Differences |
Best Practices for Building a DevOps Pipeline
To ensure your DevOps pipeline is efficient, reliable, and scalable, following these best practices will set you up for success:
1. Start Small and Scale Gradually
Don’t try to build the perfect pipeline right from the start. Begin with a simple setup and gradually add more automation and features as you go. This helps avoid overwhelm and allows you to refine the process over time.
2. Automate Everything
The key to a successful DevOps pipeline is automation. Automate everything from code testing, building, and deployment to monitoring and feedback. This reduces human error and speeds up the process.
3. Ensure Fast Feedback Loops
The quicker you get feedback, the faster you can fix issues. Automate testing and integrate tools that provide real-time feedback, allowing developers to address bugs or issues as soon as they arise.
4. Maintain Consistent Environments
Use containerization tools like Docker or Kubernetes to ensure that the development, testing, and production environments are consistent. This eliminates environment-specific issues and helps avoid surprises when deploying.
5. Version Control for Everything
Ensure that not just your code but also your configuration files, deployment scripts, and infrastructure code are under version control. This keeps track of changes and allows you to roll back to previous versions if needed.
6. Focus on Security
Integrate security practices early in the pipeline. Implement automated security checks like static code analysis, vulnerability scanning, and permissions management to avoid security breaches down the line.
7. Monitor and Continuously Improve
Once your pipeline is set up, don't just leave it. Continuously monitor its performance and gather feedback from your team to improve it. Make sure you’re constantly adapting to new tools and technologies that can optimize the pipeline further.
8. Collaborate and Communicate
DevOps is all about collaboration. Ensure clear communication between developers, operations, and other teams. Use tools that enable collaboration and transparency throughout the pipeline.
By following these best practices, you’ll build a DevOps pipeline that’s robust, efficient, and adaptable. Ready to implement them in your own pipeline?
Managing CI/CD Pipelines from the Application Portfolio Management Perspective
When managing CI/CD pipelines from an Application Portfolio Management (APM) perspective, it’s important to align your pipeline strategy with your overall business and application goals. APM helps ensure that your applications and their associated pipelines deliver maximum value while minimizing risks and inefficiencies.
Here’s how to approach it:
1. Align Pipelines with Business Objectives
Each CI/CD pipeline should serve a clear business purpose. By understanding the goals of the applications in your portfolio, you can prioritize which pipelines to optimize or create. Ensure that each pipeline’s output directly supports the larger objectives of the business, such as improving user experience or reducing operational costs.
2. Categorize and Prioritize Applications
Not all applications in your portfolio will have the same priority. Classify your applications based on factors like business criticality, customer impact, and maintenance cost. This will allow you to decide which applications should get more attention and resources in terms of pipeline management.
3. Standardize Pipelines for Efficiency
While each application might have unique needs, aim to standardize pipeline processes where possible. This makes it easier to scale and maintain your CI/CD workflows, reducing overhead while ensuring consistency across your portfolio.
4. Automate Governance and Compliance
Managing a portfolio of applications requires strong governance. Automate compliance checks within your CI/CD pipelines to ensure all applications meet required security and regulatory standards. This reduces risk and ensures consistency across the portfolio.
5. Track Metrics and KPIs
Establish key performance indicators (KPIs) to monitor the health and effectiveness of your CI/CD pipelines. Metrics like deployment frequency, lead time for changes, and failure rates can give you valuable insights into how well your pipelines are performing and where improvements are needed.
6. Optimize for Cost and Resource Management
Application Portfolio Management also involves managing resources effectively. Monitor the cost of running multiple pipelines and look for opportunities to consolidate or optimize the pipeline processes for cost efficiency without sacrificing quality.
7. Continuous Improvement and Adaptation
As your application portfolio evolves, so should your CI/CD pipelines. Regularly review your pipeline performance and make improvements based on lessons learned, new tools, or changes in business needs. Adapt your pipeline strategy to fit evolving business goals and technological advancements.
Managing CI/CD pipelines from an Application Portfolio Management perspective helps ensure that your development processes are strategic, efficient, and aligned with overall business goals. Are you ready to take a more holistic approach to pipeline management in your organization?
| Read More: Building CI/CD Pipeline with Azure DevOps |
Examples of DevOps Pipeline Configurations
DevOps pipelines can be configured in different ways depending on the needs of the project, team, and organization. Below are some common examples of DevOps pipeline configurations:
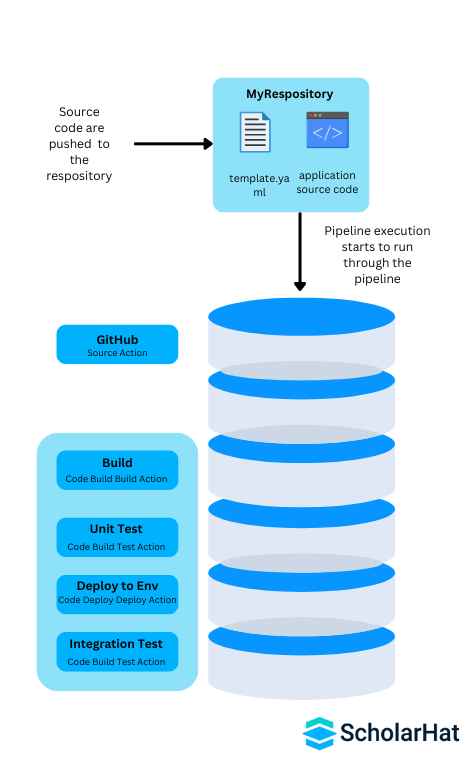
1. Basic CI Pipeline
A simple Continuous Integration (CI) pipeline focuses on automating the build and test process to ensure code quality. Here’s an example of a basic CI pipeline:
- Source Control: Git repository (GitHub, GitLab, Bitbucket)
- Build Stage: Jenkins or Azure DevOps builds the application upon code commit
- Test Stage: Automated unit tests run after the build process to catch bugs early
- Notifications: Send notifications (Slack, email) on build status
This pipeline is focused on ensuring that every commit is tested and verified before it moves forward.
2. CI/CD Pipeline with Automated Deployment
This configuration extends the CI pipeline by adding automated deployment to a staging or production environment after the build and test stages:
- Source Control: Git repository (GitHub, GitLab, Bitbucket)
- Build Stage: Jenkins, CircleCI, or GitLab CI builds the application on each commit.
- Test Stage: Unit, integration, and other automated tests run to validate code quality
- Deployment Stage: Code is automatically deployed to a staging environment (Kubernetes, Docker)
- Approval Stage: Optional manual approval before deployment to production
- Production Deployment: Code is automatically deployed to the production environment after approval
- Notifications: Slack, email, or other notifications about deployment success/failure
This pipeline automates both the testing and deployment processes, ensuring rapid delivery of code to production.
3. Multi-Environment CI/CD Pipeline
A multi-environment pipeline is used when you need to deploy the same application across multiple environments (e.g., dev, test, staging, and production). Here’s how such a pipeline might be configured:
- Source Control: Git repository (GitHub, GitLab, Bitbucket)
- Build Stage: Jenkins or Azure DevOps builds the application from the main branch
- Test Stage: Unit tests, integration tests, and security scans run for each environment
- Environment 1 (Dev): Deploy to the development environment after passing tests
- Environment 2 (Test): Deploy to a test environment for further validation
- Environment 3 (Staging): Deploy to a staging environment for final validation and user acceptance
- Approval Stage: Manual approval from stakeholders before production deployment
- Production Deployment: Deploy to production after all tests and approval stages
- Monitoring & Feedback: Monitor production and gather feedback for improvements
This configuration ensures the application works well in all environments and provides controlled release to production.
4. CI/CD with Blue-Green Deployment
Blue-Green Deployment minimizes downtime and risk by maintaining two environments: one active (Blue) and one idle (Green). Here's how this configuration works:
- Source Control: Git repository (GitHub, GitLab, Bitbucket)
- Build Stage: Jenkins or GitLab CI builds the application from the main branch
- Test Stage: Unit and integration tests run before deployment
- Blue Environment: Deploy to the Blue environment while the Green environment is still active
- Switch Traffic: After successful tests, switch traffic from Blue to Green
- Rollback Option: If something goes wrong, quickly rollback to Blue
- Production Deployment: The blue environment is now idle while the Green serves as production
This configuration helps ensure minimal downtime and a fast rollback strategy if the deployment fails.
5. CI/CD Pipeline with Infrastructure as Code (IaC)
With this configuration, infrastructure management is integrated into the CI/CD pipeline using Infrastructure as Code (IaC) tools like Terraform or CloudFormation. This allows you to manage infrastructure in a consistent and automated way:
- Source Control: Git repository (GitHub, GitLab, Bitbucket)
- Build Stage: Jenkins or GitLab CI builds the application
- Infrastructure Stage: Use IaC tools to provision and manage cloud infrastructure
- Test Stage: Run automated tests to validate both code and infrastructure
- Deployment Stage: Deploy application and infrastructure to staging or production
- Rollback Plan: Implement automated rollback strategies for infrastructure changes
Integrating IaC into your pipeline allows for more controlled and repeatable deployments, ensuring infrastructure consistency across environments.
These examples show different ways you can configure a DevOps pipeline based on your project’s needs. Each approach focuses on automating specific parts of the software delivery process to increase speed, consistency, and reliability.
Strategies for Maintaining and Improving the Performance of Your Pipeline
Ensuring that your DevOps pipeline runs smoothly and efficiently is key to delivering high-quality software at speed. Here are some strategies you can implement to maintain and improve the performance of your pipeline:
1. Continuously Monitor Pipeline Health
Monitoring the performance of your pipeline is essential to identify bottlenecks and improve its efficiency. Use monitoring tools to track key metrics such as:
- Build Time: Track how long it takes to build and test the code to ensure the pipeline is efficient.
- Failure Rate: Monitor the frequency of pipeline failures and take action to fix recurring issues.
- Deployment Time: Analyze how quickly your application is deployed to different environments.
Regular monitoring helps you identify areas for improvement and allows you to optimize your pipeline over time.
2. Automate Testing for Speed and Consistency
Automated testing is one of the most effective ways to ensure that your pipeline runs efficiently. It helps catch bugs early, reduces manual effort, and speeds up the development cycle. Consider the following testing strategies:
- Unit Tests: Run unit tests early in the pipeline to catch bugs in small code changes.
- Integration Tests: Validate how different components of the system work together after new changes are made.
- End-to-End Tests: Test the full application to ensure everything functions as expected after all changes.
Incorporating automated tests ensures that each stage of your pipeline is optimized for speed and accuracy, reducing time spent on manual testing.
3. Optimize Build and Deployment Times
Long build and deployment times can slow down the entire pipeline, leading to delays in delivering new features or fixes. Here’s how you can improve build and deployment performance:
- Parallel Builds: Break down your build process into smaller tasks that can run in parallel, reducing overall build time.
- Incremental Builds: Instead of rebuilding the entire application, use incremental builds that only rebuild parts of the application that have changed.
- Containerization: Use containers (e.g., Docker) to speed up deployments by ensuring consistent environments across stages.
Optimizing build and deployment processes reduces delays and helps improve the overall pipeline performance.
4. Implement Caching Strategies
Caching can significantly speed up your pipeline by storing frequently used dependencies and files or building artifacts. Consider using the following caching strategies:
- Dependency Caching: Cache external dependencies (e.g., npm packages, Docker images) so they don’t need to be fetched every time.
- Build Artifact Caching: Cache build artifacts to avoid redundant rebuilding, saving both time and resources.
- Docker Layer Caching: Leverage Docker’s built-in layer caching to speed up container builds.
Caching makes your pipeline faster and more efficient, allowing for quicker execution and less redundant work.
5. Prioritize Critical Pipeline Stages
Not all stages in the pipeline are equally important for every project. Prioritize the stages that have the most impact on your application’s performance and user experience:
- Critical Path Testing: Ensure that tests that are most important for the system’s functionality are completed first.
- Fast Feedback: Focus on getting feedback from testing and code quality checks as early as possible in the pipeline to catch issues before they progress.
- Deployment Automation: Streamline and automate your deployment processes to reduce downtime and ensure faster rollouts.
By prioritizing the most critical stages, you can ensure that the pipeline remains efficient without wasting time on less impactful tasks.
6. Regularly Review and Refine Your Pipeline
Your DevOps pipeline should evolve over time. As your team and project grow, it’s important to continually review and refine the pipeline to address new challenges and optimize performance. Follow these steps to ensure continuous improvement:
- Feedback Loops: Collect feedback from team members about bottlenecks or pain points in the pipeline.
- Tool Evaluation: Regularly evaluate the tools you’re using (e.g., Jenkins, GitLab, etc.) to ensure they meet your project’s evolving needs.
- Refactor Code and Processes: Optimize code and pipeline processes to eliminate inefficiencies and enhance performance.
By making continuous improvements, you ensure that your pipeline remains scalable and adaptable to future needs.
7. Integrate Monitoring and Logging
Integrating monitoring and logging into your pipeline allows you to quickly identify issues in both the application and the pipeline itself. Consider these practices:
- Pipeline Monitoring: Use tools to monitor pipeline performance and detect anomalies or failures early.
- Application Monitoring: Integrate monitoring into your application to track performance and user behavior post-deployment.
- Centralized Logging: Set up centralized logging to collect logs from all parts of your pipeline for easier troubleshooting.
These strategies enable you to detect and address issues quickly, improving pipeline efficiency and reducing downtime.
8. Implement Feature Toggles and Blue-Green Deployments
To ensure safe deployments and faster releases, consider using feature toggles and blue-green deployment strategies:
- Feature Toggles: Use feature toggles to release features incrementally without affecting the user experience.
- Blue-Green Deployments: Deploy code to one environment (Blue) while the other (Green) serves live traffic. Switch between them after the deployment is validated.
These strategies allow for smoother, more controlled releases, which reduces the risk of downtime and improves pipeline performance.
By applying these strategies, you’ll be able to optimize your DevOps pipeline, improve performance, and maintain the high speed and quality of your software delivery process.
DevOps Automation, Delivered
DevOps automation is the backbone of modern software delivery, enabling teams to work faster, more reliably, and with higher quality. Automating repetitive tasks in the DevOps pipeline can drastically reduce human error, improve efficiency, and enhance overall system performance. Here’s how DevOps automation can be delivered effectively:
1. Automate Code Integration and Deployment
Automation begins with integrating and deploying code changes. By automating this process, you can ensure that every change is tested, built, and deployed consistently across environments. Key tools for automation include:
- CI/CD Tools: Jenkins, GitLab CI, CircleCI, and Travis CI are some popular tools that automate the integration and deployment process.
- Version Control Systems: Git-based systems like GitHub or Bitbucket enable automated commits, branching, and merging to streamline the integration process.
- Infrastructure as Code (IaC): Tools like Terraform and AWS CloudFormation automate infrastructure provisioning and management.
By automating these processes, you ensure that each code change is validated and deployed automatically, saving time and reducing errors.
2. Implement Automated Testing
Automated testing is essential for ensuring that code changes do not introduce bugs or regressions. It helps maintain high quality while speeding up the testing phase in the DevOps pipeline. Consider automating the following tests:
- Unit Tests: Run unit tests on individual components of the application to ensure they function as expected.
- Integration Tests: Test how different parts of the system interact to make sure that changes in one component do not break another.
- End-to-End Tests: Simulate user journeys to ensure that the application works properly in a real-world scenario.
- Performance Testing: Automate performance tests to measure load times, throughput, and response times to identify bottlenecks.
Automating tests ensures that all changes are validated quickly, helping to maintain high-quality standards while speeding up the release cycle.
3. Automate Configuration Management
Configuration management is a critical part of ensuring that applications are deployed consistently across multiple environments. By automating this process, you eliminate configuration drift and reduce errors caused by manual interventions. Tools for automated configuration management include:
- Chef: Automates the configuration of infrastructure by writing scripts that can configure both operating systems and applications.
- Ansible: A powerful automation tool that automates the configuration of applications and infrastructure.
- Puppet: Helps automate the management of system configurations across your infrastructure, ensuring consistency across environments.
Automating configuration management improves consistency and reliability, leading to fewer issues during deployment and fewer manual interventions needed.
4. Use Containers and Orchestration
Containers are an essential part of modern DevOps automation, as they allow applications to run in isolated environments that can be easily replicated across different stages of the pipeline. Containerization tools like Docker help automate the creation and deployment of containers, while orchestration tools like Kubernetes help manage and scale these containers.
- Docker: Automates the packaging of applications into containers, allowing them to run consistently in any environment.
- Kubernetes: Automates the orchestration of containerized applications, handling scaling, load balancing, and container management.
- OpenShift: A Kubernetes-based platform that automates deployment, scaling, and management of containerized applications.
By automating container management, you can easily deploy applications at scale and with minimal effort, ensuring consistent environments across the entire pipeline.
5. Automate Monitoring and Feedback
Automation doesn’t stop at deployment; continuous monitoring and feedback are essential to ensure that the system performs optimally in production. Automated monitoring tools collect performance data, detect anomalies, and provide feedback in real time. Popular tools include:
- Prometheus: An open-source monitoring tool that automatically collects and stores time-series data, providing real-time insights into system performance.
- Grafana: Used alongside Prometheus, Grafana automates the visualization of performance data to detect issues early.
- ELK Stack (Elasticsearch, Logstash, Kibana): This stack automates log aggregation, parsing, and visualization to help you monitor application behavior in real time.
Automated monitoring ensures that you are always aware of issues in production, and real-time feedback allows your teams to respond quickly to performance problems.
6. Ensure Security Automation
Security must be embedded into the DevOps pipeline to prevent vulnerabilities from reaching production. Automation tools for security allow for the continuous scanning of code, infrastructure, and applications for potential risks. Key tools include:
- Static Application Security Testing (SAST): Automatically scans source code for vulnerabilities before it is committed.
- Dynamic Application Security Testing (DAST): Analyzes running applications for security vulnerabilities in real time.
- Infrastructure as Code (IaC) Scanning: Tools like Checkov and tfsec automate security checks for your infrastructure code, ensuring compliance with best practices.
Automating security checks ensures that vulnerabilities are caught early, reducing the risk of security breaches in production.
7. Scale Automation with AI and Machine Learning
Incorporating artificial intelligence (AI) and machine learning (ML) into DevOps automation can further enhance the speed and effectiveness of the pipeline. For example:
- Predictive Analytics: AI can predict failures before they occur by analyzing past data and patterns, allowing teams to take preventive measures.
- Automated Root Cause Analysis: ML algorithms can automatically identify the root cause of failures, speeding up troubleshooting and resolution.
- Self-Healing Systems: AI can autonomously identify and resolve system issues, improving uptime and reducing manual intervention.
By leveraging AI and ML, you can further automate your pipeline and enhance the accuracy of problem detection and resolution, leading to more efficient operations.
Summary
This article covered the essentials of DevOps pipelines, including their configurations, best practices, and real-world examples. It highlighted key steps for building and managing pipelines, emphasizing automation, faster delivery, and continuous feedback. Whether you're new to DevOps or optimizing existing workflows, these insights help create efficient, scalable pipelines aligned with business goals.
Want to master DevOps? Enroll in Scholarhat's Azure DevOps course and take your skills to the next level!
FAQs
Take our Devops skill challenge to evaluate yourself!

In less than 5 minutes, with our skill challenge, you can identify your knowledge gaps and strengths in a given skill.

