


15
MarJenkins CI/CD Pipeline
05 Feb 2025
Beginner
2.51K Views
40 min read
Understanding Jenkins CI/CD Pipeline
Jenkins is a popular open-source automation server that helps streamline the software development process. By using a Jenkins CI/CD pipeline, you can automate building, testing, and deploying your applications, making development faster, more reliable, and more efficient.
In this DevOps tutorial, I will walk you through the basics of setting up a Jenkins CI/CD pipeline. Do not worry if you are new to it. We will break everything down step by step so you can easily understand and implement it in your projects. Ready to learn how Jenkins can simplify your development process? Let us dive in!
What is a CI/CD Pipeline?
CI/CD stands for Continuous Integration and Continuous Deployment. Let’s first understand what a pipeline means. In computing, a pipeline is a series of stages or processes that work together to create a processing system. Each stage takes an input, processes it based on a set of rules, and sends the output to the next stage. The final output comes from the last stage in the pipeline.
| Read More: Continuous Delivery vs Continuous Deployment |
Wondering how it works? Think of it as a series of steps you might follow, like these:
- Test your code: It verifies that your code works as expected.
- Build your application: Combine your code and dependencies to create a deployable package.
- Push to a repository: Save the updated code in a version control system like Git.
- Deploy to the server: Release your application to a production or staging environment.
This pipeline ensures you deliver high-quality software quickly and efficiently. Isn’t it amazing how it simplifies complex processes?
Jenkins Overview: The CI/CD Game-Changer
Jenkins is a powerful automation server that simplifies CI/CD pipelines. It helps you build, test, and deploy software faster and more efficiently.
What is Jenkins?
Jenkins is an open-source automation server designed to streamline software development by automating tasks like building, testing, and deploying applications. Written in Java, it’s highly versatile and integrates with numerous tools, making it a favorite for CI/CD pipelines.
Why Use Jenkins for CI/CD?
Why should you choose Jenkins for your CI/CD processes? Here’s why:
- Efficiency: Automates repetitive tasks, saving time and effort.
- Integration: Works seamlessly with tools like Git, Docker, and Kubernetes.
- Flexibility: Supports any programming language and version control system.
- Scalability: Suitable for projects of any size, from startups to enterprises.
| Read More: Kubernetes Interview Questions |
Core Features of Jenkins
- Pipeline as Code: Define workflows using declarative or scripted pipelines.
- Plugin Ecosystem: Over 1,500 plugins to customize and enhance Jenkins’ functionality.
- Cross-Platform Compatibility: Runs on Windows, macOS, and Unix-based systems like Ubuntu.
- Deployment Flexibility: Host Jenkins on-premise or in the cloud.
- Community Support: Access resources, plugins, and troubleshooting from an active community.
Types of Jenkins Pipelines
Jenkins provides two main types of pipelines to help you automate your CI/CD workflows: Declarative Pipelines and Scripted Pipelines. Both types allow you to define the stages of your build, test, and deployment processes, but they differ in syntax and flexibility.
1. Declarative Pipeline
A Declarative Pipeline provides a more structured and simplified way to define your Jenkins pipeline. It uses a predefined syntax that is easy to read and maintain, making it ideal for beginners and teams that want a simple yet effective CI/CD pipeline.
- Simpler Syntax: Uses a predefined syntax that is easier to read and manage.
- Structure: Follows a predefined structure with defined stages and steps.
- Ideal for Beginners: Best for those who want to quickly set up CI/CD pipelines without deep programming knowledge.
2. Scripted Pipeline
A Scripted Pipeline is more flexible and provides greater control over the pipeline’s behavior. It is written in Groovy and allows for custom logic and advanced configuration. While more complex, it’s ideal for experienced users who need a higher level of control over their build process.
- Greater Flexibility: Allows complex logic and advanced configurations.
- Groovy Scripting: Written in the Groovy programming language for more flexibility.
- Advanced Users: Best suited for those with experience in Jenkins and scripting.
3. Multibranch Pipeline
The Multibranch Pipeline automatically creates Jenkins pipelines for each branch in your repository. It simplifies working with multiple branches by automatically detecting them and creating the necessary pipeline for each, so you don't have to configure each branch’s pipeline manually.
- Automatic Detection: Automatically detects and manages branches in your repository.
- Efficient Branch Management: Ideal for projects with multiple branches.
- Automatic Pipeline Creation: Creates individual pipelines for each branch without manual configuration.
Setting Up Jenkins for CI/CD
Setting up Jenkins for CI/CD is a straightforward process that can be done in just a few steps. Follow these steps to get your Jenkins environment ready for automated builds, tests, and deployments.
1. Install Jenkins
First, you need to install Jenkins on your machine or server. Jenkins can run on various platforms like Windows, macOS, and Linux (Ubuntu, CentOS, etc.).
- Windows: Download the Jenkins installer from the official website and run it.
- macOS: Use Homebrew to install Jenkins with the command
brew install jenkins. - Linux: Use the package manager for your Linux distribution. For example, on Ubuntu, you can use
sudo apt-get install jenkins.
2. Start Jenkins
Once installed, you can start Jenkins by running the following commands based on your operating system:
- Windows: Jenkins will automatically start after installation. Open
http://localhost:8080in your browser. - macOS/Linux: Start Jenkins using the command
sudo service jenkins start.
3. Unlock Jenkins
On your first login, Jenkins will require you to unlock it using an initial admin password. You can find this password in the file /var/lib/jenkins/secrets/initialAdminPassword on Linux or a similar location on other systems. Copy this password and paste it into the setup wizard.
4. Install Required Plugins
After unlocking Jenkins, you’ll be prompted to install some necessary plugins. You can choose to install the recommended plugins or manually select the plugins you need based on your project requirements. Some common plugins for CI/CD include:
- Git Plugin: For integrating Jenkins with Git repositories.
- Pipeline Plugin: To enable Jenkins pipelines for automation.
- Docker Plugin: To work with Docker containers during your CI/CD process.
5. Configure Jenkins
Once the plugins are installed, you need to configure Jenkins. This includes setting up system settings and user permissions and creating your first Jenkins job or pipeline. To configure Jenkins:
- Go to Manage Jenkins from the main dashboard.
- Select Configure System to set environment variables, tools, and other configurations.
6. Create a Jenkins Pipeline
Now that Jenkins is ready, you can create your first CI/CD pipeline. Here’s how:
- From the Jenkins dashboard, click on New Item.
- Enter a name for the pipeline and select Pipeline from the available options.
- In the configuration screen, define your pipeline script. You can write your pipeline using Declarative or Scripted Pipeline syntax.
7. Run the Pipeline
Once you’ve set up your pipeline, you can run it by clicking the Build Now button. Jenkins will execute the pipeline, starting from building the code, running tests, and deploying the application.
How to Create a CI/CD Pipeline with Jenkins
Now that we have a solid understanding of the CI/CD Jenkins Pipeline, it's time to create an efficient CI/CD pipeline using Jenkins. Let’s walk through the process step by step.
1. Prepare the System
Before diving into Jenkins installation, you need to prepare your system. You can use any cloud platform, like an AWS Instance or an Azure Virtual Machine (VM). In this guide, we'll use Azure Virtual Machine.
Stage 1: Build Your Azure Virtual Machine
Start by building your Azure Virtual Machine and selecting the operating system that works best. We recommend using Ubuntu for this setup.
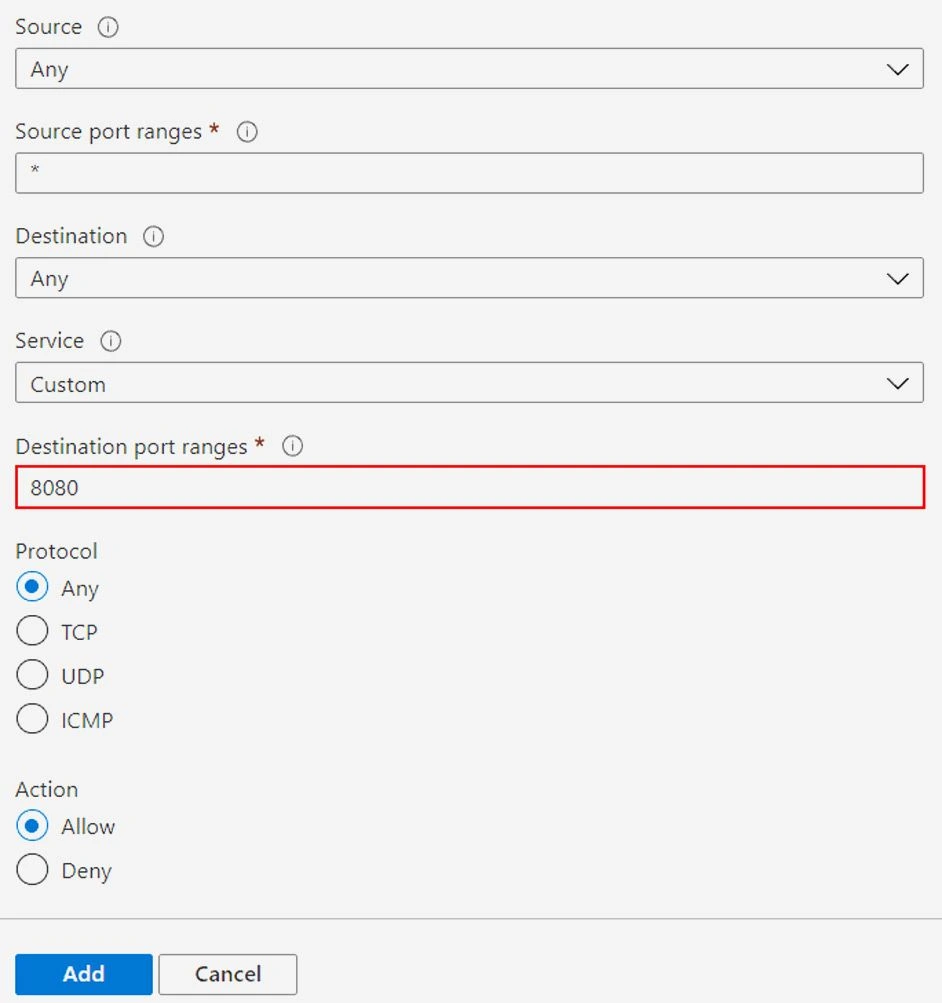
Stage 2: Configure Network Settings
Once your VM is set up, connect to it and go to the search bar. Look for Network Settings and add an Inbound Port Rule. Make sure to open ports 8080 and 8090 for Jenkins and Tomcat.
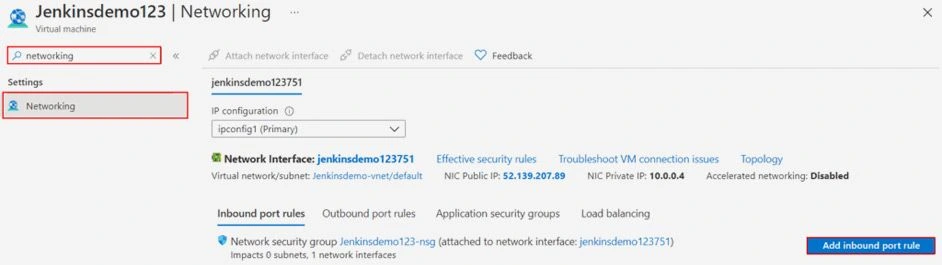
Stage 3: Set the Port
Check that the port range is set to 8080. Add another port rule for 8090 and rename it to avoid confusion. This setup is crucial as Jenkins will use these ports to run.
2. Download and Install Jenkins
Now that your system is ready let’s move on to installing Jenkins.
Stage 1: Install Java Development Kit (JDK)
Run the following command to install the default JDK:
sudo apt update
sudo apt install default-jdk
Stage 2: Install Jenkins
Use the following commands to install the stable version of Jenkins:
wget -q -O - https://pkg.jenkins.io/debian-stable/jenkins.io.key | sudo apt-key add -
sudo sh -c 'echo deb https://pkg.jenkins.io/debian-stable binary/ > /etc/apt/sources.list.d/jenkins.list'
sudo apt-get update
sudo apt-get install jenkins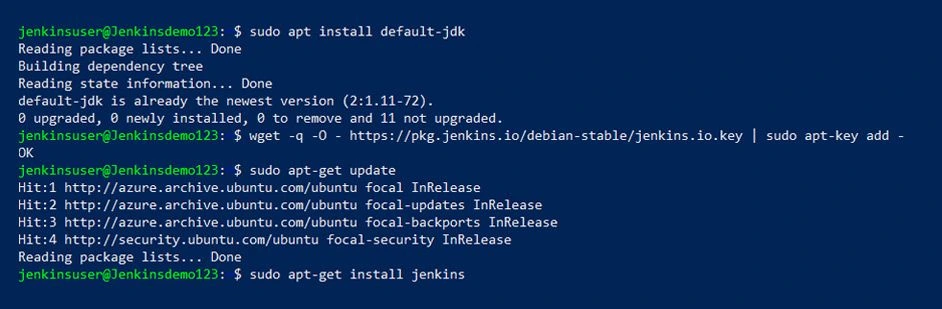
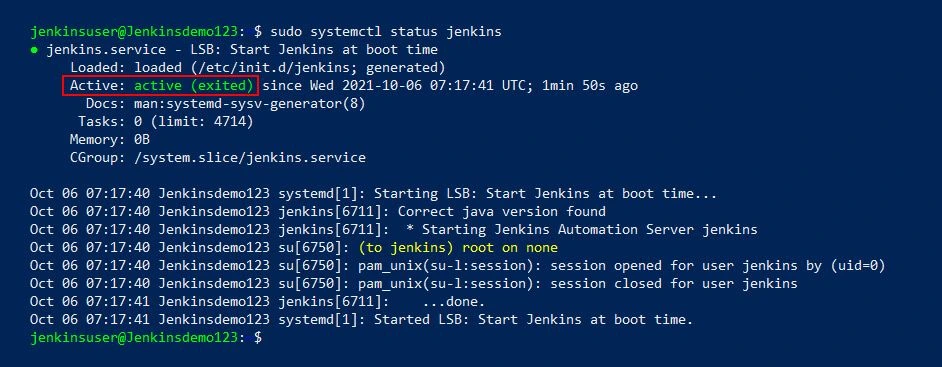
Run this command to ensure Jenkins is installed and running. You should see an Active status:
sudo systemctl status jenkins3. Start and Configure Jenkins
Once Jenkins is installed, it's time to configure it for your CI/CD pipeline.
Stage 1: Get the Public IP Address
Copy the public IP address of your Azure VM. You’ll use this to access Jenkins.
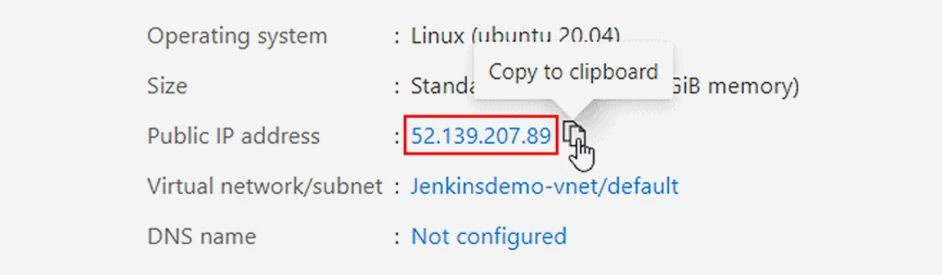
Stage 2: Access Jenkins in the Browser
In your browser, go to http://youripaddress:8080 to access Jenkins.
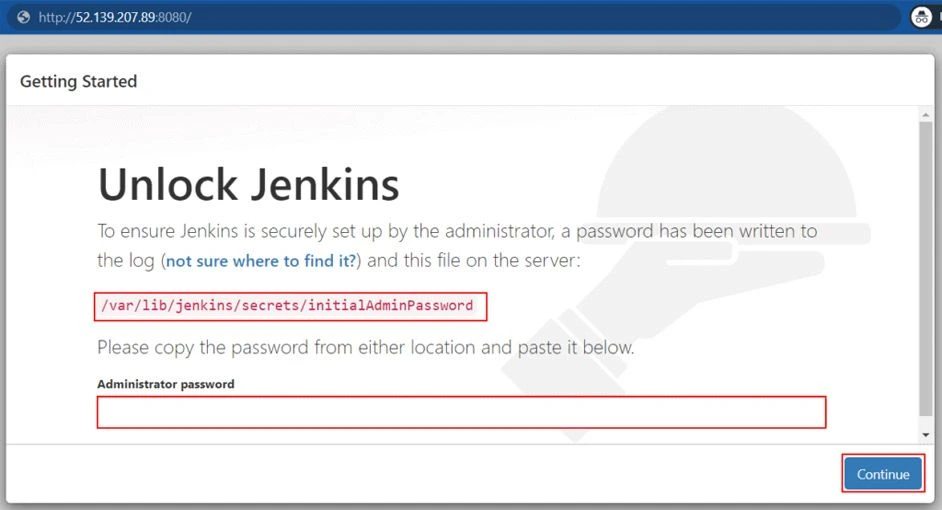
Stage 3: Enter Administrator Password
You'll be prompted for the administrator password. To get it, run the following command on your Jenkins server:
sudo cat /var/lib/jenkins/secrets/initialAdminPasswordStage 4: Install Plugins
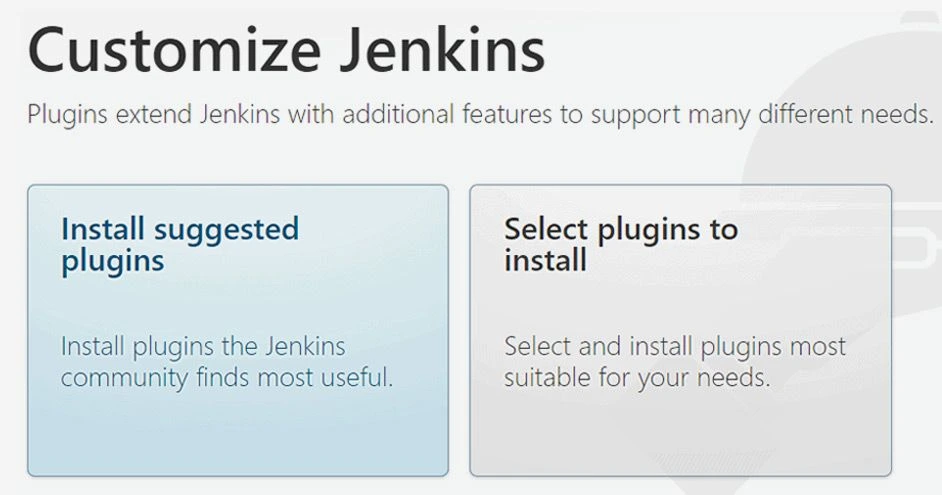
Choose the option to install the suggested plugins for Jenkins.
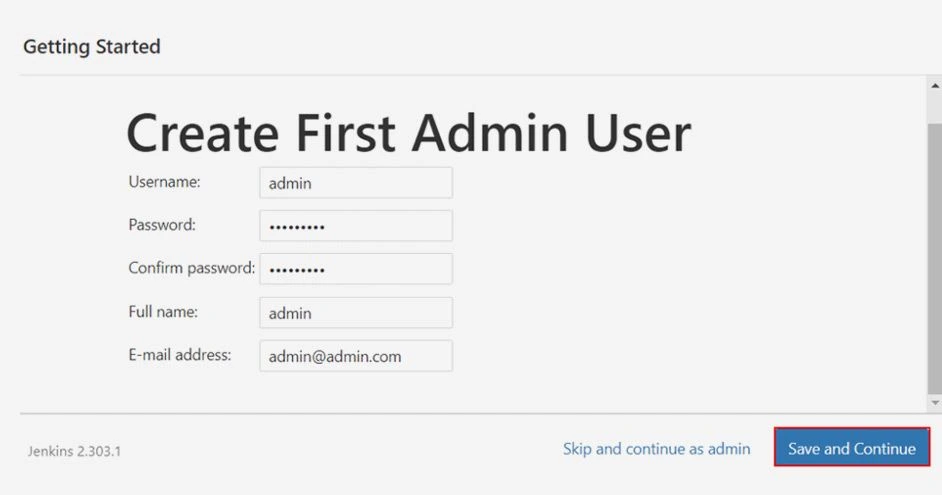
Stage 5: Set Up Admin User
After plugin installation, create a new admin user and save the credentials. This will be your access to Jenkins moving forward.
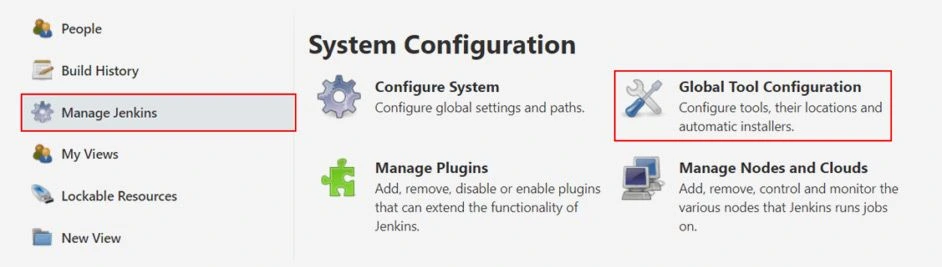
Stage 6: Set Java Location
Jenkins needs to know where Java is located. Run the following command to find the Java directory:
find / -type f -name javaUse the directory path, such as /usr/lib/jvm/java-11-openjdk-amd64/bin/java, and enter it into Jenkins under Global Tool Configuration.

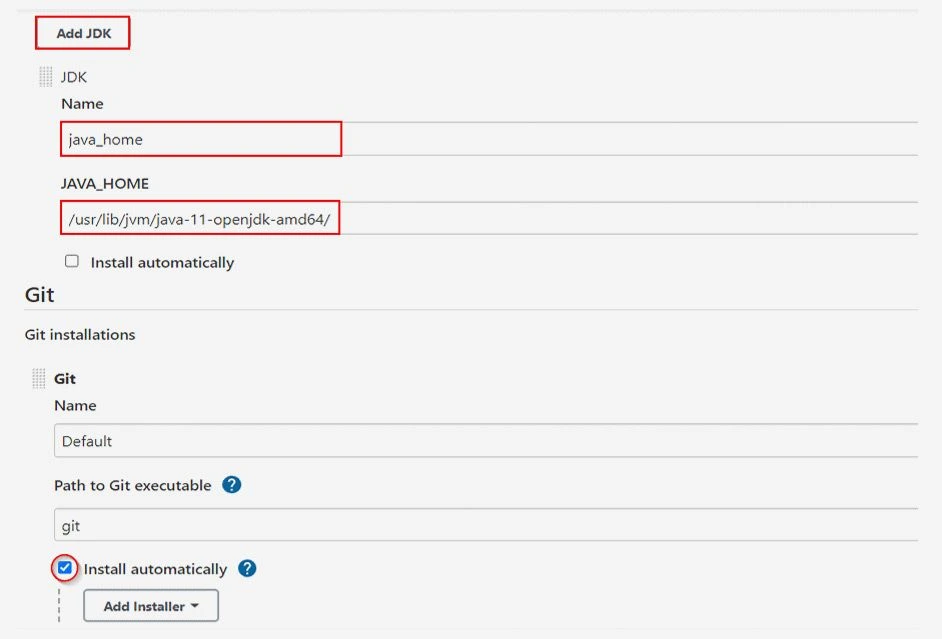
Stage 7: Configure JDK in Jenkins
In the Global Tool Configuration page, unselect “Install automatically,” then add the Java path you found earlier.
Stage 8: Add Maven Configuration
Under the same configuration page, set up Maven by checking the box for Maven and entering the appropriate details.
4. Create Jenkins CI/CD Pipeline
With Jenkins configured, let’s now create the CI/CD pipeline.
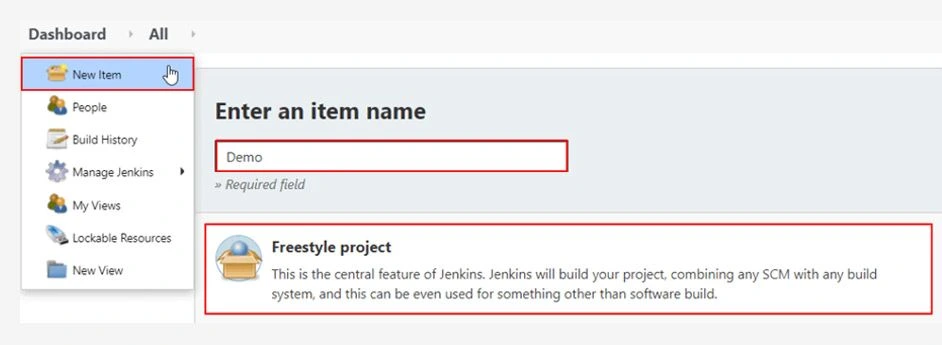
Stage 1: Create a New Item
On the Jenkins dashboard, click on New Item, choose Freestyle project, and give your project a name.
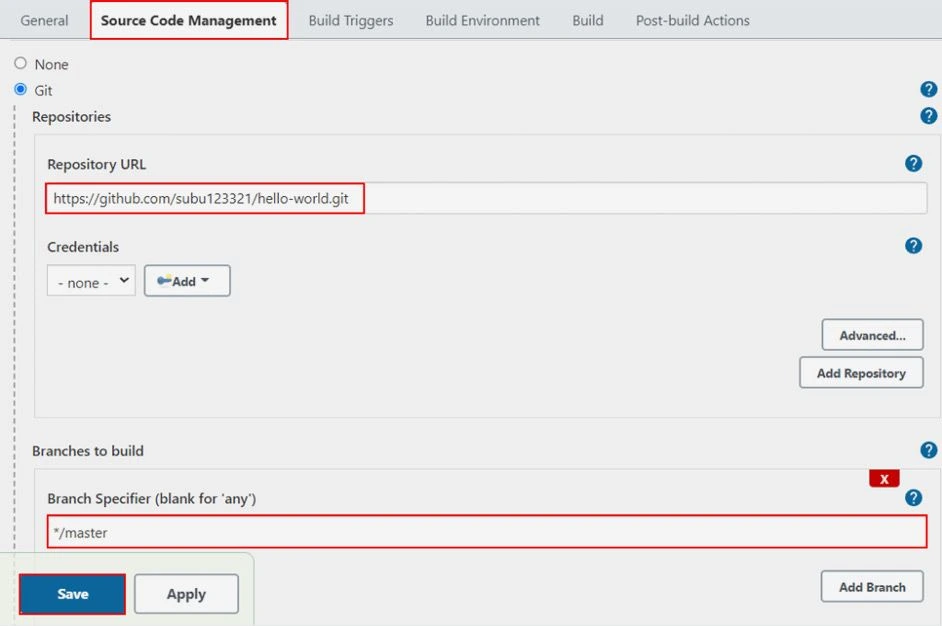
Stage 2: Set Up Source Code Management
In the Source Code Management section, enter the link to your GitHub repository and specify the branch name. Save the configuration.
Stage 3: Build the Project
Click on Build Now to fetch all the files from your repository. Then, click Configure again.

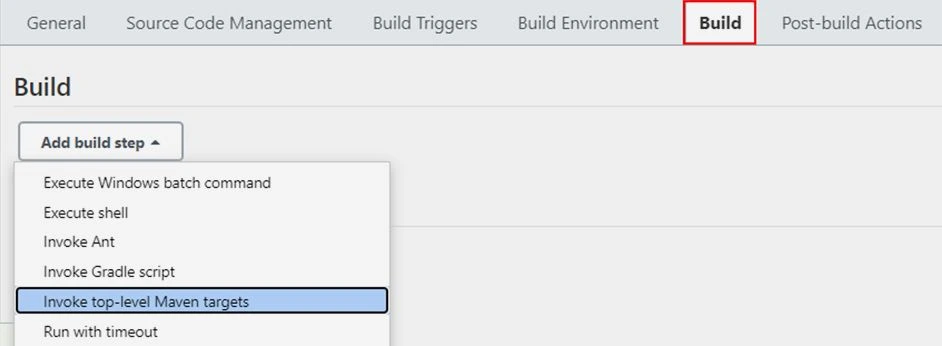
Stage 4: Add Build Step
Go to the Build tab and add the build step Invoke top-level Maven targets.
Stage 5: Define Maven Goals
Select your Maven name and enter the Maven goals needed to create a war file. Save the configuration and run the build again.

Stage 6: Locate the War File
Once the build completes, navigate to the workspace in the Jenkins dashboard to find the war file. Use the following command to list the directory:
cd /var/lib/jenkins/workspace/
ls
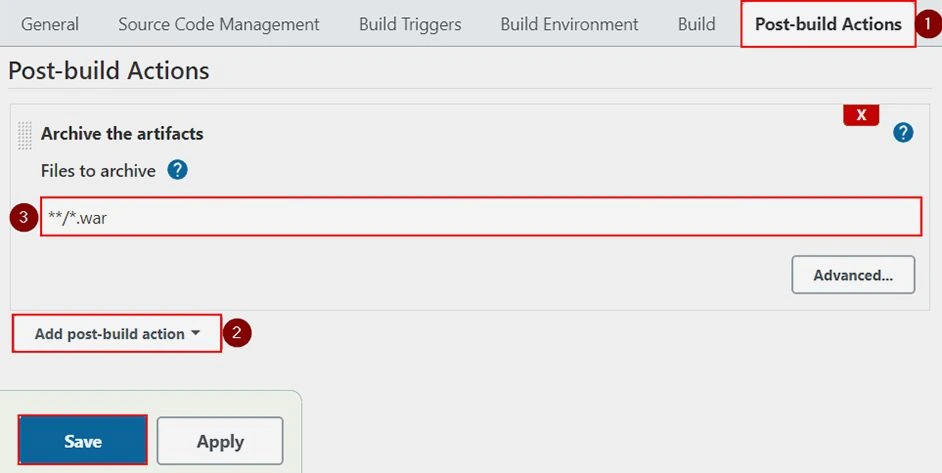
cd /Demo/webapp/targetStage 7: Archive the Artifacts
Go back to Configure and click on the Post Build Actions tab. Select Archive the Artifacts and enter **/*.war to track your war file.
5. Create the CD Pipeline
Let’s now set up the Continuous Deployment (CD) pipeline.
Stage 1: Install Tomcat
Download Apache Tomcat from the official site and follow the instructions to install it.
Stage 2: Configure Tomcat
To avoid port conflicts, change the Tomcat port to 8090 by editing the server.xml file.
vi /opt/tomcat/conf/server.xmlLook for the port number and change it from 8080 to 8090. Save the file after making the changes.
Stage 3: Modify Tomcat Users
Edit the tomcat-users.xml file to define user roles for accessing the Tomcat manager:
vi /opt/tomcat/conf/tomcat-users.xmlStage 4: Eliminate IP Restriction
Modify the context.xml file to remove IP restrictions and ensure the system is ready for deployment.
Stage 5: Restart Tomcat
Once all changes are made, restart Tomcat with the following commands:
cd /opt/tomcat/bin/
./shutdown.sh
./startup.sh
Stage 6: Install the Deploy Plugin
On the Jenkins dashboard, go to Manage Jenkins and click on Manage Plugins. Search for Deploy to Container and install it without restarting Jenkins.
Stage 7: Deploy the War File
Go to Post-build Actions and choose Deploy war/ear to a container. Enter the path to your war file and select the Tomcat 9.x Remote option. Provide the credentials and save the settings.
Stage 8: Build and Deploy
Click Build Now to trigger the deployment. If everything is set up correctly, your war file will be deployed to Tomcat.
Now, you can navigate to your Virtual Machine’s address and see the deployed application in action!
Advanced Features of Jenkins Pipelines
Jenkins pipelines offer a wide range of advanced features that can help you streamline and optimize your Continuous Integration and Continuous Deployment (CI/CD) workflows. These features allow you to build more complex and efficient pipelines, automate deployments, and integrate with various tools to enhance your DevOps processes. Let’s explore some of the most powerful advanced features Jenkins has to offer.
1. Parallel Stages
Parallel stages allow you to run multiple steps or stages simultaneously, which can significantly reduce the overall pipeline execution time. This is particularly useful when you have multiple tests or deployment tasks that can be performed in parallel.
Here's an example of a Jenkins pipeline that runs tests in parallel:
pipeline {
    agent any
    stages {
        stage('Parallel Tests') {
            parallel {
                stage('Unit Tests') {
                    steps {
                        echo 'Running unit tests...'
                    }
                }
                stage('Integration Tests') {
                    steps {
                        echo 'Running integration tests...'
                    }
                }
            }
        }
    }
}
In this example, the 'Unit Tests' and 'Integration Tests' stages will run in parallel, reducing the total build time.
2. Pipeline Libraries
Pipeline libraries allow you to store shared pipeline code in external repositories, which can be reused across different Jenkins pipelines. This promotes better organization and avoids duplicating code.
You can create a shared library and reference it in your pipelines using the @Library annotation. Here's an example:
@Library('my-shared-library') _
pipeline {
    agent any
    stages {
        stage('Build') {
            steps {
                echo 'Building project using shared library function...'
                mySharedLibrary.build()
            }
        }
    }
}
In this example, the pipeline uses a shared library called my-shared-library to access the build() function, which is defined in the library.
3. Parameterized Builds
Parameterized builds allow you to configure builds that accept input parameters. This is useful when you want to pass information to the pipeline, such as the environment to deploy to or the version of the code to test.
Here's an example of a parameterized Jenkins pipeline:
pipeline {
    agent any
    parameters {
        string(name: 'VERSION', defaultValue: '1.0', description: 'Enter the version to deploy')
    }
    stages {
        stage('Deploy') {
            steps {
                echo "Deploying version ${params.VERSION}..."
            }
        }
    }
}
In this example, the pipeline accepts a VERSION parameter, allowing you to specify which version of the software to deploy during the build process.
4. Build Triggers
Jenkins allows you to trigger builds automatically using different methods. Some common build triggers include:
- Polling SCM: Jenkins periodically checks your Source Control Management (SCM) for changes and triggers a build when it detects any updates.
- Webhooks: You can configure webhooks to notify Jenkins of commits, which then triggers a build. This is more efficient than polling.
- Scheduled Builds: Use cron syntax to schedule builds at specific intervals (e.g., daily, weekly).
5. Docker Integration
Jenkins has excellent support for Docker, which allows you to run your pipelines in isolated Docker containers. This can be helpful for testing in different environments and ensuring consistency across builds.
Here's an example of using Docker within a Jenkins pipeline:
pipeline {
    agent {
        docker { image 'node:14' }
    }
    stages {
        stage('Install Dependencies') {
            steps {
                sh 'npm install'
            }
        }
    }
}
In this example, the pipeline runs inside a Docker container using the node:14 image, and the a npm install command is executed to install dependencies.
6. Post Actions
Post actions allow you to define actions that should run after the pipeline finishes, regardless of whether it was successful or not. This is useful for cleanup tasks or notifications.
Here's an example of a post-action section in a Jenkins pipeline:
pipeline {
    agent any
    stages {
        stage('Build') {
            steps {
                echo 'Building project...'
            }
        }
    }
    post {
        always {
            echo 'Cleaning up resources...'
        }
        success {
            echo 'Build successful!'
        }
        failure {
            echo 'Build failed!'
        }
    }
}
This example defines post actions for when the build is successful, failed, or when any post-build actions are always executed.
7. Blue-Green Deployment
Blue-Green deployment is a strategy that reduces downtime and risk by running two identical production environments, called blue and green. At any time, one environment is live, while the other is idle or used for staging.
When a new version of your application is ready, you deploy it to the idle environment (e.g., green), and once it's fully tested, you switch traffic from the blue environment to the green one.
Jenkins Plugins for CI/CD Pipelines
When you're setting up a CI/CD pipeline with Jenkins, you'll find that using the right plugins can make your work much easier. These plugins automate tasks, integrate external tools, and extend Jenkins' functionality. Let’s explore some essential Jenkins plugins that can enhance your CI/CD pipeline.
1. Git Plugin
The Git Plugin is one of the most commonly used Jenkins plugins. It allows Jenkins to connect to your Git repository, making it easy to pull code, track changes, and integrate with your GitHub, GitLab, or Bitbucket repositories.
- Why use it? It enables Jenkins to clone, pull, and push repositories to Git-based version control systems.
- How does it help? This plugin ensures that Jenkins can trigger builds automatically when there are code changes in the repository.
2. Maven Integration Plugin
If you’re working with Maven, the Maven Integration Plugin is a must. It integrates Maven with Jenkins, allowing Jenkins to build and test your projects using Maven goals.
- Why use it? It enables Jenkins to run Maven goals as part of your pipeline, such as
clean installordeploy. - How does it help? It ensures the smooth execution of builds and allows you to control the Maven build lifecycle directly from Jenkins.
3. Docker Plugin
Are you using Docker to containerize your applications? The Docker Plugin allows Jenkins to interact with Docker. You can build Docker images, run containers, and execute Docker commands right from Jenkins pipelines.
- Why use it? It helps in automating Docker-related tasks in your pipeline like building images or deploying containers.
- How does it help? It allows Jenkins to manage Docker containers, facilitating CI/CD for containerized applications.
4. Blue Ocean Plugin
Want a better visual representation of your pipeline? The Blue Ocean Plugin provides a modern, user-friendly interface to Jenkins. It enhances the pipeline experience by offering visualizations of pipeline execution and results.
- Why use it? It gives you a more intuitive, graphical view of your CI/CD pipeline.
- How does it help? The clean, user-friendly interface helps both beginners and experienced users to manage and visualize the pipeline steps.
5. Deploy to Container Plugin
Suppose you're deploying to a containerized environment. In that case, the Deploy to Container Plugin allows Jenkins to deploy your WAR or EAR files directly to a Tomcat or other containers after the build is complete.
- Why use it? It simplifies the deployment process by automating the deployment of artifacts to containers.
- How does it help? You can easily deploy your application to any container without manually copying files or configuring the server.
6. Slack Notification Plugin
Want to get notified when your build is successful or fails? The Slack Notification Plugin allows Jenkins to send build notifications directly to your Slack channels.
- Why use it? It keeps your team updated on the build status in real time.
- How does it help? With instant notifications, you can quickly identify failed builds and take immediate action to resolve issues.
7. Pipeline Plugin
The Pipeline Plugin is essential for defining CI/CD pipelines in Jenkins using Jenkinsfile. It allows you to create a structured pipeline that can be version-controlled along with your project.
- Why use it? It enables you to define complex workflows and automation directly in code, using a Jenkinsfile stored in your repository.
- How does it help? It ensures your CI/CD processes are repeatable, consistent, and fully automated.
8. TestNG Plugin
If you’re running tests with TestNG, this plugin integrates TestNG with Jenkins to display test results in an easily understandable format.
- Why use it? It helps Jenkins understand and visualize TestNG reports, allowing you to view detailed test results.
- How does it help? This plugin enhances your test reporting and helps identify issues quickly within your CI/CD pipeline.
9. Email Extension Plugin
Keeping the team informed about build statuses via email is crucial. The Email Extension Plugin allows Jenkins to send highly customizable email notifications upon build completion.
- Why use it? It ensures your team is always notified when something goes wrong with the build.
- How does it help? Customizing emails helps you provide more context about the build results, reducing response time for troubleshooting.
10. Credentials Binding Plugin
For better security in your pipelines, the Credentials Binding Plugin securely stores and uses credentials like passwords or API tokens in your Jenkins pipeline.
- Why use it? It helps securely manage sensitive information in your pipeline.
- How does it help? The plugin ensures that credentials are not exposed in logs or pipeline code, ensuring safety during deployment.
Comparing Jenkins with Other CI/CD Tools
Continuous Integration (CI) and Continuous Delivery (CD) are crucial in modern software development. There are several CI/CD tools available, each offering unique features and capabilities. In this comparison, we’ll look at Jenkins and some of the most popular alternatives to understand their strengths, weaknesses, and best use cases.
1. Jenkins vs. GitLab CI
Jenkins is one of the most widely used open-source CI/CD tools. It offers flexibility, a large plugin ecosystem, and the ability to integrate with virtually any tool. However, it requires manual configuration and setup, which can be complex.
- GitLab CI, on the other hand, is a part of the GitLab ecosystem, offering built-in CI/CD features that require little configuration. GitLab CI integrates seamlessly with GitLab repositories, which makes it easier to use for teams already using GitLab for version control.
Key Differences:
- Jenkins provides flexibility with custom configurations and plugins but can require a steeper learning curve.
- GitLab CI is integrated with GitLab repositories, offering simplicity but less flexibility compared to Jenkins.
- Jenkins supports a wide variety of plugins for integrations, while GitLab CI offers integrated tools and services directly within the GitLab ecosystem.
2. Jenkins vs. CircleCI
CircleCI is a cloud-based CI/CD tool that offers a fast setup and high performance. It is known for its quick execution and ease of use, with integrations for GitHub, Bitbucket, and GitLab repositories.
- CircleCI is particularly suited for teams looking for simplicity and scalability, with many configurations handled automatically.
- Jenkins requires manual setup and custom configuration but offers more flexibility, especially for complex or highly customized pipelines.
Key Differences:
- CircleCI is simpler to set up and use, whereas Jenkins provides more customization options.
- CircleCI offers a cloud-first approach, while Jenkins can be set up both on-premises and in the cloud, giving it more deployment flexibility.
- CircleCI’s performance is optimized for speed, but Jenkins can be more resource-intensive depending on the number of plugins installed.
3. Jenkins vs. Travis CI
Travis CI is another cloud-based CI/CD service that offers a simple configuration and integration with GitHub repositories. It is especially popular with open-source projects.
- Travis CI is known for being easy to configure, especially for GitHub users, and it is often used for smaller, less complex projects.
- Jenkins is more suited for large, complex projects that require customized pipeline configurations.
Key Differences:
- Travis CI offers a simpler configuration for GitHub projects, while Jenkins allows for much more customization and integration.
- Jenkins supports a wide range of source control systems, not just GitHub, whereas Travis CI is mainly focused on GitHub repositories.
- Jenkins offers on-premises deployment, while Travis CI is cloud-based and requires a subscription for larger projects.
4. Jenkins vs. Bamboo
Bamboo is a CI/CD tool from Atlassian that integrates tightly with other Atlassian products like Jira, Bitbucket, and Confluence.
- Bamboo offers a streamlined, enterprise-friendly solution with integrations to Atlassian tools, making it ideal for teams already using Jira for issue tracking.
- Jenkins is more flexible but requires more setup and maintenance, making it more suitable for custom workflows and integrations beyond Atlassian tools.
Key Differences:
- Bamboo is more suited for teams using other Atlassian products, while Jenkins is a general-purpose CI/CD tool that can integrate with a broader range of tools.
- Jenkins has a large open-source community with many plugins, while Bamboo is a commercial product with a more controlled ecosystem.
- Bamboo provides native integration with Jira and Bitbucket, making it seamless for teams already using those tools.
5. Jenkins vs. TeamCity
TeamCity is a CI/CD tool from JetBrains known for its powerful features, such as build configuration templates, versioned settings, and extensive support for multiple build runners.
- TeamCity offers a more polished, out-of-the-box user experience, but it lacks the sheer plugin ecosystem that Jenkins offers.
- Jenkins is more suited for large, complex projects that require highly customized pipelines, while TeamCity is better suited for teams who prioritize out-of-the-box functionality and less manual configuration.
Key Differences:
- Jenkins is open-source and highly customizable, while TeamCity offers a commercial product with a focus on enterprise-level features.
- TeamCity has a cleaner user interface and better native integrations with tools like JetBrains IDEs.
- Jenkins has a much larger community and plugin ecosystem, making it more versatile for different types of projects.
Summary
This article compares Jenkins with other popular CI/CD tools such as GitLab CI, CircleCI, Travis CI, Bamboo, and TeamCity. It highlights the strengths, weaknesses, and key differences of each tool, helping you make an informed decision about which one is best for your team's needs. From ease of use to flexibility and integration with other tools, this guide gives you a clear understanding of how Jenkins stacks up against its competitors.
Looking to enhance your skills? Azure DevOps Certification Training and the free Docker Course are excellent opportunities to level up your expertise and stay ahead in the world of DevOps and cloud technologies.
Did You Know? Quiz - Jenkins CI/CD Pipeline
Q1: "Jenkins is a tool primarily used for continuous integration and continuous delivery."
- True
- False
Q2: "A Jenkins Pipeline is a sequence of automated steps in a CI/CD process."
- True
- False
Q3: "The `Jenkinsfile` is a text file that contains the pipeline code."
- True
- False
Q4: "Jenkins supports only Freestyle projects for building a CI/CD pipeline."
- True
- False
Q5: "Jenkins can integrate with Git for version control in a pipeline."
- True
- False
FAQs
The three important stages in a Jenkins pipeline are:
- Build – This stage compiles and builds the project, ensuring that the code is ready for testing and deployment.
- Test – It runs automated tests to verify the code's functionality and quality.
- Deploy – This stage deploys the code to a test or production environment, ensuring it is ready for use.
Jenkins automates the process of building, testing, and deploying code in a CI/CD pipeline. It continuously integrates and delivers code by triggering automated tasks like testing and deployment whenever new code is committed, ensuring faster and more reliable software delivery.
The stages of a CI/CD pipeline in Jenkins typically include Build, where code is compiled and packaged; test, where automated tests are run to ensure code quality; and Deploy, where the code is deployed to a staging or production environment. These stages are automated to ensure faster and more reliable software delivery.
Take our Devops skill challenge to evaluate yourself!

In less than 5 minutes, with our skill challenge, you can identify your knowledge gaps and strengths in a given skill.