13
DecMERN Stack CRUD Operations
MERN Stack CRUDE Operations: An Overview
MERN Stack is the trending technology stack nowadays. So, we have come up with this MERN Stack tutorial to help you understand the term. In this part of the React Tutorial, we are going to learn about the MERN stack. You may also have questions like What is the Difference between MEAN Stack and MERN Stack, so let us clarify that there is no major difference between them except front-end technology so that here in this article you can skip Angular and consider React as front-end technology.
It is a very comprehensive step-by-step guide for building the create-read-update-delete (CRUD) web application from the scratch using MERN (Mongo, Express, React, Node.js) stack which is one of the most popular web application stacks based on Node.js. Both MEAN and MERN stacks are almost the same except the MEAN stack using Angular as the front-end framework and the MERN stack using React to represent the UI layer. This Is a very basic step-by-step guide of the MERN stack from where you can learn how to configure and get started with the development. If you're a newbie to React, we recommend you to enroll in our fascinating React JS Certification Training to give a proper understanding of React and its concepts.
Read More - React Interview Questions For Experienced
MERN Stands For
MongoDB
It is NoSql Database documents that act as a backend for our MERN stack web application.
ExpressJS
ExpressJS is a JavaScript-based backend web application framework and is mostly used to create API for our MERN stack app.
React
React is a JavaScript-based library that is used to build a powerful and attractive user interface; it has so many features which make it unique among other front-end libraries like Virtual DOM.
NodeJS
NodeJS is a JavaScript-based run-time environment, which enables us to create a JavaScript-based back-end environment and network applications.
The main attraction is that in MERN stack everything you write is somehow JavaScript. Starting from the Database of MongoDB, to the front-end technology which is React, so if you have enough knowledge of JavaScript then you will find it pretty relevant to your technology stack.
In this article, we are going to cover all of the layers of the MERN stack by creating a separate layer of the application such as UI later and the back-end system.
Read More - React Js Roadmap 2024
Project Structure
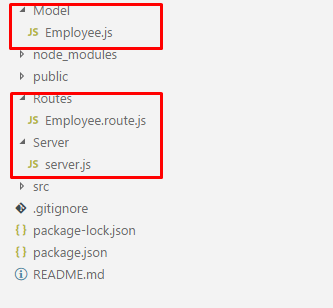
As we have discussed earlier that our front-end will be a library called React and backend/server codes are related to MongoDB, Express, and Nodejs, so for that, we need to have different folder structures accordingly, and to simplify the learning experience, we need two folders initially which is used for front-end and back-end.
Front-end Project Structure
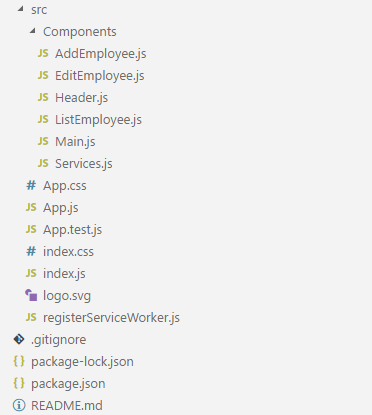
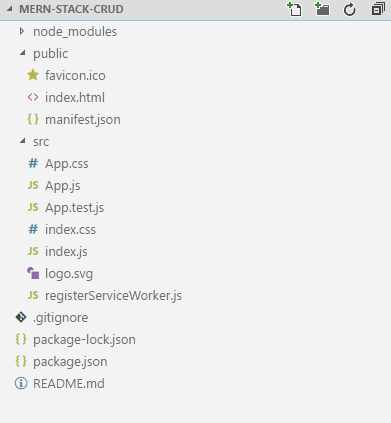
As a Front-end, we are going to use React application and every operation related to the CRUD will be implemented inside React application, please find the below snap which shows the complete project structure where we have separated the list of components and other core configuration files.
Back-end Project Structure
The back-end application contains the different files related to API routing, data models, and the express/node server configuration.
Project Prerequisites
To get started with the MERN stack, we need to have installed the following tools and editors to simplify the learning and development experience easier.
Install NodeJs
https://nodejs.org/en/download/MongoDB
https://www.mongodb.com/download-centerCode Editor
To create and implement the MERN stack application, we need to have any code editor, and for this tutorial, we will be using the popular editor called Visual Studio Code but one can also use other tools such as Visual Studio, Nuclide, etc. for now, we are going to use Microsoft Visual Studio Code for this tutorial.
Setup and Installation
When we are done with the above tools by installing and doing all required configuration, now it's time to install a few important dependencies to work with Front-end and back-end services for the MERN stack as explained below.
Front-end dependencies
Back-end dependencies
Create React Project
Our first and the basic requirement is to create a new react app using create-react-app which provides the sample boilerplate project files or we can say quick start project. To create a new project, we need to install it using the below npm command.
Npm install –g create-react-appAnd create a new project using the following command.
Create-react-app mern-stack-crudThen you can see that our new project is now created, and the folder structure looks as given below.
Setup of Backend
So far in this guide, we have installed all the necessary dependencies and tools to get started with the MERN stack along with UI layer as a React application, now it’s time to set up our backend application so that we can use it in our front-end application.
Setting up a server environment
We are going to create the server application with the help of nodejs and express framework and will set up basic configuration such as database connection with Mongo server, route configuration, express configuration and other required setup. For that create a new folder named Server into the root directory and inside the folder, create a new file called server.js as given below.
Server.js // Imported required packages
const express = require('express'),
path = require('path'),
bodyParser = require('body-parser'),
cors = require('cors'),
mongoose = require('mongoose');
// MongoDB Databse url
var mongoDatabase = 'mongodb://localhost:27017/employeeDetails';
// Created express server
const app = express();
mongoose.Promise = global.Promise;
// Connect Mongodb Database
mongoose.connect(mongoDatabase, { useNewUrlParser: true }).then(
() => { console.log('Database is connected') },
err => { console.log('There is problem while connecting database ' + err) }
);
// All the express routes
const employeeRoutes = require('../Routes/Employee.route');
// Conver incoming data to JSON format
app.use(bodyParser.json());
// Enabled CORS
app.use(cors());
// Setup for the server port number
const port = process.env.PORT || 4000;
// Routes Configuration
app.use('/employees', employeeRoutes);
// Staring our express server
const server = app.listen(port, function () {
console.log('Server Lisening On Port : ' + port);
});
In the above file, we have imported all the external dependencies as well as third-party packages that we have installed previously, apart from that, imported a few files related to routing. But the most important step of the configuration is that we have connected our application to MongoDB using the below given code snippet.
 // MongoDB Databse url
 var mongoDatabase = 'mongodb://localhost:27017/employeeDetails';

 // Connect Mongodb Database
 mongoose.connect(mongoDatabase, { useNewUrlParser: true }).then(
 () => { console.log('Database is connected') },
 err => { console.log('There is problem while connecting database ' + err) }
 );
As you can see that the database of MongoDB is running on the port number "27017" and my database name is "employeeDetails", so our all the network calls will be reflected from the selected database only.
MongoDB Model
In this tutorial, we are going to take an example table of Employee details along with the fields such as first name, last name, email, etc, so for that, we need to create the model schema which represent the employee entity. Create a new folder called "Model" and create a new file inside that folder as given below.
Employee.js const mongoose = require('mongoose');
const Schema = mongoose.Schema;
// List of columns for Employee schema
let Employee = new Schema({
firstName: {
type: String
},
lastName: {
type: String
},
email: {
type: String
},
phone: {
type: Number
}
},{
collection: 'employees'
});
module.exports = mongoose.model('Employee', Employee);
Create an API Controller
One of the necessary step of the MERN stack CRUD application is to create the REST API. and for that, we need to create an API controller based on the URL that the user is going to traverse. Create a new folder called Routes and inside the folder create a new file calledEmployee.route.js.
 // Importing important packages
 const express = require('express');

 // Using express and routes
 const app = express();
 const employeeRoute = express.Router();

 // Employee module which is required and imported
 let employeeModel = require('../Model/Employee');

 // To Get List Of Employees
 employeeRoute.route('/').get(function (req, res) {
 employeeModel.find(function (err, employee) {
 if (err) {
 console.log(err);
 }
 else {
 res.json(employee);
 }
 });
 });

 // To Add New Employee
 employeeRoute.route('/addEmployee').post(function (req, res) {
 let employee = new employeeModel(req.body);
 employee.save()
 .then(game => {
 res.status(200).json({ 'employee': 'Employee Added Successfully' });
 })
 .catch(err => {
 res.status(400).send("Something Went Wrong");
 });
 });

 // To Get Employee Details By Employee ID
 employeeRoute.route('/editEmployee/:id').get(function (req, res) {
 let id = req.params.id;
 employeeModel.findById(id, function (err, employee) {
 res.json(employee);
 });
 });

 // To Update The Employee Details
 employeeRoute.route('/updateEmployee/:id').post(function (req, res) {
 employeeModel.findById(req.params.id, function (err, employee) {
 if (!employee)
 return next(new Error('Unable To Find Employee With This Id'));
 else {
 employee.firstName = req.body.firstName;
 employee.lastName = req.body.lastName;
 employee.email = req.body.email;
 employee.phone = req.body.phone;

 employee.save().then(emp => {
 res.json('Employee Updated Successfully');
 })
 .catch(err => {
 res.status(400).send("Unable To Update Employee");
 });
 }
 });
 });

 // To Delete The Employee
 employeeRoute.route('/deleteEmployee/:id').get(function (req, res) {
 employeeModel.findByIdAndRemove({ _id: req.params.id }, function (err, employee) {
 if (err) res.json(err);
 else res.json('Employee Deleted Successfully');
 });
 });

 module.exports = employeeRoute;
In this file, we have created the set of APIs to serves the different purpose such as adding, updating, deleting and fetching the employee records.
http://localhost:4000/employeeshttp://localhost:4000/employees/addEmployeehttp://localhost:4000/employees/editEmployee/idhttp://localhost:4000/employees/updateEmployee/idhttp://localhost:4000/employees/deleteEmployee/idTest REST API’s
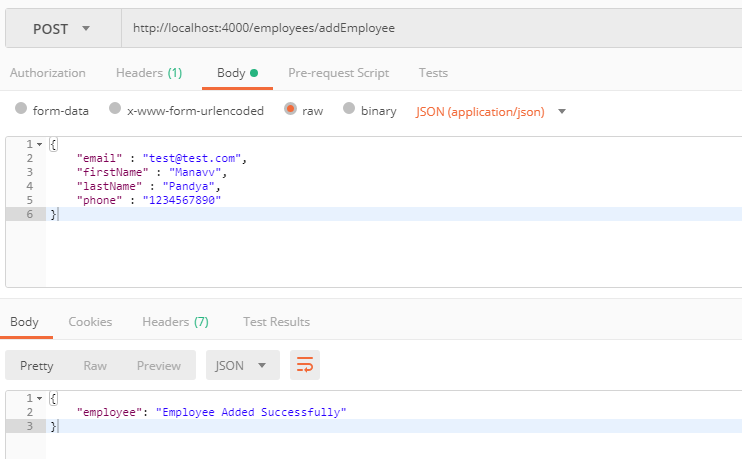
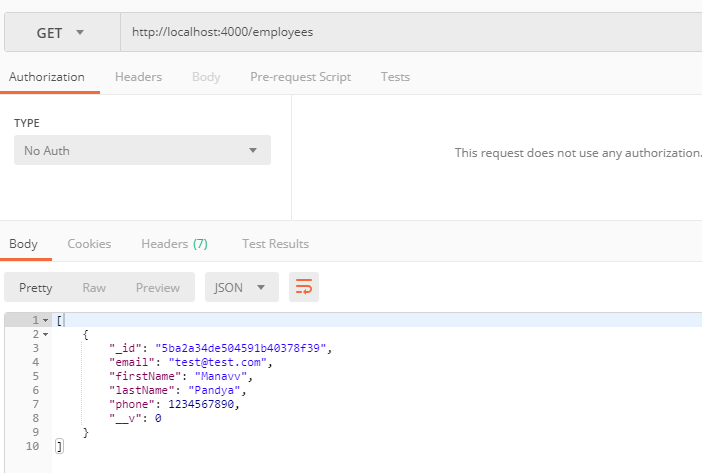
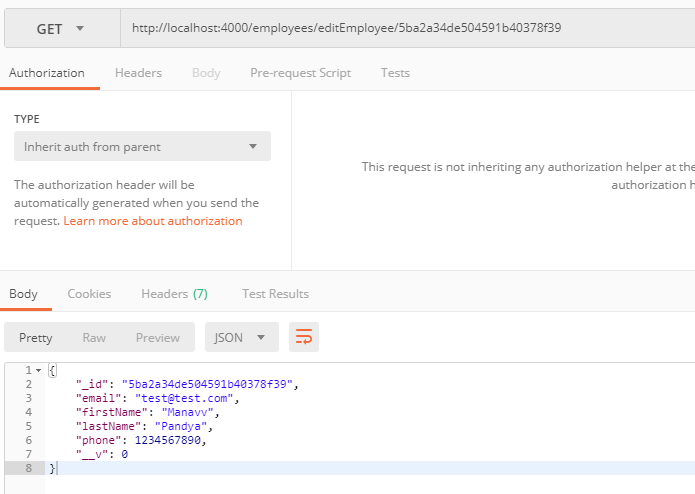
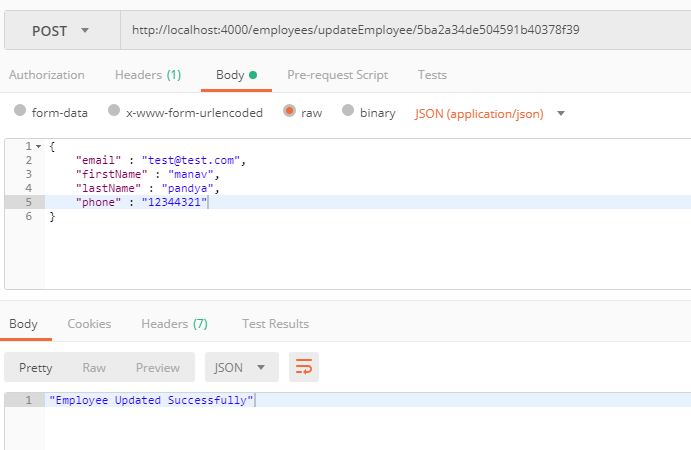
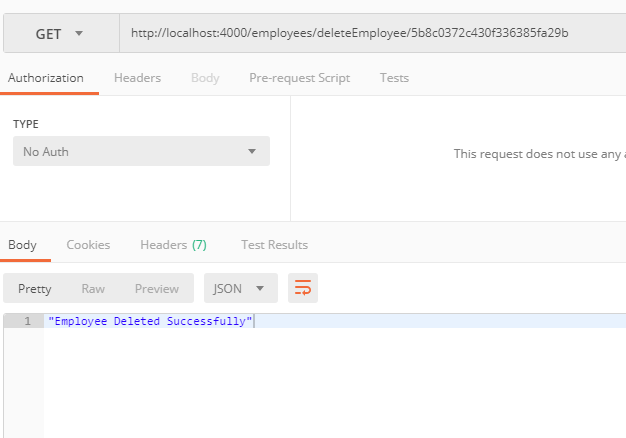
We have created the set of APIs, and to verify or ensure that how those API returns the data, we can test it with the API testing tools such as POSTMAN as given below.
Post Request
Get Request
Get By Id Request
Put Request
Delete Request
Front-end Project
Upto this section, we have completed our back-end implementation, and to manipulate the employee data, we need to use the different APIs in our react application. For user Interface, we are going to use a different component of bootstrap using third-party package called "react-bootstrap", and a few components we have used in this application are listed below.
Navbar
Nav
Table
Button
So these are some primary components we have used to design our user interface.
The next step is to create a new folder called "Components" inside /src directory and create a new file called Header.js and the content of the file is given below.
Header.js import React, { Component } from 'react';
import { Navbar, Nav, NavItem } from 'react-bootstrap';
// To use routing functionalities
import { Link } from 'react-router-dom';
import '../index.css';
class Header extends Component {
render() {
return (
<div>
<Navbar>
<Navbar.Header>
<Navbar.Brand>
<a href="javascript:void(0)">MERN Stack CRUD Operations</a>
</Navbar.Brand>
</Navbar.Header>
<Nav>
<NavItem href="javascript:void(0)">
<Link to="/">Home</Link>
</NavItem>
<NavItem href="javascript:void(0)">
<Link to="/addemployee">Add New Employee</Link>
</NavItem>
</Nav>
</Navbar>
</div>
);
}
}
export default Header;
This file will act as a reusable navigation bar for the React application. the next step is to create a new file "Main.js", in which we will implement the routing part of our MERN stack app by using the configuration of "react-router-dom".
Main.js import React, { Component } from 'react';
import { Switch, Route } from 'react-router-dom';
// Our all component files
import ListEmployee from '../Components/ListEmployee';
import AddEmployee from '../Components/AddEmployee';
import EditEmployee from '../Components/EditEmployee';
class Main extends Component {
render() {
return (
<main>
<Switch>
<Route exact path='/' component={ListEmployee} />
<Route path='/list' component={ListEmployee} />
<Route path='/addemployee' component={AddEmployee} />
<Route path='/editemployee/:id' component={EditEmployee} />
</Switch>
</main>
);
}
}
export default Main;
The next step is to include both these files and include them in our main component file called App.js as given below.
/src/App.js import React, { Component } from 'react';
import Header from './Components/Header';
import Main from './Components/Main';
class App extends Component {
render() {
return (
<div>
<Header />
<Main />
</div>
);
}
}
export default App;
To complete our routing configuration, we need to use the "BrowserRouter" selector which is part of the "react-router-dom" package and used to allow applications to switch from one router to other routers based on the URL used into the browser by comparing it.
 /src/index.js
 import React from 'react';
 import ReactDOM from 'react-dom';
 import './index.css';
 import App from './App';
 import registerServiceWorker from './registerServiceWorker';
 import { BrowserRouter } from 'react-router-dom';

 ReactDOM.render(
 <BrowserRouter>
 <App />
 </BrowserRouter>, document.getElementById('root'));
 registerServiceWorker();
Service File
In this article, for the delete requests, we are going to using a service file to call the delete API from the the back-end services, still, we can call the API directly from the component, for that, create a new file called Services.js as given below.
/src/Components/Services.js import axios from 'axios';
class EmployeeService {
deleteEmployee(id) {
axios.get('http://localhost:4000/employees/deleteEmployee/' + id)
.then(() => {
console.log('Employee Deleted !!!')
})
.catch((error) => {
console.log(error)
})
}
}
export default EmployeeService;
CRUD Pages
Create Page
To create a new employee, we need to have one component where we can implement the form-related configuration, and for that I would suggest you create a new file called AddEmployee.js as given below.
/src/Components/AddEmployee.js import React, { Component } from 'react';
import axios from 'axios';
const customStyle = {
width: '300px',
margin: '0 auto'
}
class AddEmployee extends Component {
constructor(props) {
super(props);
this.state = {
firstName: '',
lastName: '',
email: '',
phone: ''
}
}
// When value changes of the fields
handleChange = (event) => {
this.setState({ [event.target.name]: event.target.value });
}
// To add new employee when user submits the form
handleSubmit = (event) => {
event.preventDefault();
const { firstName, lastName, email, phone } = this.state;
axios.post('http://localhost:4000/employees/addEmployee', {
firstName: firstName,
lastName: lastName,
email: email,
phone: phone,
})
.then((response) => {
console.log(response);
this.props.history.push('/');
})
.catch((error) => {
console.log(error);
});
}
render() {
return (
<div className="container">
<form style={customStyle} onSubmit={this.handleSubmit}>
<label>
First Name
<input
name="firstName"
type="text"
value={this.state.firstName}
onChange={this.handleChange}
className="form-control"
/>
</label>
<br />
<label>
Last Name
<input
name="lastName"
type="text"
value={this.state.lastName}
onChange={this.handleChange}
className="form-control"
/>
</label>
<br />
<label>
Email
<input
name="email"
type="text"
value={this.state.email}
onChange={this.handleChange}
className="form-control"
/>
</label>
<br />
<label>
Phone No
<input
name="phone"
type="text"
value={this.state.phone}
onChange={this.handleChange}
className="form-control"
/>
</label>
<br />
<input
type="submit"
value="submit"
className="btn btn-primary"
/>
</form>
</div>
);
}
}
export default AddEmployee;
As you can see into the above code snippet, we have implemented a component with the form and other steps as given below.
Html form for Add new employee
Change event for all HTML form controls
Submit an event to call AddEmployee REST API
Read Page
On this page, we are going to list down the set of employee records, and also enable the user to edit and delete any specific record by providing additional actions buttons. For that create a new file called ListEmployee.js as given below.
/src/Components/ListEmployee.js import React, { Component } from 'react';
import axios from 'axios';
import { Table, Button } from 'react-bootstrap';
// To use routing functionalities
import { Link } from 'react-router-dom';
import '../index.css';
import EmployeeService from './Services';
var divStyle = {
margin: '8% 8%',
};
class ListEmployee extends Component {
constructor(props) {
super(props);
this.employeeService = new EmployeeService();
this.state = {
employees: []
}
this.deleteEmployee = this.deleteEmployee.bind(this);
}
componentDidMount = () => {
this.getEmployeeList();
}
// To get all the employees
getEmployeeList() {
axios.get('http://localhost:4000/employees')
.then((response) => {
console.log(response);
this.setState({
employees: response.data
});
})
.catch((error) => {
console.log(error);
})
}
// To delete any employee
deleteEmployee(empid) {
this.employeeService.deleteEmployee(empid);
this.getEmployeeList();
}
render() {
const { employees } = this.state;
return (
<div style={divStyle}>
<Table responsive>
<thead>
<tr>
<th>#</th>
<th>First Name</th>
<th>Last Name</th>
<th>Email</th>
<th>Phone</th>
<th></th>
<th></th>
</tr>
</thead>
<tbody>
{
employees && employees.map((employee, i) => {
return (
<tr key={i}>
<td>{i}</td>
<td>{employee.firstName}</td>
<td>{employee.lastName}</td>
<td>{employee.email}</td>
<td>{employee.phone}</td>
<td>
<Link to={"editemployee/" + employee._id} className="btn btn-primary">Edit</Link>
</td>
<td>
<Button onClick={() => this.deleteEmployee(employee._id)} bsStyle="danger" >Delete</Button>
</td>
</tr>
)
})
}
</tbody>
</Table>
</div>
);
}
}
export default ListEmployee;
FRom the above main page of the application, we have displayed the list of employees using the bootstrap table and also provide two different action buttons which enable the user to manipulate employee data for the edit and delete operations.
When the user clicks on the action buttons, respective events is being triggered along with the network call using the redux configuration.
Update Page
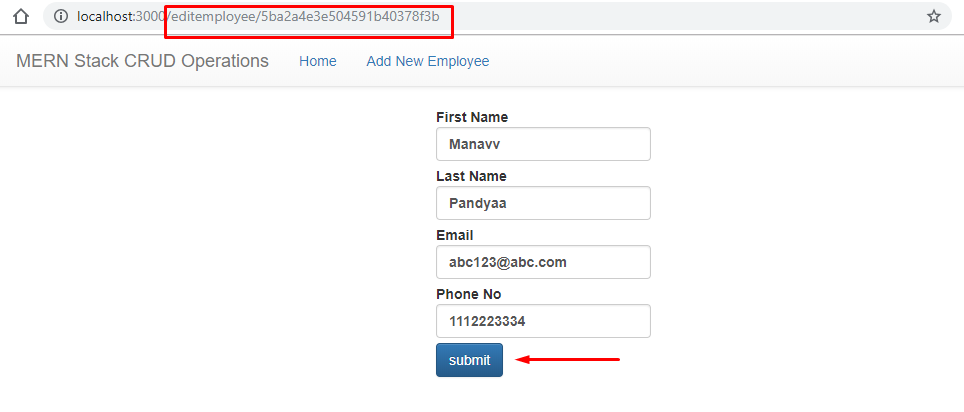
When the user wants to edit the employee, at that time they will be navigated to the edit page where the details of the existing employee will be populated automatically into the form and the user will be able to update it after doing certain changes and the component for the same is given below.
/src/Components/EditEmployee.js import React, { Component } from 'react';
import axios from 'axios';
const customStyle = {
width: '300px',
margin: '0 auto'
}
class EditEmployee extends Component {
constructor(props) {
super(props);
this.state = {
firstName: '',
lastName: '',
email: '',
phone: ''
}
}
componentDidMount = () => {
this.getEmployeeById();
}
// To get employee based on ID
getEmployeeById() {
axios.get('http://localhost:4000/employees/editEmployee/' + this.props.match.params.id)
.then((response) => {
this.setState({
firstName: response.data.firstName,
lastName: response.data.lastName,
email: response.data.email,
phone: response.data.phone
});
})
.catch((error) => {
console.log(error);
})
}
handleChange = (event) => {
this.setState({ [event.target.name]: event.target.value });
}
// To update the record on submit
handleSubmit = (event) => {
event.preventDefault();
const { firstName, lastName, email, phone } = this.state;
axios.post('http://localhost:4000/employees/updateEmployee/' + this.props.match.params.id, {
firstName: firstName,
lastName: lastName,
email: email,
phone: phone,
})
.then((response) => {
console.log(response);
this.props.history.push('/');
})
.catch((error) => {
console.log(error);
});
}
render() {
return (
<div className="container">
<form style={customStyle} onSubmit={this.handleSubmit}>
<label>
First Name
<input
name="firstName"
type="text"
value={this.state.firstName}
onChange={this.handleChange}
className="form-control"
/>
</label>
<br />
<label>
Last Name
<input
name="lastName"
type="text"
value={this.state.lastName}
onChange={this.handleChange}
className="form-control"
/>
</label>
<br />
<label>
Email
<input
name="email"
type="text"
value={this.state.email}
onChange={this.handleChange}
className="form-control"
/>
</label>
<br />
<label>
Phone No
<input
name="phone"
type="text"
value={this.state.phone}
onChange={this.handleChange}
className="form-control"
/>
</label>
<br />
<input
type="submit"
value="submit"
className="btn btn-primary"
/>
</form>
</div>
);
}
}
export default EditEmployee;
In above component, we have implemented few set of operations as given below.
Calling REST API to get employee details by ID
Filling the form data as per the details based on the API call
Submit the updated data when the user submits the form
Now our CRUD-related files are created and also implemented API calls, the next step is to add CDN to the root HTML file.
Add Stylesheet CDN
As we have discussed previously that we are using different components of react-bootstrap, so for that we need to add a respective stylesheets into the root HTML file as described below.
/public/index.html <!DOCTYPE html>
<html lang="en">
<head>
<meta charset="utf-8">
<meta name="viewport" content="width=device-width, initial-scale=1, shrink-to-fit=no">
<meta name="theme-color" content="#000000">
<link rel="manifest" href="%PUBLIC_URL%/manifest.json">
<link rel="shortcut icon" href="%PUBLIC_URL%/favicon.ico">
<!-- Latest compiled and minified CSS -->
<link rel="stylesheet" href="https://maxcdn.bootstrapcdn.com/bootstrap/3.3.7/css/bootstrap.min.css" integrity="sha384-BVYiiSIFeK1dGmJRAkycuHAHRg32OmUcww7on3RYdg4Va+PmSTsz/K68vbdEjh4u"
crossorigin="anonymous">
<!-- Optional theme -->
<link rel="stylesheet" href="https://maxcdn.bootstrapcdn.com/bootstrap/3.3.7/css/bootstrap-theme.min.css" integrity="sha384-rHyoN1iRsVXV4nD0JutlnGaslCJuC7uwjduW9SVrLvRYooPp2bWYgmgJQIXwl/Sp"
crossorigin="anonymous">
<title>React App</title>
</head>
<body>
<noscript>
You need to enable JavaScript to run this app.
</noscript>
<div id="root"></div>
</body>
</html>
Running MERN Stack APP
In visual studio code PowerShell or command prompt, use below command to run the front-end application.
Npm startApart from the front-end app, run the server-side application using the seperate terminal/powershell, we need to change the directory and execute the below command.
Cd Server Node server.jsHow It Works
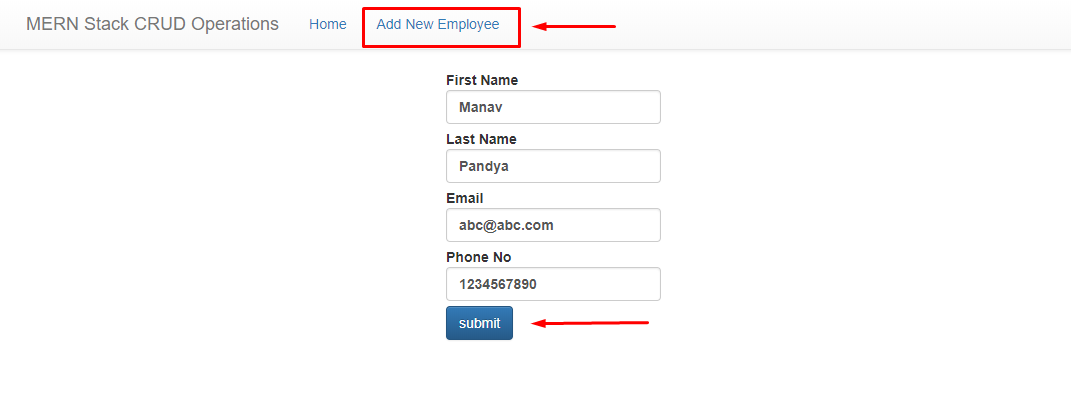
Create Operation
Click on the "Add New Employee" link and add form details and you can add the record to the database.
Read Operation
Once you click on the "Home" button, you will be redirected to the new page where the table is populated along with the employee records fetch from the database.

Edit/Update Operation
Once you click on the edit button from the employee list page, it will be redirected to the edit page where the specific employee details is populated into the form, it can be changes and submitted once user click on the submit button.
Delete Operation
When we click on the delete button, the record of the employee can be deleted from the database.

Important Note
We are done with the CRUD operations using the MERN stack, but because of this tutorial is for learning purpose, certain things are not covered and as a exercise, you can developed few enhancements areas as described below.
Better user interface
Provide proper form validations
Show notification for user acknowledgment
Summary
The MERN stack is a popular stack to work upon and for the same practices, we have created a MERN stack CRUD operation with the different JavaScript technologies and database services such as MongoDB, ExpressJs, React, and NodeJs,
By using MERN stack we can create high performance, scalable and robust applications by just using different JavaScript-based technologies, I would recommend you to download the source code and play around that and try to complete the additional exercise given at the end of this guide. To learn React from scratch, consider enrolling in our React JS Certification Course.
FAQs
- set up MongoDB,
- create API endpoints with Express.js/Node.js,
- implement functions for Create, Read, Update, Delete
- integrate frontend components with React
Take our Fullstack skill challenge to evaluate yourself!

In less than 5 minutes, with our skill challenge, you can identify your knowledge gaps and strengths in a given skill.

