


27
MarMicroservices Architecture in .NET Core - Net microservices Tutorial
29 Aug 2025
Intermediate
4.97K Views
54 min read

Learn with an interactive course and practical hands-on labs
Free .NET Microservices Online Course - Beginners Start Here
Microservices have changed the way modern applications are built. Instead of creating one big, complicated system, developers break it down into smaller, independent services. This makes applications easier to scale, update, and manage. In this .NET Microservices – A Complete .NET Microservices Tutorial, you will learn everything from the basics to advanced concepts.
.NET is one of the best platforms for building microservices. It provides powerful tools like ASP.NET Core, Docker, Kubernetes, and gRPC to help developers create high-performance, scalable applications. Many large companies use .NET microservices architecture to handle millions of users efficiently. This tutorial will show you how to build, secure, and deploy microservices step by step.
In this Microservices tutorial guide, we will explore why microservices are important and how they work in real-world applications. You will learn how to set up your development environment, build your first microservice, and connect multiple services. We will also cover key topics like service communication, API gateways, security, monitoring, and cloud deployment. If you want to start learning microservices for free, join Microservices Free Certification Course to help you validate your skills and boost your career.
What Are Microservices in .NET?
Microservices are a modern software architecture where applications are divided into small, independent services. Each service performs a specific function and communicates with others using APIs, making the system more scalable, flexible, and easier to manage.
Core Principles of Microservices Architecture
- Single Responsibility – Each microservice focuses on one specific task, making development and maintenance simpler.
- Independent Deployment – Microservices can be updated or modified without affecting the entire application.
- Decentralized Data Management – Each service can have its database, preventing conflicts and improving performance.
- API-Based Communication – Microservices interact using REST, gRPC, or message queues, ensuring smooth data flow.
- Scalability & Resilience – Services can be individually scaled based on demand, improving system performance and fault tolerance.
Microservices vs. Monolithic Architecture: Key Differences
Traditional architecture (monolithic architecture) is different from Microservice architecture in various conditions that are:
- Traditional apps are built as one big unit, while microservices are made of many small parts.
- In traditional apps, all developers work on the same code, but in microservices, different teams work on different services.
- Traditional apps are deployed all at once, but microservices can be deployed one by one.
- If you want to scale a traditional app, you have to scale the whole app. In microservices, you can scale only the service that needs it.
- Traditional apps usually use only one language or tool. Microservices can use different languages for different services.
- If one part fails in a traditional app, the whole app might stop. In microservices, other parts can still work if one fails.
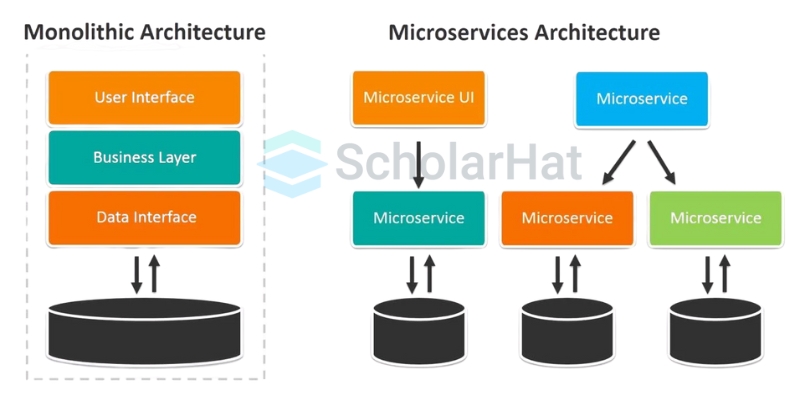
Understanding .NET Microservices Architecture
Microservices architecture is a way of designing software as a collection of small, independent services. Each service focuses on a specific function and communicates with others through APIs. This approach helps build scalable, flexible, and easy-to-maintain systems.
Setting Up Your .NET Microservices Environment
Before building .NET microservices, you need to set up the right tools. Here, you will learn how to install .NET SDK, use Visual Studio, set up Docker, and connect a database to start your microservices project.
1. Installing .NET SDK for Microservices Development
To develop .NET microservices, you need to install the .NET SDK (Software Development Kit). This provides all the necessary tools to create, build, and run .NET applications. Without it, you cannot start developing microservices.
Steps to Install .NET SDK
- Visit the official Microsoft website and download the latest version of .NET SDK that matches your operating system (Windows, macOS, or Linux).
- Run the installation file and follow the on-screen instructions to complete the setup.
- After installation, open the Command Prompt (CMD) or Terminal and type the following command to verify the installation:
dotnet --versionIf a version number appears, it means the installation was successful.
Once the .NET SDK is installed, you can create and run microservices using simple commands.
2. Setting Up an IDE for .NET Microservices
An IDE (Integrated Development Environment) is a software application that helps you write and manage your code easily. For .NET microservices development, you can choose between two popular IDEs:
- Visual Studio – A full-featured IDE with advanced tools for large projects.
- Visual Studio Code – A lightweight code editor suitable for microservices development.
Steps to Set Up an IDE
- Download Visual Studio or Visual Studio Code from the official Microsoft website.
- Install necessary extensions, such as the C# extension in VS Code, to support .NET development.
- Open the IDE and create a new ASP.NET Core project to check if everything is working properly.
With the IDE setup, you are now ready to start writing and managing your .NET microservices code efficiently.
3. Using Docker for .NET Microservices
Microservices need to run independently, and Docker helps in achieving this by creating isolated environments called containers. With Docker, microservices work the same way on every system, making deployment easier and more efficient.
Steps to Install and Set Up Docker
- Download and install Docker Desktop from the official Docker website.
- Follow the installation instructions based on your operating system.
- Open the Command Prompt or Terminal and type the following command to check if Docker is installed correctly:
docker --versionIf a version appears, Docker is successfully installed. Docker allows you to package your .NET microservices into containers, making them easy to deploy and run on different machines.
4. Configuring a Database for .NET Microservices
Every microservice needs a database to store and manage data. The choice of the database depends on the project requirements. Some commonly used databases in .NET microservices are SQL Server, PostgreSQL, and MongoDB.
Steps to Set Up SQL Server (Example)
- Download and install SQL Server Express from the official Microsoft website.
- Install SQL Server Management Studio (SSMS) to manage and interact with the database.
- Create a new database and configure it to connect with your .NET microservice using Entity Framework Core.
To connect a .NET microservice with a SQL Server, you will need to add a connection string in the appsettings.json file:
  "ConnectionStrings": {
    "DefaultConnection": "Server=localhost;Database=MyMicroserviceDB;User Id=sa;Password=yourpassword;"
  }
Each microservice can have its own database, making it more flexible and reducing dependency on a single database system.
5. .NET Microservices Project Structure Explained
A well-organized project structure is essential for managing .NET microservices efficiently. Let’s look at some of the important files in a .NET microservices project:
- Program.cs: This is the main entry point of the application, where the microservice starts running.
- appsettings.json: This file contains essential configuration settings, including database connection strings and API settings.
- Controllers Folder: This folder contains API controllers that handle client requests and process responses.
A basic ASP.NET Core Web API project structure looks like this
  /MyMicroservice
 │-- Controllers
 │   ├── WeatherForecastController.cs
 │-- Models
 │   ├── User.cs
 │-- Services
 │   ├── UserService.cs
 │-- appsettings.json
 │-- Program.cs
 │-- Startup.cs
 │-- MyMicroservice.csproj
By maintaining a clean and well-structured project, you can easily scale and manage .NET microservices without confusion.
Building Your First .NET Microservice
Now that we have set up the development environment, it's time to build our first .NET microservice. In this section, we will create a simple microservice, set up an API, connect it to a database, and run it inside a Docker container. Follow the steps carefully, and by the end, you will have a fully working .NET microservice.
1. Setting Up a New ASP.NET Core Microservice Project
First, we need to create a new ASP.NET Core Web API project. This project will act as our microservice, handling requests and responses.
Steps to Create a New Project
- Open the Command Prompt (CMD) or Terminal and run the following command:
dotnet new webapi -n MyMicroservice- Navigate into the project folder:
cd MyMicroservice- Open the project in Visual Studio or VS Code and explore the folder structure.
Now, our microservice project is ready, and we can start adding features to it.
2. Creating the API Controller
A controller is the brain of an API. It handles incoming requests and sends back responses. We will create a controller to manage simple operations like getting and adding data.
Steps to Create a Controller:
- Inside the Controllers folder, create a new file named UserController.cs.
- Add the following code to create a simple API with a GET request:
  using Microsoft.AspNetCore.Mvc;

    [ApiController]
    [Route("api/users")]
    public class UserController : ControllerBase
    {
        [HttpGet]
        public IActionResult GetUsers()
        {
            var users = new List<string> { "Alice", "Bob", "Charlie" };
            return Ok(users);
        }
} - Run the project using:
dotnet run- Open Swagger or Postman and test the GET /api/users endpoint.
Now, we have our first working API endpoint!
3. Adding a Service Layer for Business Logic
Instead of writing logic inside the controller, we create a service layer. This makes the code cleaner and easy to manage.
Steps to Create a Service
- Inside the project, create a new folder called Services.
- Inside Services, create a file named UserService.cs.
- Write the following code inside UserService.cs:
  public class UserService
    {
        private readonly List<string> _users = new() { "Alice", "Bob", "Charlie" };

        public List<string> GetUsers()
        {
            return _users;
        }
    }
4. Connecting the Microservice to a Database
A microservice needs a database to store and manage data. We will use Entity Framework Core (EF Core) to connect our microservice to a database.
Steps to Connect to a Database:
- Install EF Core and SQL Server support using this command:
  dotnet add package Microsoft.EntityFrameworkCore.SqlServer
dotnet add package Microsoft.EntityFrameworkCore.Design - Create a DbContext to manage the database connection:
 using Microsoft.EntityFrameworkCore;

    public class AppDbContext : DbContext
    {
        public DbSet<User> Users { get; set; }

        public AppDbContext(DbContextOptions<AppDbContext> options) : base(options) { }
    }
5. Running the Microservice in Docker
To make our microservice portable, we will run it inside a Docker container.
Steps to Dockerize the Microservice
- Inside the project, create a Dockerfile:
  FROM mcr.microsoft.com/dotnet/aspnet:7.0
    COPY . /app
    WORKDIR /app
    RUN dotnet build
CMD ["dotnet", "MyMicroservice.dll"] - Build and run the Docker container:
 docker build -t my-microservice .
 docker run -p 8080:80 my-microservice
Now, you are ready to build more advanced microservices and deploy them in real-world applications!
Communication in .NET Microservices
1. Overview of Microservices Communication
In "A Complete .NET Microservices Tutorial," one of the most important aspects is how microservices communicate with each other. Since microservices are small, independent services, they need a way to share data and work together.
There are two main types of communication: Synchronous and Asynchronous. Synchronous means that a microservice waits for a response before continuing, like a phone call. Asynchronous means it sends a message and continues its work, like sending a text and waiting for a reply later.
2. Synchronous Communication Using HTTP and gRPC
The most common way for .NET microservices to communicate is through REST APIs using HTTP requests. This is like how a browser talks to a website. One microservice calls another, waits for a response, and processes the result.
Another faster way to communicate is using gRPC (Google Remote Procedure Call). gRPC uses binary messages instead of text-based JSON, making it much faster and more efficient for microservices. It is great for real-time communication in high-performance .NET applications.
Example: Calling a Microservice Using HTTP
  using System.Net.Http;
  using System.Threading.Tasks;

    public class UserServiceClient
     {
        private readonly HttpClient _httpClient;

         public UserServiceClient(HttpClient httpClient)
    {
          _httpClient = httpClient;
    }

         public async Task GetUserDataAsync()
        {
           var response = await _httpClient.GetAsync("https://example.com/api/users");
           return await response.Content.ReadAsStringAsync();
       }
     }
3. Asynchronous Communication with Message Brokers
Sometimes, waiting for a response slows down the system. Instead, microservices can send messages and continue their work. This is called asynchronous communication, and it makes services loosely coupled (not directly dependent on each other).
To make this work, we use Message Brokers like:
- RabbitMQ: Lightweight and easy to use for event-driven communication.
- Apache Kafka: Best for handling large-scale streaming data.
- Azure Service Bus: A cloud-based solution for enterprise-level messaging.
Example: Sending Messages Using RabbitMQ
  using RabbitMQ.Client;
  using System.Text;

  var factory = new ConnectionFactory() { HostName = "localhost" };
  using var connection = factory.CreateConnection();
  using var channel = connection.CreateModel();

  channel.QueueDeclare(queue: "order_queue", durable: false, exclusive: false, autoDelete: false, arguments: null);

  string message = "New Order Placed!";
  var body = Encoding.UTF8.GetBytes(message);

  channel.BasicPublish(exchange: "", routingKey: "order_queue", basicProperties: null, body: body);
4. Using Event-Driven Architecture for Microservices
In event-driven architecture (EDA), microservices communicate using events instead of direct calls. When one service performs an action, it publishes an event. Other services subscribe to this event and react to it when needed.
This method is great for real-time updates and helps in building loosely coupled microservices. Tools like MediatR and MassTransit help in handling events in .NET.
Example: Publishing an Event Using MediatR
  using MediatR;
   public class OrderPlacedEvent : INotification
 {
     public string OrderId { get; set; }
 }

 public class OrderPlacedHandler : INotificationHandler
 {
     public Task Handle(OrderPlacedEvent notification, CancellationToken cancellationToken)
     {
          Console.WriteLine($"Order {notification.OrderId} placed successfully.");
         return Task.CompletedTask;
       }
  }
5. Handling Failures and Retries in Communication
Since microservices run over a network, failures can happen due to network issues, service downtime, or slow responses. A smart solution is to use retry policies and circuit breakers to prevent complete system failure.
The Polly library in .NET helps with automatic retries and failure handling.
Example: Implementing Retry Policy with Polly
 using Polly;
 using Polly.Retry;
 using System;
 using System.Net.Http;
 using System.Threading.Tasks;

 public class ResilientHttpClient
  {
    private static readonly AsyncRetryPolicy retryPolicy =
        Policy.HandleResult(r => !r.IsSuccessStatusCode)
              .RetryAsync(3);

    public async Task GetWithRetryAsync(string url)
    {
         using HttpClient client = new();
        return await retryPolicy.ExecuteAsync(() => client.GetAsync(url));
     }
  }
By implementing these best practices, you can build fast, scalable, and fault-tolerant microservices in .NET. Keep experimenting and optimizing for better performance!
Securing .NET Microservices
When you build .NET microservices, security is very important. Since microservices talk to each other over the internet, they can be attacked by hackers. You need to protect your APIs, data, and communication so that only the right users can access them. Let’s learn how to secure .NET microservices in the easiest way!
1. Authentication and Authorization in .NET Microservices
Before allowing someone to use your microservices, you must verify their identity (authentication) and decide what they can do (authorization). Here’s how you can do it:
- OAuth 2.0 and OpenID Connect: Secure logins using identity providers like Azure AD, Okta, or Auth0.
- JWT (JSON Web Token): A secure token-based login system where users get a token to access APIs.
- Role-Based and Policy-Based Authorization: Control access for admins, users, or guests in your application.
Example: Adding JWT Authentication in .NET
 services.AddAuthentication(JwtBearerDefaults.AuthenticationScheme)
        .AddJwtBearer(options =>
        {
            options.Authority = "https://secure-auth-server.com";
            options.Audience = "microservice_api";
        });
This makes sure that only trusted users can use your microservices.
2. Secure Communication Between Microservices
When microservices send data to each other, hackers can try to steal or change the data. To prevent this, you should:
- Use HTTPS and TLS: Encrypts data to keep it safe from hackers.
- Service-to-Service Authentication (mTLS): This ensures microservices only talk to trusted services.
- API Gateway Security: Use Ocelot or Azure API Management to check all requests.
Example: Enforcing HTTPS in .NET
app.UseHttpsRedirection(); This forces your microservices to always use secure HTTPS connections.
3. Protecting APIs with Rate Limiting and Throttling
If someone sends too many requests to your microservice, it can crash or become slow. To stop this, you can:
- Use Rate Limiting: Blocks users who send too many requests in a short time.
- Throttling: Slows down requests when a user crosses the limit.
- API Gateway Rate Limiting: Control traffic automatically with Azure API Management.
Example: Adding Rate Limiting in .NET
  services.AddRateLimiter(options =>
        options.GlobalLimiter = PartitionedRateLimiter.Create(
            context => RateLimitPartition.GetFixedWindowLimiter("global", TimeSpan.FromSeconds(10), 100)
        ));
This prevents overloading your microservice and protects it from attacks.
4. Logging, Monitoring, and Threat Detection
You need to keep an eye on your microservices to catch security issues before they become big problems. You can do this by:
- Logging Everything: Save logs using Serilog or ELK Stack for later checking.
- Monitoring Performance: Track API requests and errors with Azure Application Insights.
- Detecting Attacks: Use Microsoft Defender for Cloud to detect threats.
Example: Adding Serilog for Logging
  Log.Logger = new LoggerConfiguration()
        .WriteTo.Console()
        .WriteTo.File("logs/microservice-log.txt")
  .CreateLogger();
This records all necessary actions so you can find and fix problems quickly.
Deploying .NET Microservices
After building your .NET microservices, the next big step is to deploy them properly. A good deployment ensures that your microservices are fast, secure, and always available. Let's examine this step by step.
1. Choosing the Right Deployment Strategy
There are different ways to deploy microservices. Based on your project needs, you need to choose the best strategy.
- Single-Service Deployment: You deploy one microservice at a time, but it can cause downtime.
- Rolling Updates: New updates replace old versions slowly, so there is no downtime.
- Blue-green deployment: Two versions (old and new) run simultaneously, and you can switch safely.
- Canary Releases: New updates are tested on a few users before being made available to everyone.
2. Deploying .NET Microservices on Docker
Docker is a popular tool for packaging and running microservices. It allows for the deployment of .NET microservices without worrying about system differences.
Steps to Deploy .NET Microservices with Docker
- Write a Dockerfile to define how your microservice runs.
- Use Docker Compose to manage multiple microservices.
- Run the microservice using Docker commands.
Example: Dockerfile for a .NET Microservice
 FROM mcr.microsoft.com/dotnet/aspnet:7.0
    COPY . /app
    WORKDIR /app
    CMD ["dotnet", "MicroserviceApp.dll"]
This helps you create a container for your microservice that runs anywhere.
3. Deploying .NET Microservices on Kubernetes
Kubernetes is a powerful tool for managing microservices automatically. It helps with scaling, load balancing, and monitoring your services.
Steps to Deploy on Kubernetes
- Write YAML configuration files for your microservices.
- Use kubectl to deploy and manage them.
- Monitor and update them using Helm charts.
Example: Kubernetes Deployment YAML
 apiVersion: apps/v1
    kind: Deployment
    metadata:
      name: microservice-deployment
    spec:
      replicas: 3
      selector:
        matchLabels:
          app: microservice
      template:
        metadata:
          labels:
            app: microservice
        spec:
          containers:
          - name: microservice-container
            image: my-microservice:latest
This file tells Kubernetes to run 3 copies of your microservice for better performance.
4. Cloud Deployment Options for .NET Microservices
You can deploy .NET microservices on cloud platforms for better scalability and security.
- Azure Kubernetes Service (AKS): Best for running .NET apps in the Microsoft cloud.
- AWS ECS and EKS: Amazon's services for managing Docker and Kubernetes.
- Google Kubernetes Engine (GKE): Google's cloud solution for microservices.
5. CI/CD for Automated Deployment
Continuous Integration and Continuous Deployment (CI/CD) help in automating the deployment process so that your microservices are always updated.
Popular CI/CD Tools
- GitHub Actions: Automates build and deployment using GitHub.
- Azure DevOps: Best for deploying .NET microservices to Azure.
- Jenkins: A popular tool for automating deployments.
Example: GitHub Actions CI/CD for .NET
  name: CI/CD Pipeline
    on: [push]

    jobs:
      build:
        runs-on: ubuntu-latest
        steps:
          - name: Checkout Code
            uses: actions/checkout@v3

          - name: Build and Test
            run: dotnet build && dotnet test

          - name: Deploy to Azure
            run: az webapp deploy --name my-microservice --resource-group my-group
This automatically builds, tests, and deploys your .NET microservices.
Securing .NET Microservices
Security is very important when working with .NET microservices. If your microservices are not secure, hackers can steal sensitive data, disrupt services, or exploit vulnerabilities.
In this guide, you will learn about the best security practices for .NET microservices, including authentication, data protection, secure communication, and deployment security.
1. Authentication and Authorization
Authentication verifies user identity, while authorization controls their access to different services.
1. Using JWT for Authentication
JWT (JSON Web Token) is one of the most used authentication mechanisms in microservices. It allows secure user login and helps in passing user identity securely between services.
 public void ConfigureServices(IServiceCollection services)
  {
    services.AddAuthentication(JwtBearerDefaults.AuthenticationScheme)
        .AddJwtBearer(options =>
        {
            options.TokenValidationParameters = new TokenValidationParameters
            {
                ValidateIssuer = true,
                ValidateAudience = true,
                ValidateLifetime = true,
                ValidateIssuerSigningKey = true,
                ValidIssuer = "yourdomain.com",
                ValidAudience = "yourdomain.com",
                IssuerSigningKey = new SymmetricSecurityKey(Encoding.UTF8.GetBytes("your-secret-key"))
            };
        });
  }
2. Role-Based Access Control (RBAC)
RBAC is a technique that assigns permissions based on user roles. For example, an admin can perform all operations, but a regular user has limited access.
  [Authorize(Roles = "Admin")]
  public IActionResult GetAdminData()
  {
      return Ok("Only Admin can access this!");
  }
2. Secure Communication Between Microservices
Ensuring safe data transfer between microservices is essential to prevent cyberattacks.
1. Using HTTPS
Always use HTTPS instead of HTTP to encrypt data. This prevents hackers from stealing sensitive information while data is transmitted between microservices.
2. Mutual TLS (mTLS) for Service Security
Mutual TLS (mTLS) is a method where both the client and server verify each other’s certificates before communication. This ensures that only trusted microservices talk to each other.
3. Data Security in .NET Microservices
Protecting data from unauthorized access ensures privacy and system integrity.
1. Encrypting Sensitive Data
You should encrypt sensitive data like passwords, payment details, and user information before storing it in a database.
2. Preventing SQL Injection
SQL injection is a common attack where hackers try to inject malicious SQL queries into your system.
  var command = new SqlCommand("SELECT * FROM Users WHERE Username = @username", connection);
  command.Parameters.AddWithValue("@username", userInput);
4. Logging and Monitoring for Security
Tracking and monitoring security logs helps detect suspicious activities early.
1. Using Serilog and Application Insights
Serilog and Azure Application Insights help in tracking security issues like failed logins, suspicious activities, and API misuse.
5. Security Best Practices for Deployment
Following best security practices ensures the safe and smooth deployment of microservices.
Securing Docker Containers
- Use official .NET Docker images
- Scan containers for vulnerabilities
- Do not run containers as root
By following these security best practices, your .NET microservices will be safe from attacks and run smoothly.
Testing and Debugging in .NET Microservices
Testing and debugging help ensure that .NET microservices are stable, secure, and efficient. Without proper testing, microservices might fail, slow down, or cause unexpected issues when handling real-world traffic.
1. Introduction to Testing in .NET Microservices
Testing is very important in .NET microservices because it helps to check if everything is working fine before going live. If you don’t test properly, your microservices might crash, give wrong results, or even fail under high traffic.
There are different types of tests, like unit testing, integration testing, API testing, and performance testing. These tests help in making sure that each microservice runs correctly and interacts well with others.
2. Unit Testing in .NET Microservices
Unit testing is about testing small parts of the microservice separately. These small parts could be functions, methods, or classes.
- In .NET microservices, we use frameworks like xUnit, MSTest, and NUnit to write unit tests.
- Unit testing helps in finding bugs in the early stages of development.
- It ensures that each part of the microservice works as expected before combining everything.
  using Xunit;

  public class MathTests
  {
    [Fact]
    public void Add_TwoNumbers_ReturnsSum()
    {
        int result = MathService.Add(2, 3);
        Assert.Equal(5, result);
      }
  }
3. Integration Testing for Microservices
Integration testing checks how different microservices work together. Even if unit tests pass, microservices might still fail when communicating with each other.
- In .NET, we use TestServer, Docker, and In-Memory Databases to run integration tests.
- These tests ensure that APIs, databases, and external services interact correctly.
- It helps in catching issues like wrong API responses or failed connections between microservices.
   public class MyIntegrationTests
   {
      private readonly HttpClient _client;
       public MyIntegrationTests()
      {
          var server = new TestServer(new WebHostBuilder().UseStartup<Startup>());
          _client = server.CreateClient();
      }
     [Fact]
     public async Task Get_Endpoint_ReturnsSuccess()
     {
          var response = await _client.GetAsync("/api/products");
        response.EnsureSuccessStatusCode();
     }
   }
4. API Testing in .NET Microservices
API testing makes sure that APIs return correct responses, handle errors properly, and work under different conditions.
- Postman and Swagger are popular tools for manual API testing.
- Automated API tests can be written using RestSharp or xUnit.
  var client = new RestClient("https://myapi.com/api/products");
  var request = new RestRequest(Method.GET);
  IRestResponse response = client.Execute(request);
  Assert.Equal(HttpStatusCode.OK, response.StatusCode);
5. Load and Performance Testing
Even if a microservice works fine in normal conditions, it might crash when too many users access it at the same time.
- Load testing checks how a system performs under high traffic.
- Performance testing ensures microservices respond quickly and use resources efficiently.
- JMeter and k6 are popular tools for performance testing in .NET.
  import http from 'k6/http';
  import { check } from 'k6';

  export default function () {
    let res = http.get('https://myapi.com/api/products');
    check(res, { 'response code was 200': (r) => r.status == 200 });
  }
6. Debugging Techniques for .NET Microservices
If something goes wrong, debugging helps find the issue. Some common debugging techniques are:
- Using logs with Serilog and Application Insights to track errors.
- Debugging in Visual Studio to find issues in real-time.
- Remote debugging for microservices running on Docker or Kubernetes.
  Log.Logger = new LoggerConfiguration()
      .WriteTo.Console()
      .WriteTo.File("logs/myapp.txt", rollingInterval: RollingInterval.Day)
      .CreateLogger();
  Log.Information("This is a log message!");
7. CI/CD and Automated Testing
CI/CD makes testing easier by automating the process.
- GitHub Actions, Azure DevOps, and Jenkins help in running tests automatically.
- This ensures that new code changes do not break existing features.
- Automated testing in CI/CD pipelines reduces manual work and speeds up deployment.
  name: .NET Microservices CI

  on: [push]

  jobs:
    test:
      runs-on: ubuntu-latest
      steps:
        - uses: actions/checkout@v2
        - name: Setup .NET
          uses: actions/setup-dotnet@v1
          with:
            dotnet-version: 6.0
        - name: Run tests
          run: dotnet test
8. Best Practices for Testing and Debugging
- Follow Test-Driven Development (TDD): Write tests before writing the actual code.
- Use proper error handling: Catch and log exceptions properly.
- Mock dependencies in unit tests: Avoid using actual databases or external APIs.
- Run automated tests regularly: Prevent new bugs from breaking the system.
- Monitor logs continuously: Identify security threats or system failures.
Monitoring and Logging in .NET Microservices
Monitoring and logging are very important in .NET microservices because they help you find and fix problems before they become big. Monitoring lets you check if your services are running properly, while logging keeps records of everything happening inside your system. Without proper monitoring and logging, issues can go unnoticed and cause major failures.
1. Why is monitoring important?
Monitoring helps you track the health and performance of your microservices. If a service is slow or not working, monitoring tools can send alerts so you can fix the issue before users face problems.
- It helps detect errors early and avoid downtime.
- Improves system performance by identifying slow services.
- Helps in capacity planning to avoid server overload.
Without monitoring, you might not know something is wrong until users complain. That’s why every microservices system must have a proper monitoring setup.
2. Best Tools for Monitoring and Logging
There are many tools available that help in tracking and logging your .NET microservices. These tools collect performance data and show useful insights to help you make improvements.
Some of the best monitoring tools include:
- Azure Application Insights: Monitors the performance of your .NET microservices in real-time.
- Prometheus and Grafana: Collects and visualizes system metrics like CPU usage, memory, and request time.
- ELK Stack (Elasticsearch, Logstash, and Kibana): Helps in log collection, searching, and visualization.
For logging, Serilog and NLog are great choices to store logs in a structured way. Using the right tools makes it easier to find and fix issues.
3. Centralized Logging for Better Debugging
When multiple microservices are running, logs should be stored in one place. Centralized logging helps in tracking issues across different services without searching in multiple locations.
- Logs from all services are stored in a single location.
- Developers can easily search logs to find errors.
- Makes debugging faster and more efficient.
You can use Fluentd or Logstash to collect logs from different services and store them centrally. This way, you don’t have to check each microservice separately when something goes wrong.
4. Real-Time Alerts for Quick Issue Resolution
Real-time alerts help in detecting failures before they cause big problems. You don’t want to wait for users to report issues. Instead, alerts notify you as soon as something goes wrong.
- Alerts can be sent via email, SMS, or Slack when errors occur.
- Azure Monitor and Prometheus Alertmanager are great tools for setting up real-time alerts.
- Helps in quickly fixing critical problems before they impact users.
If a microservice crashes or slows down, real-time alerts allow you to act immediately, reducing downtime and improving reliability.
5. Best Practices for Effective Monitoring
To make sure your .NET microservices run smoothly, follow these best practices for monitoring and logging:
- Use structured logging: Store logs in a format that is easy to read and search.
- Set up automated alerts: Get notified as soon as something goes wrong.
- Monitor API calls and database queries: Identify slow responses and fix performance issues.
- Use tracing tools like OpenTelemetry: Track requests between different microservices to find bottlenecks.
When you apply these best practices, monitoring and logging become efficient and easy to manage.
Common Challenges in .NET Microservices
When you use .NET microservices, you get many benefits like flexibility and easy scaling. But some problems can make things difficult. If you don’t handle these properly, your system can become slow and hard to manage. Here are six common challenges in microservices and how to solve them.
1. Communication Between Services
Each microservice is like a small independent system, but they still need to talk to each other. If one service stops working, others may also face issues. To avoid this, you can use message queues like RabbitMQ or Kafka, which help services communicate smoothly. Also, use circuit breakers like Polly to prevent failures from spreading.
2. Managing Data in Different Services
Each microservice has its own database, which can make it hard to keep data consistent across services. If one service updates data, another might not get the update immediately. To fix this, you can use event-driven architecture, where changes in one service automatically update others. You can also use the Saga pattern to handle transactions across services.
3. Keeping Microservices Secure
Because microservices talk to each other over a network, hackers can try to steal information or break into your system. To keep your services safe, use JWT tokens and OAuth 2.0 to make sure only the right users can access them. Also, always use HTTPS to encrypt data and store important information securely in Azure Key Vault or AWS Secrets Manager.
4. Deploying and Managing Many Services
When you have lots of microservices, it can be hard to manage them all at once. Updating one service without breaking others can be tricky. To make things easier, you can use Kubernetes or Docker Swarm, which help you organize, update, and scale your microservices automatically.
5. Finding and Fixing Errors
If something goes wrong in one service, it can be difficult to find where the problem is because logs and errors are spread across multiple services. Instead of checking each service manually, use logging and monitoring tools like ELK Stack (Elasticsearch, Logstash, and Kibana) or Prometheus and Grafana to track errors in one place.
6. Avoiding Slow Responses
When microservices talk to each other, it takes time, and too many API calls can slow down your system. This is called network latency. To fix this, you can use caching tools like Redis, which stores frequently used data so that services don’t need to keep asking for the same information. You can also use gRPC, which is faster than regular REST APIs.
Want to move from theory to practice? Check out our Java Microservices Training and .NET Software Architecture & Design Training with real-world projects.
Conclusion
In conclusion, .NET microservices are powerful, but they come with challenges that need proper solutions. By using the right tools and best practices, you can make your system more reliable and secure. Handling issues like service communication, security, and performance will help microservices run smoothly. With careful planning and the right approach, you can build scalable and efficient microservices without significant problems.
Boost your career with the .NET Microservices Course and gain expert skills in designing scalable applications.
Test Your Skills By Following MCQs
Boost your confidence and test your knowledge with these quick and powerful MCQs – perfect for interviews and real-world skills!
Q 1: What is the main goal of using microservices in .NET?
FAQs
The biggest challenges include service communication, data management, security, deployment, monitoring, and performance issues. Without proper solutions, these challenges can make microservices complex and hard to manage.
You can improve communication by using message brokers like RabbitMQ or Kafka for asynchronous messaging. Also, using an API Gateway helps manage API requests efficiently and securely.
The best way to secure microservices is to use JWT authentication, OAuth 2.0, and HTTPS encryption. You should also store sensitive data securely in tools like Azure Key Vault or AWS Secrets Manager.
You can monitor microservices using logging and monitoring tools like ELK Stack, Prometheus, and Grafana. These tools help track logs, detect errors, and analyze system performance in real-time.
Tools like Kubernetes and Docker Swarm help in managing and deploying multiple microservices. They allow you to scale services automatically and handle failures efficiently.
Take our Microservices skill challenge to evaluate yourself!

In less than 5 minutes, with our skill challenge, you can identify your knowledge gaps and strengths in a given skill.