


21
MarFull-Stack .NET Developer Interview Q&A for 10 Year Experienced Professionals
18 Jul 2025
Question
38.6K Views
45 min read

Learn with an interactive course and practical hands-on labs
Free ASP.NET Core Online Course with Certificate - Start Now
Full-Stack .NET Developer Interview Questions and Answers:
.NET is an ever-evolving framework developed by Microsoft. It supports services, websites, and desktop applications on Windows, Linux, Mac, etc. In this .NET tutorial, we will look at the Full-Stack .NET Developer Interview Questions and Answers for 10+ years of experienced professionals. We have segregated the questions into three categories based on technology i.e. .NET, Angular, and Azure.
.NET Questions and Answers for Full-Stack .NET Developer
1. How do you handle security in your project?
Handling security in a .NET project involves multiple layers, from the application level down to the infrastructure. Here are some key practices and considerations to enhance security in your .NET projects:
- Use ASP.NET Core Identity for Authentication and Authorization
- ASP.NET Core Identity is a comprehensive system for managing users, passwords, profile data, roles, claims, tokens, email confirmation, and more.
- It supports password hashing, and session management, and is easily configurable for common scenarios.
- Implement HTTPS
- Enforce HTTPS to ensure that data in transit is encrypted. ASP.NET Core provides easy-to-use tools to enforce HTTPS across your application.
- Use HSTS (HTTP Strict Transport Security) to ensure browsers only send requests over HTTPS.
- Secure Your Data
- Utilize Entity Framework Core with parameterized queries to protect against SQL injection.
- Use Data Protection APIs to encrypt sensitive data stored in your application or database.
- Cross-Site Scripting (XSS) Protection
- ASP.NET Core automatically encodes output to prevent XSS attacks. Ensure that any custom HTML content is sanitized.
- Use Content Security Policy (CSP) headers to restrict the sources of executable scripts.
- Cross-Site Request Forgery (CSRF) Protection
- ASP.NET Core includes built-in support for CSRF protection by validating anti-forgery tokens in form submissions and AJAX requests.
- Dependency Management and Security
- Regularly update your NuGet packages to the latest versions to mitigate vulnerabilities.
- Use tools like NuGet Package Manager and Visual Studio’s built-in security features to identify and manage outdated or vulnerable dependencies.
- Configure Security Headers
- Implement security headers like X-Content-Type-Options, X-Frame-Options, and Content-Security-Policy to protect against various types of attacks.
- Tools like NWebsec can be used to easily configure these headers in ASP.NET Core.
- Logging and Monitoring
- Use ASP.NET Core’s built-in logging to log security-relevant events. Integrate with a centralized log management solution for monitoring and alerts.
- Consider using Application Insights for detailed telemetry and performance monitoring.
- Secure Session Management
- Configure session cookies correctly, marking them as HttpOnly and Secure, and consider setting the SameSite attribute to prevent CSRF.
- Manage session expiration and invalidation properly, especially on logout.
- Application Settings and Secrets Management
- Avoid storing sensitive information in your code or app settings files. Use Azure Key Vault or ASP.NET Core's Secret Manager for local development to manage application secrets.
- Regular Security Audits and Code Reviews
- Perform regular security audits and code reviews to identify and mitigate potential security issues.
- Consider using automated tools like OWASP ZAP or Veracode to scan for vulnerabilities.
Read More - Full Stack .Net Developer Salary For Freshers
2. How have you increased performance in your project?
Here are several strategies I've implemented to enhance performance in .NET projects:
- Optimize Data Access
- Use Entity Framework Core efficiently by selecting only the needed columns, avoiding Include overuse, and leveraging async operations to improve database access performance.
- Consider using Dapper for high-performance scenarios where raw SQL queries are necessary.
- Caching
- Implement caching strategies to reduce database load and speed up response times. Use MemoryCache for storing frequently accessed data in memory.
- Utilize Distributed Cache (like Redis or SQL Server) for caching data in web farm scenarios where data needs to be shared across multiple servers.
- Asynchronous Programming
- Make use of async/await patterns to improve the scalability of web applications by freeing up threads while waiting for I/O operations to complete.
- Application Insights and Profiling
- Use Application Insights or other profiling tools to identify and diagnose performance bottlenecks in the application.
- Response Compression
- Implement response compression middleware in ASP.NET Core to reduce the size of responses sent over the network.
- Static Files and Content Delivery Network (CDN)
- Serve static files efficiently and, when possible, use a CDN to reduce load times for static assets by serving them closer to the user's location.
- Optimize Front-end Assets
- Minify and bundle JavaScript and CSS files to reduce the number of requests and the size of the assets being loaded.
- Implement lazy loading for images and other heavy resources to improve page load times.
- Database Optimization
- Regularly perform database optimizations, including indexing, query optimization, and proper schema design to ensure efficient data access.
- Code Optimization and Best Practices
- Regularly refactor and review code to eliminate inefficient algorithms and data structures. Profile CPU and memory usage to find areas for improvement.
- Follow SOLID principles and clean code practices to maintain code quality, which indirectly contributes to performance by making optimizations easier to implement.
- Upgrade to the Latest .NET Versions
- Regularly update to the latest .NET versions to benefit from performance improvements and new features in the framework and runtime.
These strategies can significantly improve the performance of a .NET project. It's important to measure and monitor the impact of these changes using appropriate tools and metrics to ensure they are delivering the desired improvements.
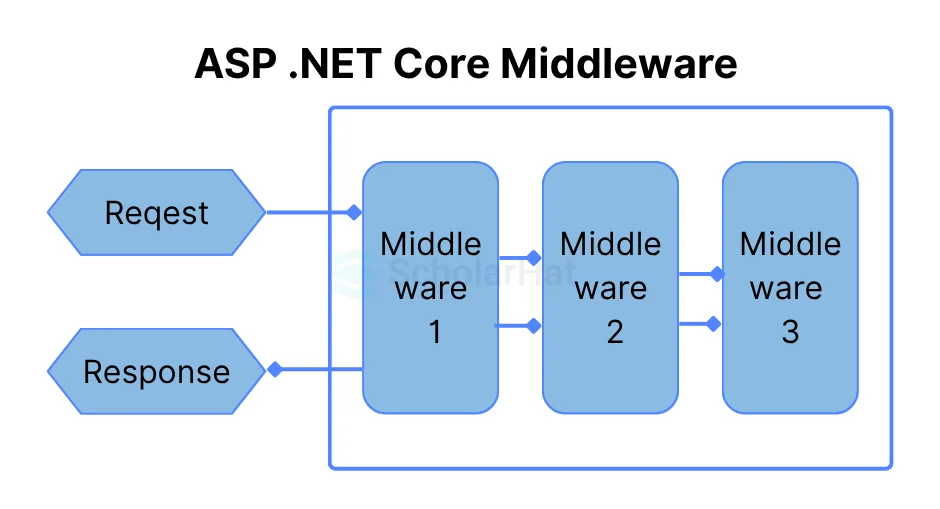
3. What is custom middleware? How you will implement custom middleware?
Custom middleware in the context of ASP.NET Core is a way to plug in your request processing logic into the application's HTTP pipeline. This pipeline consists of a sequence of middleware components that are executed for each HTTP request and response. Custom middleware allows you to perform operations such as logging, authentication, redirection, or any custom logic before or after the next component in the pipeline.
Implementing Custom Middleware in .NET 6
To implement custom middleware in a .NET 6 application, you need to follow these steps:
- Create the Middleware Class
You start by creating a class for your middleware. This class should have an Invoke or InvokeAsync method that includes the logic to be executed. The method must accept HttpContext as a parameter and return a Task. To continue the middleware pipeline execution, it should also have a parameter for the next middleware delegate.
Example of a Simple logging Middleware
public class CustomLoggingMiddleware { private readonly RequestDelegate _next; private readonly ILogger<customloggingmiddleware> _logger; public CustomLoggingMiddleware(RequestDelegate next, ILogger<customloggingmiddleware> logger) { _next = next; _logger = logger; } public async Task InvokeAsync(HttpContext context) { // Log the request _logger.LogInformation("Handling request: " + context.Request.Path); // Call the next middleware in the pipeline await _next(context); // Log the response _logger.LogInformation("Finished handling request."); } } - Create an Extension Method for the Middleware
It’s a common practice to create an extension method for the IApplicationBuilder interface to easily add your middleware to the pipeline. This makes it easier to register the middleware in the Startup class.
public static class CustomLoggingMiddlewareExtensions { public static IApplicationBuilder UseCustomLogging(this IApplicationBuilder builder) { return builder.UseMiddleware<customloggingmiddleware>(); } } - Register the Middleware in the Application Pipeline
Finally, you need to register your middleware in the application’s request pipeline. This is done in the Configure method of the Startup class or the Program.cs file in .NET 6.0 and above.
For a .NET 6 application, you would modify the Program.cs file like this:
var builder = WebApplication.CreateBuilder(args);
// Add services to the container.
var app = builder.Build();
// Configure the HTTP request pipeline.
app.UseCustomLogging(); // Register the custom middleware
app.Run();
This sequence will insert your custom middleware into the application pipeline, ensuring that your logic is executed for every request and response.
Key Points:
- Custom middleware is created by defining a class with an InvokeAsync method that processes the request and calls the next middleware.
- It's common to create an extension method for easy registration of the middleware.
- Middleware is registered in the application pipeline using the UseMiddleware extension method, typically in the Program.cs file for .NET 6 applications.
- Middleware components are executed in the order they are added to the pipeline.
4. What is CORS?
Cross-origin resource sharing (CORS) is a way of integrating programs. CORS outlines how client web applications loaded in one domain can interact with resources in another domain. This is useful since complicated apps frequently leverage third-party APIs and resources in their client code. CORS enables the client browser to verify with third-party servers to see if the request is authorized before transferring any data.
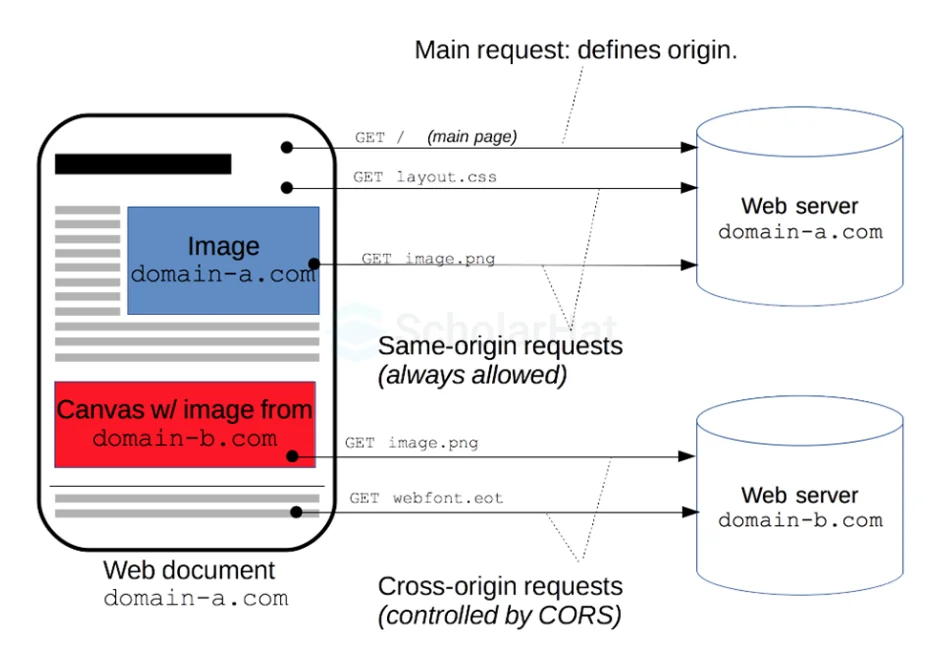
5. How do you define and restrict domain in CORS?
Define and restrict the domain in Cross-Origin Resource Sharing (CORS) by designating which websites are permitted to access your API or resources from a different domain. This is accomplished via HTTP headers given by the server in response to requests from other domains.
This is how it works:
- Defining the allowed origin
This specifies which websites or applications are permitted to make requests to your API or resource. There are numerous approaches to defining the acceptable origin:
- Specific origin: Using the Access-Control-Allow-Origin header, you can define a single origin, including the protocol, hostname, and port number (for example, https://example.com).
- Wildcard origin: To allow requests from any domain, specify a wildcard (*) as the origin value. This is not recommended for security reasons, as it allows uncontrolled access.
- Multiple origins: Use the Access-Control-Allow-Origin header to define a list of allowed sources separated by commas.
- Restricting access:
After you've set the approved origin, you can further restrict access by defining extra headers using other headers.
- Access-Control-Allow-Methods: This header specifies which HTTP methods the allowed origin can use to send requests (e.g., GET, POST, PUT).
Example
Access-Control-Allow-Methods: <method>[, <method>]* - Access-Control-Allow-Headers: This header specifies which HTTP headers the approved origin may include with its requests (for example, Authorization, Content-Type).
Example
Access-Control-Allow-Headers: <header-name>[, <header-name>]* - Access-Control-Allow-Credentials: This header specifies whether the browser should include cookies and authorization headers in the request to your API. Set it to true if your API requires authentication and session data.
Example
Access-Control-Allow-Credentials: true
- Access-Control-Allow-Methods: This header specifies which HTTP methods the allowed origin can use to send requests (e.g., GET, POST, PUT).
6. For .NET Core dependency injection, once use login will come under which category, AddSingleton AddScoped or AddTransient?
In ASP.NET Core's dependency injection, the decision between AddSingleton, AddScoped, and AddTransient is determined by the scope and lifetime of the service being registered.
- AddSingleton: The service is created once and then reused throughout the application's lifetime. If you register a service as a singleton, the same instance will be utilized for each request and will be created just once when the application is launched.
- AddScoped: The service is only created once per request. If you register a service as scoped, it will create a new instance for each HTTP request and it for all requested instances for the same service in that request.
- AddTransient: The service is created upon request. If you mark a service as transient, a new instance is produced each time it is requested.
7. How you will handle JWT after creation?
Handling JSON Web Tokens (JWT) after creation involves several key steps to ensure secure transmission, validation, and usage throughout your application's authentication and authorization processes. Here's a comprehensive approach to handling JWTs after you've created them, especially in the context of a .NET application:
- Secure Transmission
- HTTPS: Always use HTTPS to transmit the JWT between the client and server to prevent man-in-the-middle attacks.
- Cookies vs. Authorization Headers: Decide whether to send the JWT in a secure, HttpOnly cookie or through Authorization headers. Cookies can mitigate the risk of XSS attacks, while Authorization headers can prevent CSRF attacks. Choose based on your application's security requirements and architecture.
- Storage on the Client Side
- Web Applications: If you're using Authorization headers, store the JWT in memory or in secure, HttpOnly cookies. Avoid local storage or session storage if possible, as they are accessible through JavaScript and vulnerable to XSS attacks.
- Mobile Applications: Use secure storage solutions provided by the platform, such as Keychain on iOS or EncryptedSharedPreferences/Keystore on Android.
- Use in Subsequent Requests
- For every subsequent request after obtaining the JWT, it must be included in the request headers. For Authorization headers, it's typically sent as a Bearer token: Authorization: Bearer
- If using cookies, ensure they're sent with requests to domains that require authentication.
- For every subsequent request after obtaining the JWT, it must be included in the request headers. For Authorization headers, it's typically sent as a Bearer token: Authorization: Bearer
- Validation on the Server Side
- Expiration: Ensure that the JWT has not expired.
- Signature: Verify the JWT's signature to ensure it was issued by your server and has not been tampered with. In .NET, this is typically done using the JwtBearer middleware, which automatically validates the token on each request.
- Issuer and Audience Checks: Validate that the token's issuer (iss) and audience (aud) claims match your application's expected values.
- Scope/Role Checks: Optionally, verify that the JWT contains the required scopes or roles for the requested operation.
- Revocation and Logout
- JWTs are stateless and cannot be invalidated or revoked by the server. To handle logout or token revocation, you'll need to implement a server-side list of revoked tokens or use a short token expiry time combined with refresh tokens.
- Refresh Tokens: Implement refresh tokens to issue new JWTs. Store refresh tokens securely on the server and associate them with the user. On logout, invalidate the refresh token.
- Refresh Token Rotation and Re-issuance
- Implement refresh token rotation to improve security. Each time a refresh token is used to obtain a new JWT, issue a new refresh token and invalidate the old one.
- This prevents the long-term use of compromised refresh tokens and limits the damage an attacker can do.
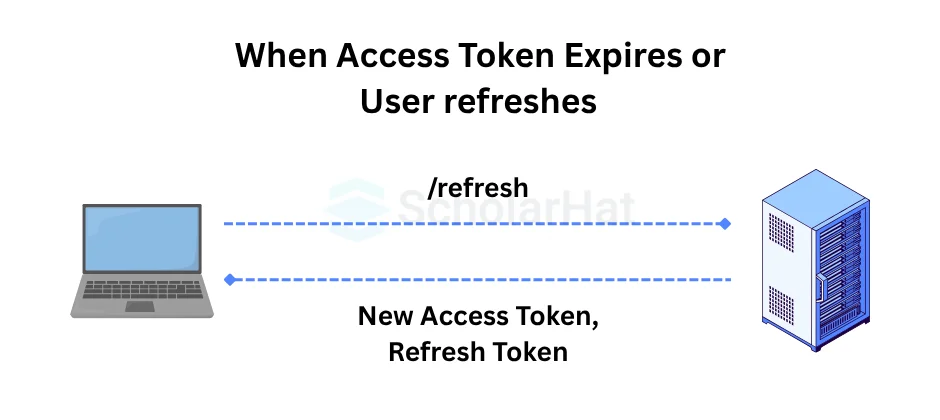
8. How do you refresh JWT?
- To refresh a JWT (JSON Web Token), you usually need a refresh token.
- During the initial user authentication process, generate an access token and a refresh token.
- Set a short expiration time for the access token (e.g., minutes) and a longer one for the refresh token (e.g., days).
- Include the access token in the Authorization header for API queries.
- If the access token expires, the server returns a 401 Unauthorised status.
- When your access token expires, send the refresh token to a token refresh endpoint.
- The server validates the refresh token and issues a new access token, as well as, if necessary, a new refresh token.
- Replace the old access token with the new one in future requests.
9. How are you handling Exception Global?
Middleware is commonly used in ASP.NET Core to handle global exception handling. Middleware is a pipeline component that inspects, modifies, or terminates incoming and outgoing requests. You can write custom middleware to handle exceptions and include it in the application flow.
10. How to handle XSRF Cross-site request forgery?
To minimize XSRF (Cross-Site Request Forgery) attacks, add anti-CSRF tokens in your online application. Create unique tokens for each user session and embed them in forms or headers. Validate these tokens on the server before processing requests to ensure that only valid requests from the same origin are accepted. To improve security, keep tokens updated and rotated regularly. Using secure coding methods and frameworks with built-in CSRF protection can also help defend against similar attacks.
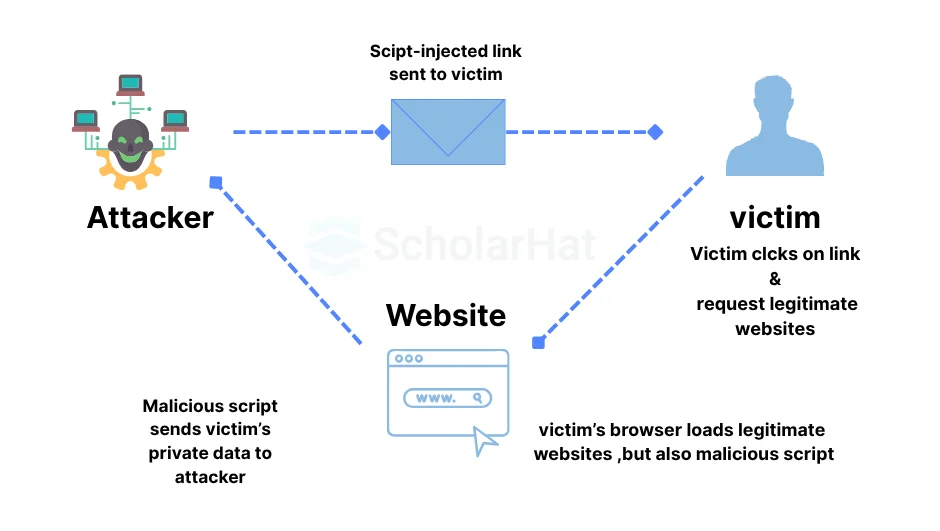
11. What is cross-site scripting?
Cross-site scripting (XSS) is an attack in which an attacker inserts malicious executable scripts into the code of a legitimate program or website. Attackers frequently launch an XSS attack by sending a malicious link to the user and tempting them to click it.
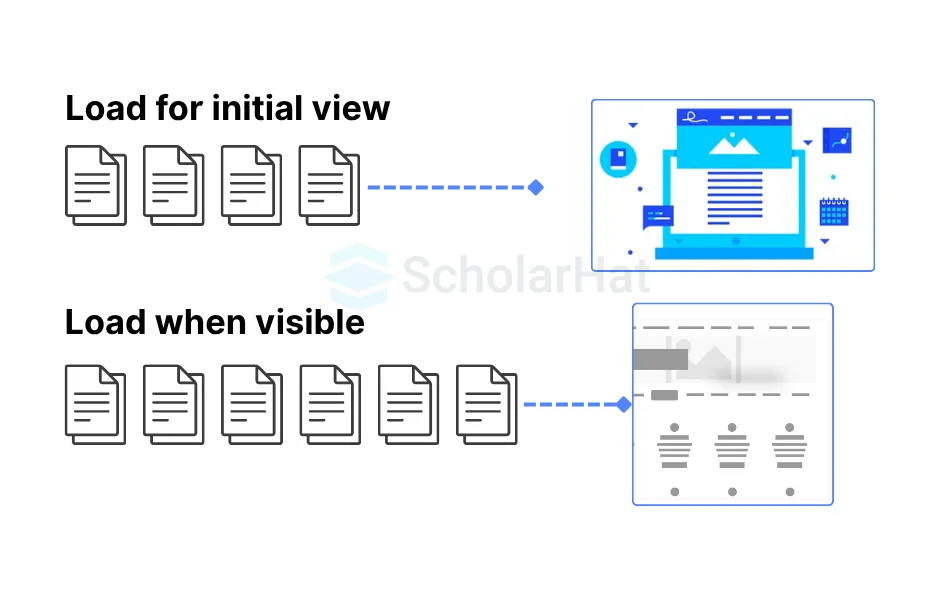
12. What is lazy loading?
Lazy loading is a technique that allows specific portions of a webpage, particularly images, to be loaded only when they are required. Instead of loading everything at once, often known as "eager" loading, the browser does not request certain resources until the user interacts in a way the resources are required.
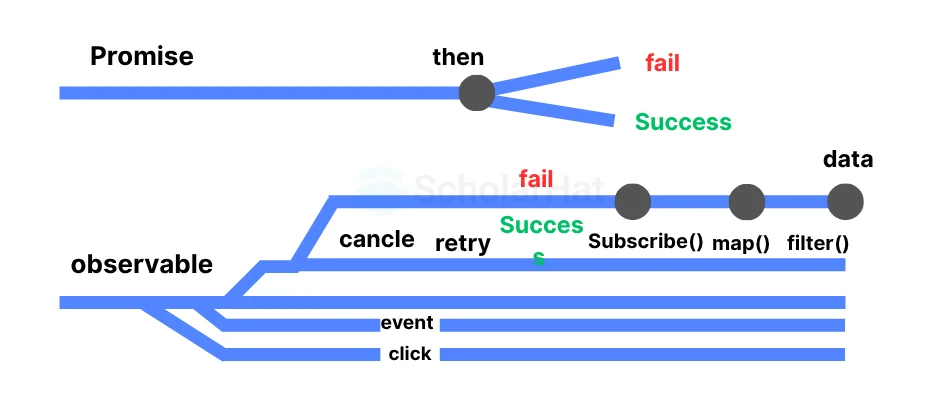
13. What is the key difference between promise and observable?
Promises can only return one value (or an error). Observables may produce numerous values, one value, or no values at all. For a web app, this means that observables can be utilized in numerous cases whereas promises cannot.
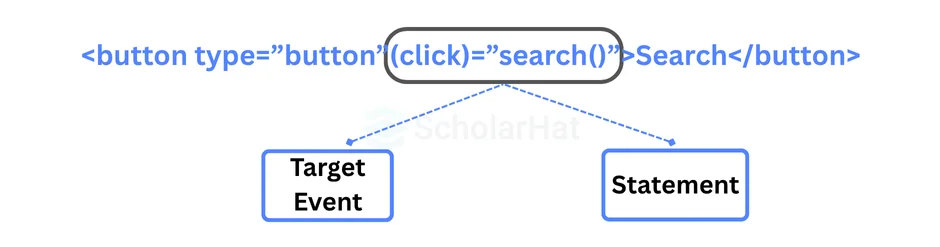
14. What is event binding?
Event binding is used to handle events triggered by user activities such as button clicks, mouse movements, and keystrokes. When a DOM event occurs at an element (e.g., click, key down, key up), it invokes the given method in the corresponding component.
15. Which tools or services can you use in a .NET project?
For .NET projects, a wide array of tools and services can be utilized to enhance development, testing, deployment, and monitoring. These tools and services range from IDEs (Integrated Development Environments) and libraries to cloud services and monitoring tools. Here's an overview of essential tools and services beneficial for .NET projects:
- Development and IDEs
- Visual Studio: A comprehensive IDE from Microsoft for .NET development, offering powerful features for coding, debugging, and testing.
- Visual Studio Code: A lightweight, cross-platform code editor that supports .NET development through extensions like C# for Visual Studio Code.
- Rider: A cross-platform .NET IDE from JetBrains that provides advanced features for .NET development.
- Version Control
- Git: A distributed version control system. GitHub, GitLab, and Bitbucket are popular platforms that host Git repositories and provide additional tools for code review and collaboration.
- Azure DevOps: Offers Git-based repositories, CI/CD pipelines, and project tracking tools.
- Continuous Integration and Continuous Deployment (CI/CD)
- Azure DevOps Pipelines: Provides build and release services for continuous integration and continuous deployment to Azure.
- GitHub Actions: Allows automation of workflows, including CI/CD, directly within GitHub repositories.
- Jenkins: An open-source automation server that can be used for automating all sorts of tasks, including building, testing, and deploying .NET applications.
- Package Management
- NuGet: The package manager for .NET, allowing developers to share and consume useful code.
- MyGet: Provides private NuGet feeds for teams that need to share packages privately.
- Testing
- NUnit: A unit-testing framework for all .NET languages.
- xUnit: Another popular test framework for writing .NET tests.
- Moq: A mocking library for .NET, useful for unit testing by creating mock objects.
- Selenium: For automated web application testing.
- Cloud Services
- Azure App Services: A platform for building and hosting web applications, REST APIs, and mobile backends.
- Azure Functions: An event-driven, serverless compute platform that can run .NET code in response to triggers.
- Azure VM: Allows running .NET Core applications on a VM.
- Database
- Entity Framework Core: An object-relational mapper (ORM) for .NET, supporting LINQ queries, change tracking, updates, and schema migrations.
- SQL Server: A relational database management system by Microsoft, integrating well with .NET.
- Azure Cosmos DB: A globally distributed, multi-model database service for building scalable and performance-intensive applications.
- Monitoring and Logging
- Application Insights: An extensible Application Performance Management (APM) service for web developers on multiple platforms.
- Serilog: A diagnostic logging library for .NET applications, allowing structured logging.
- ELK Stack: Elasticsearch, Logstash, and Kibana can be used for logging and visualizing logs and data.
- Security
- Azure Active Directory (AAD): For implementing secure identity and access management.
- Identity Server: An OpenID Connect and OAuth 2.0 framework for ASP.NET Core, enabling authentication and security features in .NET applications.
These tools and services encompass the full spectrum of .NET project development, from initial development through deployment and maintenance. Depending on the project requirements, developers might choose a combination of these tools to create efficient, scalable, and robust .NET applications.
16. How to implement Data caching in .NET?
Implementing data caching in .NET applications is a common approach to improve performance by reducing the time and resources required to fetch data repeatedly from a slower data source (like a database or an external web service). .NET provides several options for caching, including in-memory caching, distributed caching using Redis, and caching through third-party libraries.
Angular Questions and Answers for Full-Stack .NET Developer
17. How to do role-based authorization?
To enable role-based authentication in Angular, follow these steps:
- User Authentication: Implement safe user authentication with Angular tools or other libraries such as Firebase or Auth0. Create features for user registration, password reset, and logins.
- Define User Roles: Define user roles like "admin," "user," and "guest" to customize access permissions for your application's needs.
- Route Guards: Use Angular's route guards to restrict access to specific routes based on user role. Create route guards that validate the user's role before allowing access to specific routes.
- Apply Route Guards: To improve Angular application security, employ route guards to enforce access restrictions based on user roles.
18. Where do you store JWT in angular Validation?
To ensure safe JWT storage, avoid utilizing local storage or session storage, which is subject to XSS. Instead, save JWTs in an httpOnly cookie. Unlike conventional cookies, httpOnly cookies are only delivered in HTTP requests, preventing JavaScript from accessing them. This protects tokens even if third-party scripts on your page are compromised, hence increasing overall security.
19. What you will do to increase performance in Angular security?
Here are ten best practices for making your Angular application faster, more efficient, and more scalable
- Use trackBy in the ngFor loops: Angular's ngFor directive is used to iterate through arrays and display the results on the screen. Using the trackBy function improves the list's display.
// app.component.ts @Component({ selector: 'app-root', templateUrl: './app.component.html', }) export class AppComponent { items = [ { id: 1, name: 'Item 1' }, { id: 2, name: 'Item 2' }, { id: 3, name: 'Item 3' } ]; trackByFn(index, item) { return item.id; } } - Use Lazy loading: Lazy loading modules improve the application's initial load time by only loading the components that are required.
Example
// app-routing.module.ts const routes: Routes = [ { path: '', component: HomeComponent }, { path: 'about', loadChildren: () => import('./about/about.module').then(m => m.AboutModule) } ]; - Avoid ngIf for complex expressions: Instead of a complex ngIf statement, utilize ngSwitch for better results.
- Implement an OnPush change detection process: Angular's OnPush change detection strategy checks for changes when the input changes, rather than every time the application updates.
Example
// app.component.ts @Component({ selector: 'app-root', templateUrl: './app.component.html', changeDetection: ChangeDetectionStrategy.OnPush }) export class AppComponent { @Input() items: Item[]; } - Use immutable data structures: Immutable data structures boost application performance by reducing needless data manipulation.
Example
@Component({ selector: 'app-root', templateUrl: './app.component.html', }) export class AppComponent { items = Object.freeze([ { id: 1, name: 'Item 1' }, { id: 2, name: 'Item 2' }, { id: 3, name: 'Item 3' } ]); } - Use the AOT compilation: Ahead of Time (AOT) compilation increases application performance by compiling template code during the build process.
Example
ng build –aot - Use Angular Universal for server-side rendering: Angular Universal enables the application to be rendered on the server, resulting in improved speed for users with slow connections.
- Use RxJS for reactive programming: RxJS enables developers to create reactive apps, in which data flows easily between components.
Example
import { Component, OnInit } from '@angular/core'; import { Observable } from 'rxjs'; @Component({ selector: 'app-example', template: ` {{ count$ | async }} Increment ` }) export class ExampleComponent implements OnInit { count$: Observable<number>; private count = 0; ngOnInit() { this.count$ = new Observable(subscriber => { setInterval(() => { this.count++; subscriber.next(this.count); }, 1000); }); } increment() { this.count++; } } - Use NgRx for state management: NgRx is an Angular state management library that enhances application performance by providing a single source of truth for the application's state.
- Use Web Workers: Web Workers run scripts in the background, boosting application speed by moving CPU-intensive tasks to a different thread.
20. How do different components in Angular communicate with each other?
Components are the basis of Angular. So we need to know how components communicate with one another.
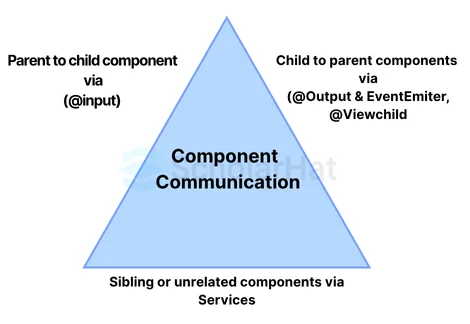
There are three options:
- Parent-to-child sharing data via input: We utilize the @input decorator to transfer data across the parent and child components.
Example
parent.component. import { Component } from '@angular/core'; @Component({ selector: 'app-parent', template: ` ` }) export class ParentComponent { message = 'Hello from the parent!'; } child.component import { Component, Input } from '@angular/core'; @Component({ selector: 'app-child', template: ` Message from parent: {{ childMessage }} ` }) export class ChildComponent { @Input() childMessage: string; } - child to parent - sharing data via viewChild with AfterViewInit: It allows the child component to be injected into the parent component, granting the parent component access to its child's attributes and functions. Parents will only have access after the view has been initialized.
Example
parent.component import { Component, ViewChild, AfterViewInit } from '@angular/core'; import { ChildComponent } from './child.component'; @Component({ selector: 'app-parent', template: ` Log Child Data ` }) export class ParentComponent implements AfterViewInit { @ViewChild('myChild') childComponent: ChildComponent; ngAfterViewInit() { console.log(this.childComponent.data); // Access child component's data } logChildData() { console.log(this.childComponent.getData()); // Call child component's function } } child.component import { Component } from '@angular/core'; @Component({ selector: 'app-child', template: `...` }) export class ChildComponent { data = 'Data from the child'; getData() { return this.data; } } - child to parent - sharing data via output and EventEmitter: You use this method when you want to share information about button clicks or other occurrences. The child component utilizes @output to convey data to the parent by triggering an event using an EventEmitter imported from @angular/core.
Example
Child.component
import { Component, Output, EventEmitter } from '@angular/core';

@Component({
  selector: 'app-child',
  template: `
    Send Message
  `
})
export class ChildComponent {
  @Output() childMessage = new EventEmitter();

  sendMessage() {
    this.childMessage.emit('Message from child!');
  }
}

Parent.Component
import { Component } from '@angular/core';

@Component({
  selector: 'app-parent',
  template: `

  `
})
export class ParentComponent {
  receiveMessage(message: string) {
    console.log('Received message from child:', message);
  }
}
Azure Questions and Answers for Full-Stack .NET Developer
21. How do you see errors in App service?
We can see errors in App Service in the following ways:
- App Service logs: Navigate to your App Service in the Azure Portal. Under the "Monitoring" section, select "App Service logs". Here, you can enable application logging (for Windows and Linux), web server logging, detailed error messages, and failed request tracing. Once enabled, you can download the logs directly from the portal or access them via FTP.
- Log stream: Still within the Azure Portal, under "Monitoring", there's a "Log stream" option that provides real-time logging information. This is useful for viewing logs without having to download them.
- Diagnostics and solve problems: The "Diagnose and solve problems" feature in the App Service menu offers a suite of diagnostic tools and guided troubleshooting that can help identify and solve common problems, including errors.
- Kudu Console (Advanced Tools): The Kudu Console (Advanced Tools in the Azure Portal) provides low-level details for your App Service. Access it by navigating to your App Service in the Azure Portal, then select "Advanced Tools" and click "Go". In Kudu, you can access log files, environment settings, and more. To view logs, navigate to the "Debug console" and select "CMD" or "PowerShell", where you can navigate to the "LogFiles" directory.
22. How you will log errors in the App Service?
Logging errors in the Azure App Service involves enabling and configuring various types of logging mechanisms to capture application errors, server errors, and other diagnostic information. Here’s a step-by-step guide on how to set up logging for different types of errors in an Azure App Service:
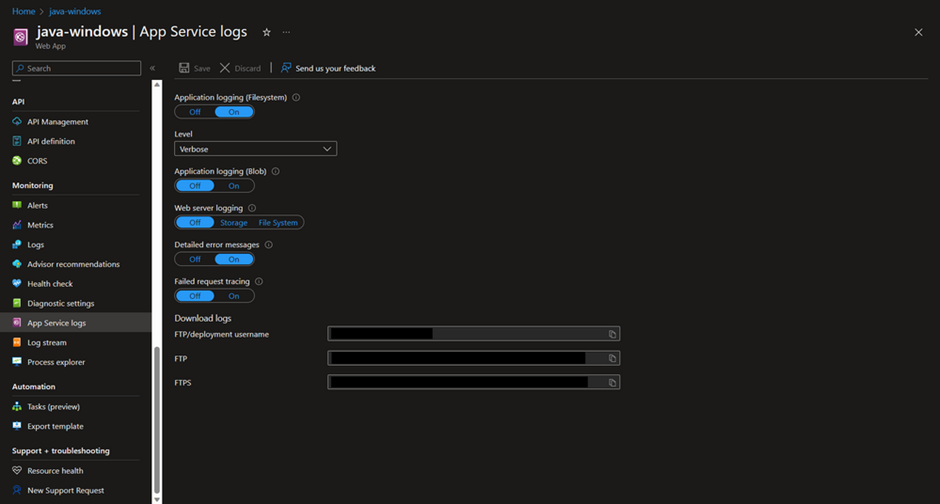
- Enable Application Logging
Application logging captures errors and other diagnostic information from your application code. You can enable this in both Windows and Linux environments.
- For Windows:
- Go to the Azure Portal, navigate to your App Service, and select "App Service logs" under Monitoring.
- Turn on "Application Logging (Filesystem)" for temporary logging or "Application Logging (Blob)" to store logs in Azure Blob Storage for long-term persistence.
- Choose the level of logging you need (Verbose, Information, Warning, Error).
- If you choose Blob storage, configure a storage account and container.
- For Linux:
- Similar to Windows, navigate to "App Service logs".
- Enable "Application Logging" and select the level of detail.
- Logs can be directed to the file system or blob storage.
- For Windows:
- Configure Web Server Logging
Web server logs capture information at the HTTP server level, including request details, which can be useful for diagnosing errors.
- In the "App Service logs" section, enable "Web server logging".
- Choose between filesystem or blob storage for storing logs.
- Set a retention period if you're using blob storage to automatically delete old logs.
- Enable Detailed Error Messages and Failed Request Tracing
For more granular error information, especially for troubleshooting HTTP error codes:
- Still in "App Service logs", enable "Detailed error messages" to capture detailed error information when your app returns HTTP status codes such as 5XX errors.
- Enable "Failed request tracing" to capture detailed information on failed HTTP requests. This is particularly useful for debugging request processing pipelines.
- Use Application Insights for Advanced Monitoring and Diagnostics
Application Insights provides rich, real-time performance monitoring and failure diagnostics. To set it up:
- In the Azure Portal, navigate to your App Service and select "Application Insights" under Monitoring.
- Choose to create a new Application Insights resource or link to an existing one.
- Follow the prompts to configure Application Insights, including instrumenting your application code as necessary, depending on your development framework.
- Accessing and Analyzing the Logs
Once logging is enabled, you can access and analyze logs through:
- The Azure Portal (e.g., via "App Service logs", "Log stream", or the Application Insights section).
- Downloading logs directly or accessing them via FTP if stored on the filesystem.
- Querying logs stored in Blob storage or using tools like Azure Storage Explorer.
- Using Kusto Query Language (KQL) in Application Insights for advanced queries and analytics.
23. How many types of azure functions are there?
Azure Functions support various types of triggers, each allowing you to execute code in response to different events. Here's an overview of the main types of Azure Function triggers:
- HTTP Trigger
Used for building APIs or webhooks. Functions can be invoked by HTTP requests.
- Timer Trigger
Executes a function on a schedule. Useful for recurring tasks like daily reports or database cleanup.
- Blob Trigger
Responds to events in Azure Blob storage. A function is executed when a file is added to or updated in a Blob storage container.
- Queue Trigger
Responds to messages arriving in an Azure Queue storage. Useful for processing tasks asynchronously.
- Service Bus Trigger
Triggers from messages on a Service Bus queue or topic. Ideal for integrating different systems or microservices.
- Event Grid Trigger
Responds to events delivered via Azure Event Grid. Supports a wide range of events (e.g., changes in Azure resources, custom events).
- Event Hub Trigger
Designed for high-throughput event processing from Azure Event Hubs. Useful for real-time data processing scenarios.
- Cosmos DB Trigger
Automatically runs a function in response to document changes in Azure Cosmos DB collections.
- SignalR Service Trigger
Facilitates real-time communications via Azure SignalR Service. Useful for applications requiring real-time data updates.
- Durable Functions Triggers
An extension of Azure Function that enables stateful functions in a serverless environment. It includes several types of triggers specific to orchestrating complex workflows, such as:
- Orchestrator functions: Manage function execution and state.
- Activity functions: Execute tasks in a workflow.
- Entity functions: Define operations for reading and updating small pieces of state.
24. How do you handle deadlock in the Azure queue?
Handling deadlocks in Azure Queue Storage typically involves addressing the potential for messages to become "stuck" or unprocessable, rather than traditional database deadlocks. If a message cannot be processed successfully by a consumer (for example, an Azure Function or a WebJob triggered by a queue message), it may repeatedly reappear in the queue and potentially block the processing of other messages. Here are strategies to handle such scenarios:
- Visibility Timeout
When a message is retrieved from the queue, it becomes invisible to other consumers for a specified "visibility timeout" period. If the message processing is not completed within this period, the message becomes visible again for processing. Adjust the visibility timeout based on the expected processing time to minimize the chance of another consumer picking up the message too soon.
- De-duplication
Implement logic in your application to handle duplicate messages gracefully. This can be achieved by making message processing idempotent (i.e., processing the same message multiple times results in the same outcome) or by tracking processed message IDs in a storage mechanism to prevent reprocessing.
- Poison Message Handling
A "poison message" cannot be processed successfully after several attempts. Implement logic to detect such messages and move them to a "dead-letter" queue or a storage table for later investigation, instead of letting them cycle endlessly. This often involves counting the number of attempts to process the message and moving it out of the processing queue after a certain threshold is reached.
- Improved Error Handling
Enhance error handling in the message processing logic to manage transient failures (e.g., retry policies) and permanent failures (e.g., moving to a dead-letter queue) differently. Utilize try-catch blocks to catch exceptions that may occur during processing and decide on the next steps based on the error type.
- Scaling and Partitioning
For high-volume scenarios, ensure that your queue processing is scalable and that you're partitioning workloads efficiently. This might involve using multiple queues to distribute workloads or scaling out the number of consumers based on the queue length.
- Monitoring and Alerts
Implement monitoring and alerting on your queues to detect anomalies such as a sudden increase in queue length, which may indicate processing issues or deadlocks. Azure Monitor and Application Insights can be configured to track these metrics and send alerts.
- Message Expiration
Set an appropriate time-to-live (TTL) for messages. Messages that are not processed within the TTL are automatically removed from the queue. This can prevent a system from being clogged by messages that cannot be processed.
- Concurrency and Throttling
Control the number of concurrent message processing operations to avoid overwhelming downstream systems or the message processing application itself. Implementing throttling can help maintain stability and prevent deadlocks from occurring due to resource contention.
Handling deadlocks in Azure Queue Storage is more about preventing a single or a set of messages from blocking the queue's processing capabilities. By implementing robust error handling, poison message handling, and thoughtful design around message visibility and processing, you can mitigate the impact of unprocessable messages on your system.
| Download this PDF Now - Full-Stack .NET Developer Interview Questions PDF By ScholarHat |

If you are preparing for the .NET Core Interview, this .NET Core Interview Questions and Answers Book can really help you. It has simple questions and answers that are easy to understand. Download and read it for free today!
Take our Net skill challenge to evaluate yourself!

In less than 5 minutes, with our skill challenge, you can identify your knowledge gaps and strengths in a given skill.