04
JulCreating a MEAN Stack SPA with CRUD Operations
MEAN stack stands for MongoDB, Express, AngularJS and Node.js. MEAN stack is a most popular full-stack JavaScript solution for developing fast, robust and scalable web applications. It uses MongoDB to store data in JSON/BSON formats which makes it well suited to use with JavaScript. It uses Express as Node.js web application framework. It uses AngularJS as front-end SPA development. It uses Node.js as Server Side JavaScript environment.
You can also check out a Node.js Free Course With Certificate to strengthen your backend skills and get certified.

#Why MEAN Stack
MEAN stack uses Node.js as javascript server-side environment which is based non-blocking I/O paradigm. Node.js provides more efficiency per CPU core than multi threads languages like C#, Java and Php etc. Also, there are following reasons to use MEAN stack for web development.
One Language
MEAN stack uses JavaScript as a programming language for both client-side and server-side. Language unification improve the developer productivity.
One Object
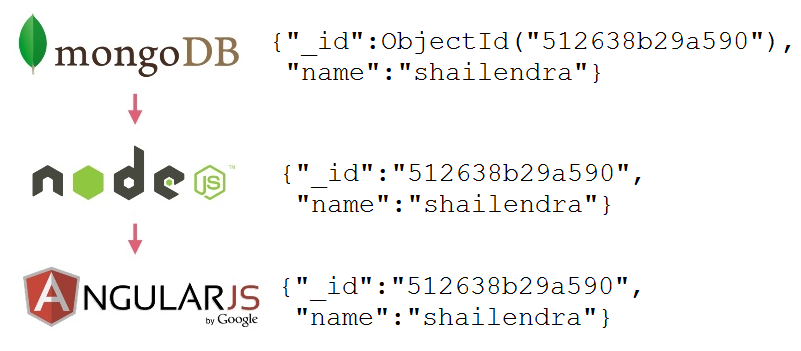
Programmers write code in object oriented fashion and MEAN stack allows you to play with same object on client-side, server-side and also in database-side. So, there is no need to use libraries for converting data into objects during client-side and server-side interaction.
NoSQL database
MEAN stack uses most popular NoSQL database (MongoDB) that is extremely flexible as compared to RDBMS. You don’t need to worry about the schema changes and database migrations.
Cross Platform
All the technologies used by the MEAN stack are cross platform compatible. They can run on windows, linux, mac etc.
Free and Open Source
All the technologies used by the MEAN stack are free and open-source. Hence, you need to worry about the cost.
Community Support
All the technologies used by the MEAN stack have very good community support. You will find a lot of samples for Node.js, Express, AngularJS and MongoDB.
Read More - Node JS Interview Questions and Answers
#MEAN App Structure
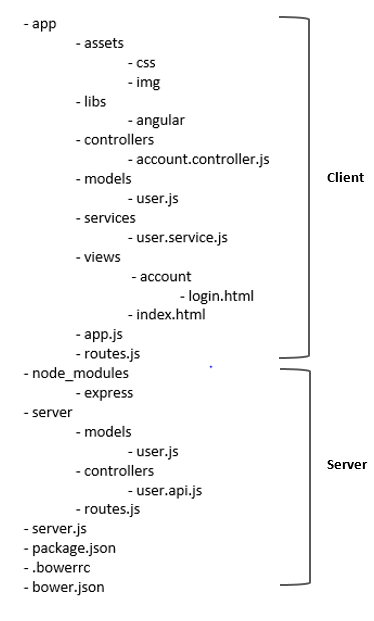
A typical folder structure for a MEAN stack application is given below:
#MEAN App Pre-requisite
Here, Node.js and Express will be used to develop backend like running server, configuration settings, and routing. MongoDB will be used to store data in JSON format. AngularJS will be used to develop application front-end part.
To get started with MEAN stack development, you should have the following softwares:
JavaScript Development IDE like Visual Studio Code, WebStorm, Brackets etc.
Node.js
MongoDB
#Setting Up MEAN Stack Application
Here, I am using VS Code for building the app. First of all, create an empty folder called "MEAN_App" in your drive, navigate to this folder and open it with VS Code.Let's inialize MEAN Stack app by running command npm init using VS Code integrated terminal.
> npm init
When you will run above command, it will ask to you some input like project name, version, description etc. Just provides all these inputs and in this way it will create a package.json file within your project folder having following code.
{
 "name": "mean_app",
 "version": "1.0.0",
 "description": "mean app",
 "main": "server.js",
 "scripts": {
 "test": "echo \"Error: no test specified\" && exit 1",
 "start": "node server.js"
 },
 "keywords": [
 "mean",
 "crud",
 "crud",
 "operations"
 ],
 "author": "shailendra",
 "license": "ISC"
}
#Installing Node Modules
Let's install node modules one by one, like express, body-parser and mongoose for backend code; and angular, angular-ui-router and bootstrap for front-end code. Use save option for adding node modules as production dependencies.
npm install express --save
npm install mongoose --save
npm install angular --save
npm install angular-ui-router --save
npm install bootstrap --save
#The Backend - Node, Express and MongoDB
Let's create backend of our application using Node.js, Express and MongoDB. First of all create server.js file within MEAN_App folder for creating a simple express server and create other folders and files as shown in given fig.
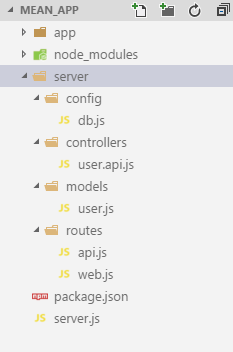
Now, write the code for express server as given below:
//========= importing modules ==========
var express = require('express'),
 path = require('path'),
 bodyParser = require('body-parser'),
 routes = require('./server/routes/web'), //web routes
 apiRoutes = require('./server/routes/api'), //api routes
 connection = require("./server/config/db"); //mongodb connection

// creating express server
var app = express();

//========= configuration ==========

//===== get all the data from the body (POST)

// parse application/json
app.use(bodyParser.json());

// parse application/x-www-form-urlencoded
app.use(bodyParser.urlencoded({ extended: false }));

// setting static files location './app' for angular app html and js
app.use(express.static(path.join(__dirname, 'app')));
// setting static files location './node_modules' for libs like angular, bootstrap
app.use(express.static('node_modules'));

// configure our routes
app.use('/', routes);
app.use('/api', apiRoutes);

// setting port number for running server
var port = process.env.port || 3000;

// starting express server
app.listen(port, function() {
 console.log("Server is running at : http://localhost:" + port);
});
#MongoDB Configuration
To define MongoDB configuration setting, add a db.js file in config folder and add following code to make a connection with MongoDB database.
var mongoose = require('mongoose');
var connection = mongoose.connect('mongodb://localhost/mean_db');

module.exports = connection;
#Mongoose Model
Let's define the MongoDB user document mappings with the help of Mongoose model. The Mongoose model allow us to handle CRUD operations on user document.
Let’s open server/models/user.js file and add the following code:
var mongoose = require("mongoose"),
 Schema = mongoose.Schema,
 objectId = mongoose.Schema.ObjectId;

var userSchema = new Schema({
 _id: { type: objectId, auto: true },
 name: { type: String, required: true },
 contactNo: { type: String, required: true },
 address: { type: String, required: true }
}, {
 versionKey: false
});

var user = mongoose.model('users', userSchema);

module.exports = user;
#Creating User API Controller
Let's define the user api controller to perform CRUD opeartions on MongoDB's user document. Let’s open server/controllers/user.api.js file and add the following code:
var express = require("express"),
 router = express.Router(),
 user = require("../models/user.js");

router.get("/", function(req, res) {
 user.find({}, function(err, data) {
 if (err) {
 res.send("error");
 return;
 }
 res.send(data);
 });
}).get("/:id", function(req, res) {
 var id = req.params.id;
 user.find({ _id: id }, function(err, data) {
 if (err) {
 res.send("error");
 return;
 }
 res.send(data[0]);
 });
}).post("/", function(req, res) {
 var obj = req.body;
 var model = new user(obj);
 model.save(function(err) {
 if (err) {
 res.send("error");
 return;
 }
 res.send("created");
 });
}).put("/:id", function(req, res) {
 var id = req.params.id;
 var obj = req.body;

 user.findByIdAndUpdate(id, { name: obj.name, contactNo: obj.contactNo, address: obj.address },
function(err) {
 if (err) {
 res.send("error");
 return;
 }
 res.send("updated");
 });
}).delete("/:id", function(req, res) {
 var id = req.params.id;
 user.findByIdAndRemove(id, function(err) {
 if (err) {
 res.send("error");
 return;
 }
 res.send("deleted");
 });
});

module.exports = router;
#Routes Configuration
Let's configure the routes for our REST API and web (Angular App). Let’s open server/routes/api.js file write the code for configuring routes for our API routes as given below:
var express = require('express'),
 router = express.Router();

//routes for user api
router.use("/user", require("../controllers/user.api"));

//add here other api routes

module.exports = router;
Let's configure the routes for our web (Angular App). Let’s open server/routes/web.js file and write the code:
var express = require('express'),
 router = express.Router(),
 path = require("path");

var absPath = path.join(__dirname, "../../app");

// route to handle home page
router.get('/', function(req, res, next) {
 res.sendFile(absPath + "/app.html");
});

module.exports = router;
The Backend Code Done!
In this way, backend code has been done. At this point we should start express server and test our REST API code.
Let's start our MongoDB server by running following command using VS Code integrated terminal.
> mongod
Now, open one more instance of integrated terminal and run the following command to run server.
> node server
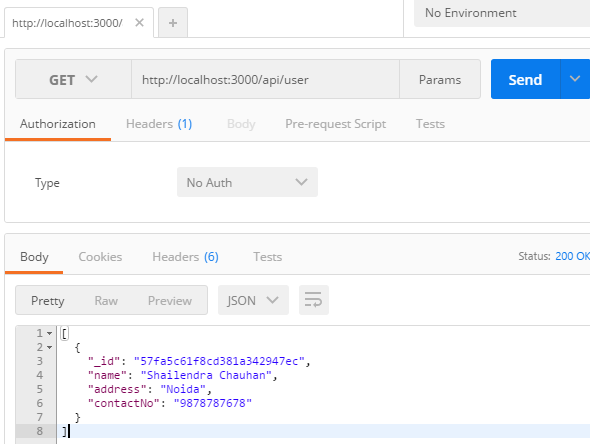
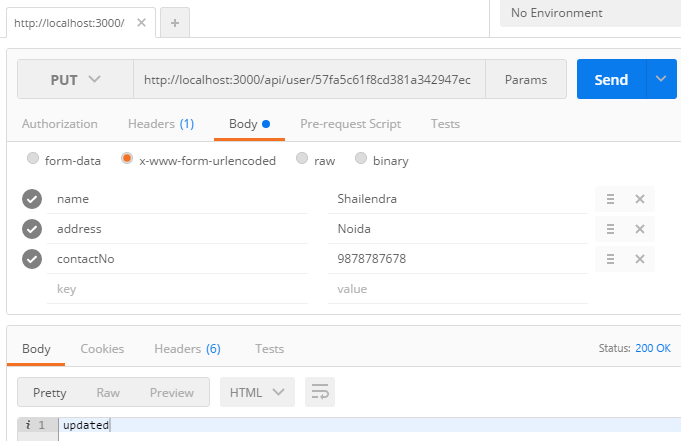
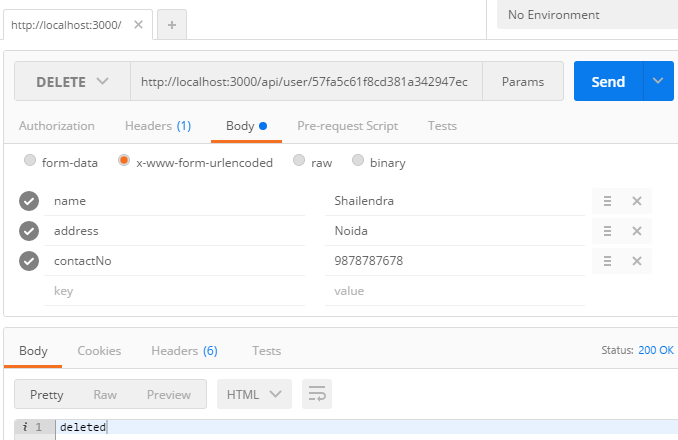
#Testing REST API
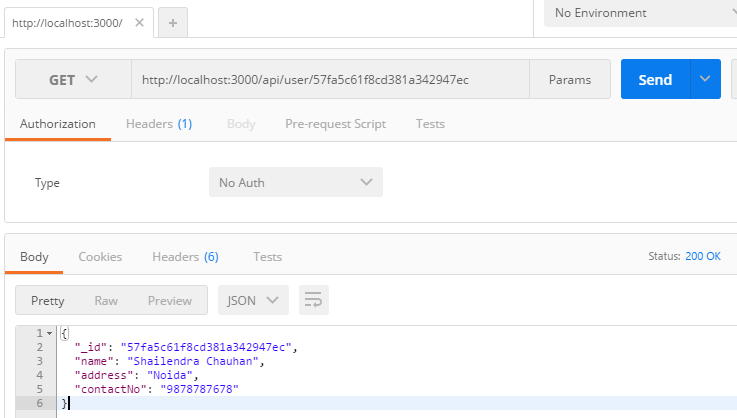
Let's test our REST API using Google Chrome REST client extensions like Postman, REST Client etc. Here, I am using Postman for testing our REST API.
Create Operation
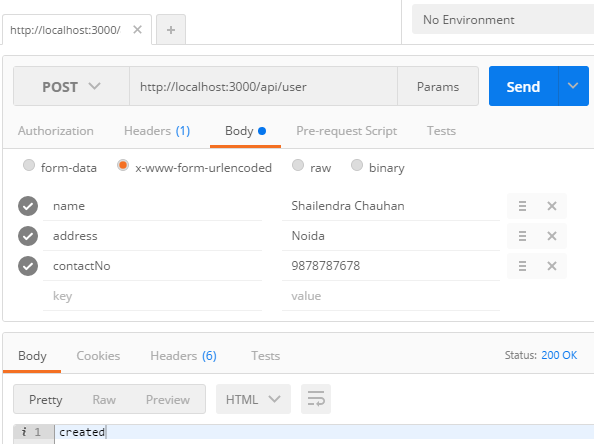
CREATE Operation

RETRIEVE Operation

UPDATE Operation
DELETE Operation
#The Frontend - Setting Up AngularJS SPA
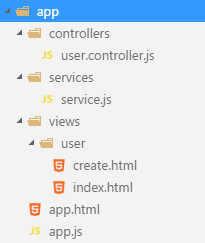
Let's create frontend of our application using AngularJS. Let's create folders for AngularJS components like controllers, services and views. Here is the folder structure for AngularJS SPA.
#App Layout
Let’s create index.html file within MEAN_App/app folder as a layout for Angular SPA.
<!DOCTYPE html>
<html ng-app="app">
<head>
 <meta charset="UTF-8">
 <title>{{Title}}</title>
 <link href="bootstrap/dist/css/bootstrap.css" rel="stylesheet" />
 <script src="angular/angular.js"></script>
 <script src="angular-ui-router/release/angular-ui-router.js"></script>

 <script src="app.js"></script>
 <script src="services/service.js"></script>
 <script src="controllers/user.controller.js"></script>
</head>
<body>
<nav class="navbar navbar-default">
 <div class="container-fluid">
 <div class="navbar-header">
 <a class="navbar-brand" ui-sref="users">MEAN CRUD</a>
 </div>
 <ul class="nav navbar-nav">
 <li><a ui-sref="users">Home</a></li>
 <li><a ui-sref="create">Create</a></li>
 </ul>
 </div>
</nav>

<div class="container">
 <ui-view></ui-view>
</div>
</body>
</html>
#Angular Module and Routes Configuration
Let's configure the routes for our Angular App. Let’s open app/app.js file and write the code for configuring routes for our AngularJS SPA as given below:
(function() {
 'use strict';

 angular.module('app', [
 "ui.router"
 ])
 .config(function($stateProvider, $urlRouterProvider) {
 $urlRouterProvider.otherwise("/");

 $stateProvider.state("users", {
 url: "/",
 templateUrl: "/views/user/index.html",
 controller: "userController"
 }).state("create", {
 url: "/create",
 templateUrl: "/views/user/create.html",
 controller: "userController"
 }).state("edit", {
 url: "/edit/:id",
 templateUrl: "/views/user/create.html",
 controller: "userController"
 }).state("details", {
 url: "/details/:id",
 templateUrl: "/views/user/details.html",
 controller: "userController"
 });
 })
 .constant("globalConfig", {
 apiAddress: 'http://localhost:3000/api'
 });
})();
#Angular Services
Let's create Angular Service named as userService for calling Node.js REST API using Angular $http service as given below:
(function() {
 'use strict';

 angular
 .module('app')
 .factory('userService', Service);

 Service.$inject = ['$http', 'globalConfig'];

 function Service($http, globalConfig) {
 var url = "";
 return {
 getUsers: function() {
 url = globalConfig.apiAddress + "/user";
 return $http.get(url);
 },
 getUser: function(id) {
 url = globalConfig.apiAddress + "/user/" + id;
 return $http.get(url);
 },
 createUser: function(user) {
 url = globalConfig.apiAddress + "/user";
 return $http.post(url, user);
 },
 updateUser: function(user) {
 url = globalConfig.apiAddress + "/user/" + user._id;
 return $http.put(url, user);
 },
 deleteUser: function(id) {
 url = globalConfig.apiAddress + "/user/" + id;
 return $http.delete(url);
 }
 };
 }
})();
#Angular Controllers
Let's create Angular Controller and with the help above created userService perform CRUD operations as given below:
(function() {
 'use strict';

 angular
 .module('app')
 .controller('userController', Controller);

 Controller.$inject = ['$scope', '$rootScope', 'userService', '$state', '$stateParams'];

 function Controller($scope, $rootScope, userService, $state, $stateParams) {
 $scope.users = [];

 if ($state.current.name == "users") {
 $rootScope.Title = "User Listing";
 userService.getUsers().then(function(res) {
 $scope.users = res.data;
 }).catch(function(err) {
 console.log(err);
 });

 $scope.deleteUser = function(id) {
 if (confirm('Are you sure to delete?')) {
 userService.deleteUser(id).then(function(res) {
 if (res.data == "deleted") {
 $state.go("users", {}, { reload: true });
 }
 }).catch(function(err) {
 console.log(err);
 });
 }
 };
 } else if ($state.current.name == "edit") {
 $rootScope.Title = "Edit User";
 var id = $stateParams.id;
 userService.getUser(id).then(function(res) {
 $scope.user = res.data;
 }).catch(function(err) {
 console.log(err);
 });

 $scope.saveData = function(user) {
 if ($scope.userForm.$valid) {
 userService.updateUser(user).then(function(res) {
 if (res.data == "updated") {
 $state.go("users");
 }
 }).catch(function(err) {
 console.log(err);
 });
 }
 };
 } else if ($state.current.name == "create") {
 $rootScope.Title = "Create User";
 $scope.saveData = function(user) {
 $scope.IsSubmit = true;
 if ($scope.userForm.$valid) {
 userService.createUser(user).then(function(res) {
 if (res.data == "created") {
 $state.go("users");
 }
 }).catch(function(err) {
 console.log(err);
 });
 }
 };
 }
 }
})();
#Angular Views
Let's create Angular views for CRUD operations as given below:
<-- Create.html -->
<h2 ng-show="user._id!=null">Edit</h2>
<h2 ng-hide="user._id!=null">Create</h2>
<hr>
<form name="userForm" ng-submit="saveData(user)" novalidate class="form-horizontal">
 <div class="form-group">
 <label class="col-md-2">Name</label>
 <div class="col-md-10">
 <input type="text" ng-model="user.name" name="name" ng-required="true" class="form-control"/>
 <p ng-show="userForm.name.$error.required && (userForm.$submitted || userForm.name.$dirty)" class="text-danger">Please Enter Name</p>
 </div>
 </div>
 <div class="form-group">
 <label class="col-md-2">Address</label>
 <div class="col-md-10">
 <textarea name="address" ng-model="user.address" ng-required="true" class="form-control"></textarea>
 <p ng-show="userForm.address.$error.required && (userForm.$submitted || userForm.address.$dirty)" class="text-danger">Please Enter Address</p>
 </div>
 </div>
 <div class="form-group">
 <label class="col-md-2">Contact No.</label>
 <div class="col-md-10">
 <input type="text" ng-model="user.contactNo" name="contactNo" ng-required="true" class="form-control"/>
 <p ng-show="userForm.contactNo.$error.required && (userForm.$submitted || userForm.contactNo.$dirty)" class="text-danger">Please Enter Contact No.</p>
 </div>
 </div>
 <div class="form-group">
 <div class="col-md-offset-2 col-md-10">
 <input type="submit" value="Update" class="btn btn-primary" ng-show="user._id!=null"/>
 <input type="submit" value="Save" class="btn btn-primary" ng-hide="user._id!=null"/>
 <a ui-sref="users" class="btn btn-warning">Cancel</a>
 </div>
 </div>
</form>
<-- index.html -->
<h2>Users Listing</h2>

<table class="table" ng-if="users.length>0">
 <tr>
 <th>SNo.</th>
 <th>Name</th>
 <th>Address</th>
 <th>Contact No.</th>
 <th>Actions</th>
 </tr>
 <tr ng-repeat="user in users">
 <td>{{$index+1}}</td>
 <td>{{user.name}}</td>
 <td>{{user.address}}</td>
 <td>{{user.contactNo}}</td>
 <td>
 <a ui-sref="edit({id:user._id})">Edit</a> |
 <a href="#" ng-click="deleteUser(user._id)">Delete</a>
 </td>
 </tr>
</table>
<div ng-if="users.length==0">
 No record found !!
</div>
The Frontend Code Done!
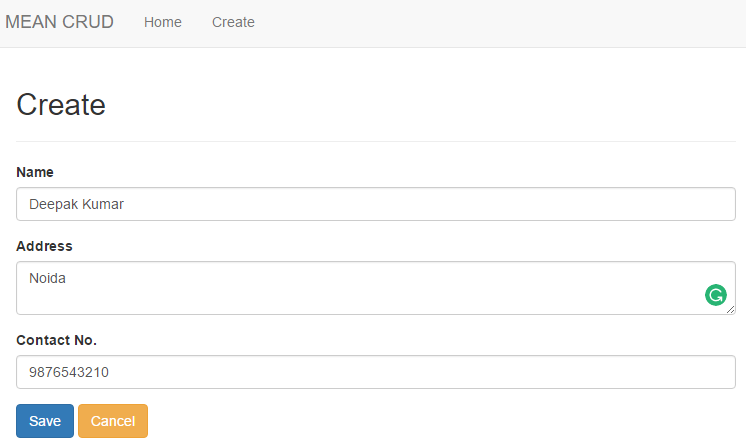
In this way, frontend code has been done. At this point we should start mongodb and express server and test our MEAN app.
Create Operation
Reterieve Operation

Update Operation
Delete Operation

What do you think?
Now you have a complete MEAN stack application having Node.js, Express, and MonogoDB as backend and AngularJS as frontend. You should use MEAN stack to build fast, robust and scalable web applications using JavaScript as a primary language. You can refer this article to develop any MEAN stack application.
You may also be interested in a Free Node.js Course With Certification if you're getting started with backend development. I would like to have feedback from my blog readers. Your valuable feedback, questions, or comments about this article are always welcome.
Take our Nodejs skill challenge to evaluate yourself!

In less than 5 minutes, with our skill challenge, you can identify your knowledge gaps and strengths in a given skill.


