20
FebReact Query Tutorial: A Begginer Guide
React Query is a data fetching library designed that simplifies fetching, caching, synchronizing, and updating data in your React applications especially from APIs. It has emerged as a powerful tool to simplify state management and handle data fetching seamlessly.
In this React Tutorial, we will delve into the installation, core concepts of react query and benefits of React Query, exploring how it addresses common challenges in state management, when to use react query, comparison between libraries( React Query vs Redux vs SWR vs RTK vs Axios). Mastering React.js opens doors to remote jobs and global opportunities. Don’t wait—enroll in our Free React Course now and get started!
What is React Query?
React Query (also called as TanStack Query) is an open-source JavaScript library that simplifies the management of remote and local data in React applications. Developed by Tanner Linsley, the library provides a set of hooks and utilities to handle data fetching, caching, and state synchronization effortlessly.
Unlike traditional state management solutions, React Query is designed to work seamlessly with asynchronous data fetching, making it particularly well-suited for modern web applications that heavily rely on APIs.
Why Use React Query?
| Without React Query | With React Query |
| Manual data fetching | Auto fetch with caching |
| Complex loading logic | Built-in isLoading. isError |
| Manual refetching | Auto refetching + intervals |
| No cache by default | Built-in caching |
| Difficult pagination | Easy pagination & infinite scroll |
Read More - Top 50 Mostly Asked React Interview Question & Answers
Installation of React Query
Getting started with React Query is straightforward.
Step1: Use the following command to create a pre-build React.js application in the react-query-demo-app directory.
npx create-react-app react-query-demo-appYou can install React Query using npm or yarn:
npm install react-query
# or
yarn add react-query
After installation, you may use React Query in your project and start taking advantage of its features.
Use the following basic settings in your root index.js directory file to get started with React-Query:
Core Concepts of React Query
Read More - React developer salary in India
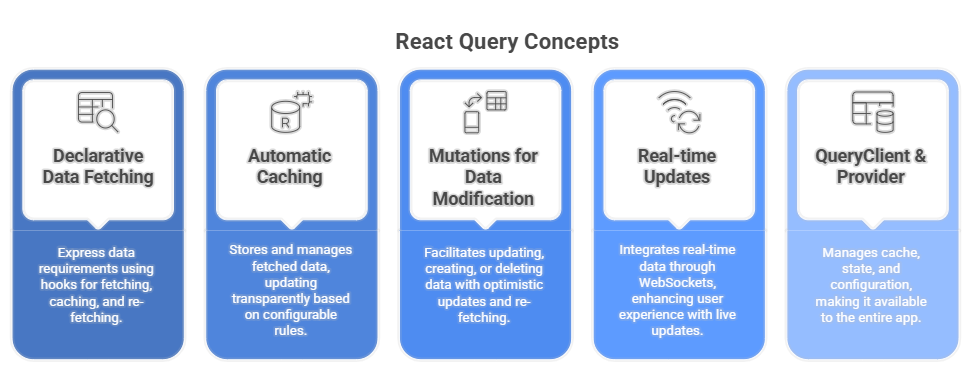
1. Declarative Data Fetching
React Query introduces a declarative approach to data fetching, allowing developers to express their data requirements using hooks.
useQuery :
- The useQuery hook is a fundamental part of React Query, enabling components to specify the data they need and automatically handling the fetching, caching, and re-fetching processes.
import { useQuery } from 'react-query';

const MyComponent = () => {
  const { data, isLoading, error } = useQuery('myData', fetchDataFunction);

  if (isLoading) {
    return Loading...;
  }
  if (error) {
    return Error: {error.message};
  }
  // Render component with data
  return {/* ... */};
};
2. Automatic Caching
React Query includes a powerful caching mechanism that automatically stores and manages fetched data. Cached data is invalidated and updated transparently based on configurable rules, ensuring that components always display the latest information without unnecessary network requests.
3. Mutations for Data Modification
For modifying data on the server, React Query provides the useMutation hook.
useMutation
- This hook facilitates the process of updating, creating, or deleting data, and it comes with built-in features such as optimistic updates and automatic re-fetching.
import { useMutation } from 'react-query';

const MyForm = () => {
  const mutation = useMutation(updateDataFunction);

  const handleSubmit = async (formData) => {
    await mutation.mutateAsync(formData);
  };
  return (
      {/* Form fields */}
        {mutation.isLoading ? 'Saving...' : 'Save'}
  );
};
4. Real-time Updates with WebSockets
React Query extends its capabilities to real-time data updates through WebSockets. By leveraging the useQuery hook, applications can seamlessly integrate real-time data, enhancing the user experience with live updates.
5. QueryClient & QueryClientProvider
QueryClient:
- It is the central manager that holds all the cache, state, and configuration related to your queries and mutations.
- You create a single instance of it and pass it to the QueryClientProvider.
QueryClientProvider:
- QueryClientProvider is a React context provider that makes the QueryClient instance available to the entire app.
- Every component that uses useQuery, useMutation, etc., must be wrapped inside this provider.
import { QueryClient, QueryClientProvider } from 'react-query';
const queryClient = new QueryClient();
function App() {
  return (
    <QueryClientProvider client={queryClient}>
      <MyComponent />
    </QueryClientProvider>
  );
}
Example of React Query
Firstly, let's set up a mock API to simulate fetching tasks. For simplicity, we'll use a function that returns a promise with a delay to mimic an asynchronous API call:
// mockApi.js
export const fetchTasks = () => {
  return new Promise((resolve) => {
    setTimeout(() => {
      resolve([
        { id: 1, title: 'Complete React Query tutorial' },
        { id: 2, title: 'Implement task filtering' },
        { id: 3, title: 'Test application thoroughly' },
      ]);
    }, 1000); // Simulate a 1-second delay
  });
};
Now, let's create a React component using React Query to fetch and display the tasks:
// TaskList.js
import React from 'react';
import { useQuery } from 'react-query';
import { fetchTasks } from './mockApi';

const TaskList = () => {
  const { data, isLoading, isError, refetch } = useQuery('tasks', fetchTasks);

  return (

      Task List
      {isLoading && Loading...}
      {isError && Error fetching tasks}
      {data && (
        <>            {data.map((task) => (
              {task.title}
            ))}           refetch()}>Refetch Tasks
      )}
  );
};

export default TaskList;
In this example:
- We use the useQuery hook to fetch tasks with the key 'tasks' and the fetchTasks function.
- The isLoading, isError, and data variables from the hook represent the loading state, error state, and the fetched data, respectively.
- The component renders different UI elements based on the loading and error states.
- If data is available, it renders an unordered list of tasks and a button to refetch tasks.
Now, let's include this TaskList component in our main application:
// App.js
import React from 'react';
import { QueryClient, QueryClientProvider } from 'react-query';
import TaskList from './TaskList';

const queryClient = new QueryClient();

const App = () => {
  return (
    <QueryClientProvider client={queryClient}>
      <div>
        <h1>React Query Example</h1>
        <TaskList />
      </div>
    </QueryClientProvider>
  );
};
export default App;
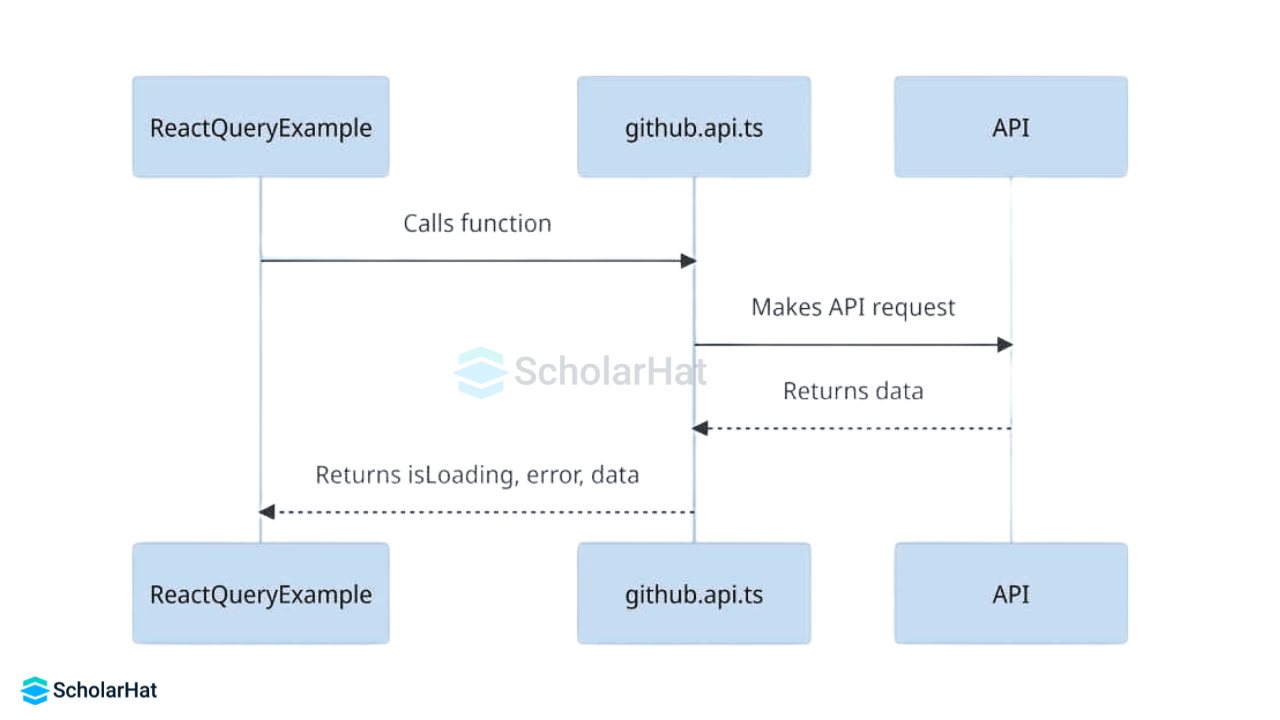
Sometimes, In React Query, we import the useGithubUser hook from github.api.ts and use it to get the isLoading, error, and data states. This way, ReactQueryExample doesn't need to worry about how the data is fetched; it just consumes the data provided by the useGithubUser hook.
Benefits of Using React Query
1. Simplified Codebase
- React Query significantly reduces boilerplate code associated with data fetching and state management.
- With concise hooks and a declarative syntax, developers can focus more on building features and less on handling the intricacies of asynchronous operations.
2. Improved Developer Experience
- The library's intuitive API and well-documented features contribute to an enhanced developer experience.
- React Query encourages best practices in data fetching, making it easier for both beginners and experienced developers to understand and maintain the codebase.
3. Optimal Performance
- By leveraging automatic caching and efficient re-fetching strategies, React Query optimizes the performance of data-driven applications.
- Unnecessary network requests are minimized, resulting in a faster and more responsive user interface.
4. Versatile Integration
- React Query is not limited to any specific data fetching library or pattern.
- It can be seamlessly integrated with popular solutions like Axios or Fetch, giving developers the flexibility to choose the tools that best fit their project requirements.
When to Use React Query
Use React Query when your app deals with server-side or remote data - data that comes from an API, database, or third-party service and you want to manage it efficiently without writing repetitive logic.
1. You’re Fetching Data from an API
- REST or GraphQL endpoints
- Example: /api/users, /posts, etc.
- React Query handles fetching, caching, and state.
2. You Want Built-in Caching
- To avoid refetching the same data multiple times.
- Improves performance and user experience.
3. You Need Auto Refetch or Polling
- For real-time apps like dashboards, chat apps, or stock tickers.
- React Query supports interval refetching and refetch on window focus.
4. You’re Tired of Manually Handling useEffect and useState
No more boilerplate logic for:
- useEffect for API calls
- useState for loading/errors/data
5. You Want to Handle Mutations (POST, PUT, DELETE) Easily
React Query's useMutation() handles API requests that change data- with built-in support for:
- Optimistic updates
- Cache invalidation
- Error handling
React Query vs Redux vs SWR vs RTK vs Axios
| Library | Type | Use For | Caching | Auto Refetch | Mutations |
| React Query | Data Fetching | API/server state | Yes | Yes | Yes |
| Redux | State Management | App/UI state | No | No | Yes |
| RTK | Redux Toolkit | Simplified redux logic | No | No | Yes |
| SWR | Data Fetching | Lightweight fetch(next.js) | Basic | Yes | No |
| Axios | HTTP Client | API calls only | No | No | Yes |
Summary
React Query has quickly become a go-to solution for handling state in React applications, particularly those with complex data-fetching requirements. Its declarative approach, automatic caching, and seamless integration make it a valuable addition to the toolkit of React developers.
Without advanced React.js skills, you’ll be stuck in low-paying roles. Enroll in our React Certification Course now and break into high-demand jobs!
FAQs
Take our React skill challenge to evaluate yourself!

In less than 5 minutes, with our skill challenge, you can identify your knowledge gaps and strengths in a given skill.

